Blog Widget by LinkWithin
Showing posts with label Thinking of You. Show all posts

Thinking of You

>> Monday, April 1, 2024


I realized while going through my stamps that I did not have a stamp that just said Thinking of You. Well that just gets me going through all of my stamps to say how can I make a card with this sentiment if I don't have just that sentiment. I know, look at all of my sentiments and see if there is another I can use and yes, indeed I found one.


For my card:

  • I used a scrap watercolor paper and sponged 2 different blue distress oxide inks with the dark ink at the bottom.
  • Next, I spritzed water over the panel to get the rain effect.
  • I then die cut an umbrella and some clouds to add to the panel.
  • I found with the THINKING OF YOU AT CHRISTMAS GREETING - 183D the perfect font and sentiment. I heat embossed just the Thinking of You in white on black card stock and popped it up on dimensionals.

If you don't have this THINKING OF YOU AT CHRISTMAS GREETING - 183D in your collection, I encourage you to look for it in the DRS Designs shop because this can be used year-round for a Thinking of You card.

Thank you for stopping by to check out my card.

Read more...

Birds, Feathers, and Sweet Thoughts

>> Friday, December 29, 2023

Hello Crafty Friends,


I need to build up my pile of 'thinking of you' cards so here is quick and easy one. 

I stamped the Bird Feeder with black waterproof ink and then drew in a skinny tree and a little more pine needle groupings (also using waterproof ink).  I then did a quick watercolor wash in blue adding in green to the pine needles while still wet.  The bird feeder and tree were painted next.  I finished off the base card with a splatter of leftover paint and some Distess ink on the edges. 

DRS has several fun bird sentiments that would work for this image.  I went with this Thinking of You Tweetie which I fussy cut and then sponged with Distress Ink in Vintage Photo.  Lastly, I added a few feathers from the Feathers 3-in-1 image. 

Hope you have a lovely New Year's Weekend!

Hugz,

Nancy


Read more...

On my Mind

>> Tuesday, August 29, 2023

Hi Everyone,

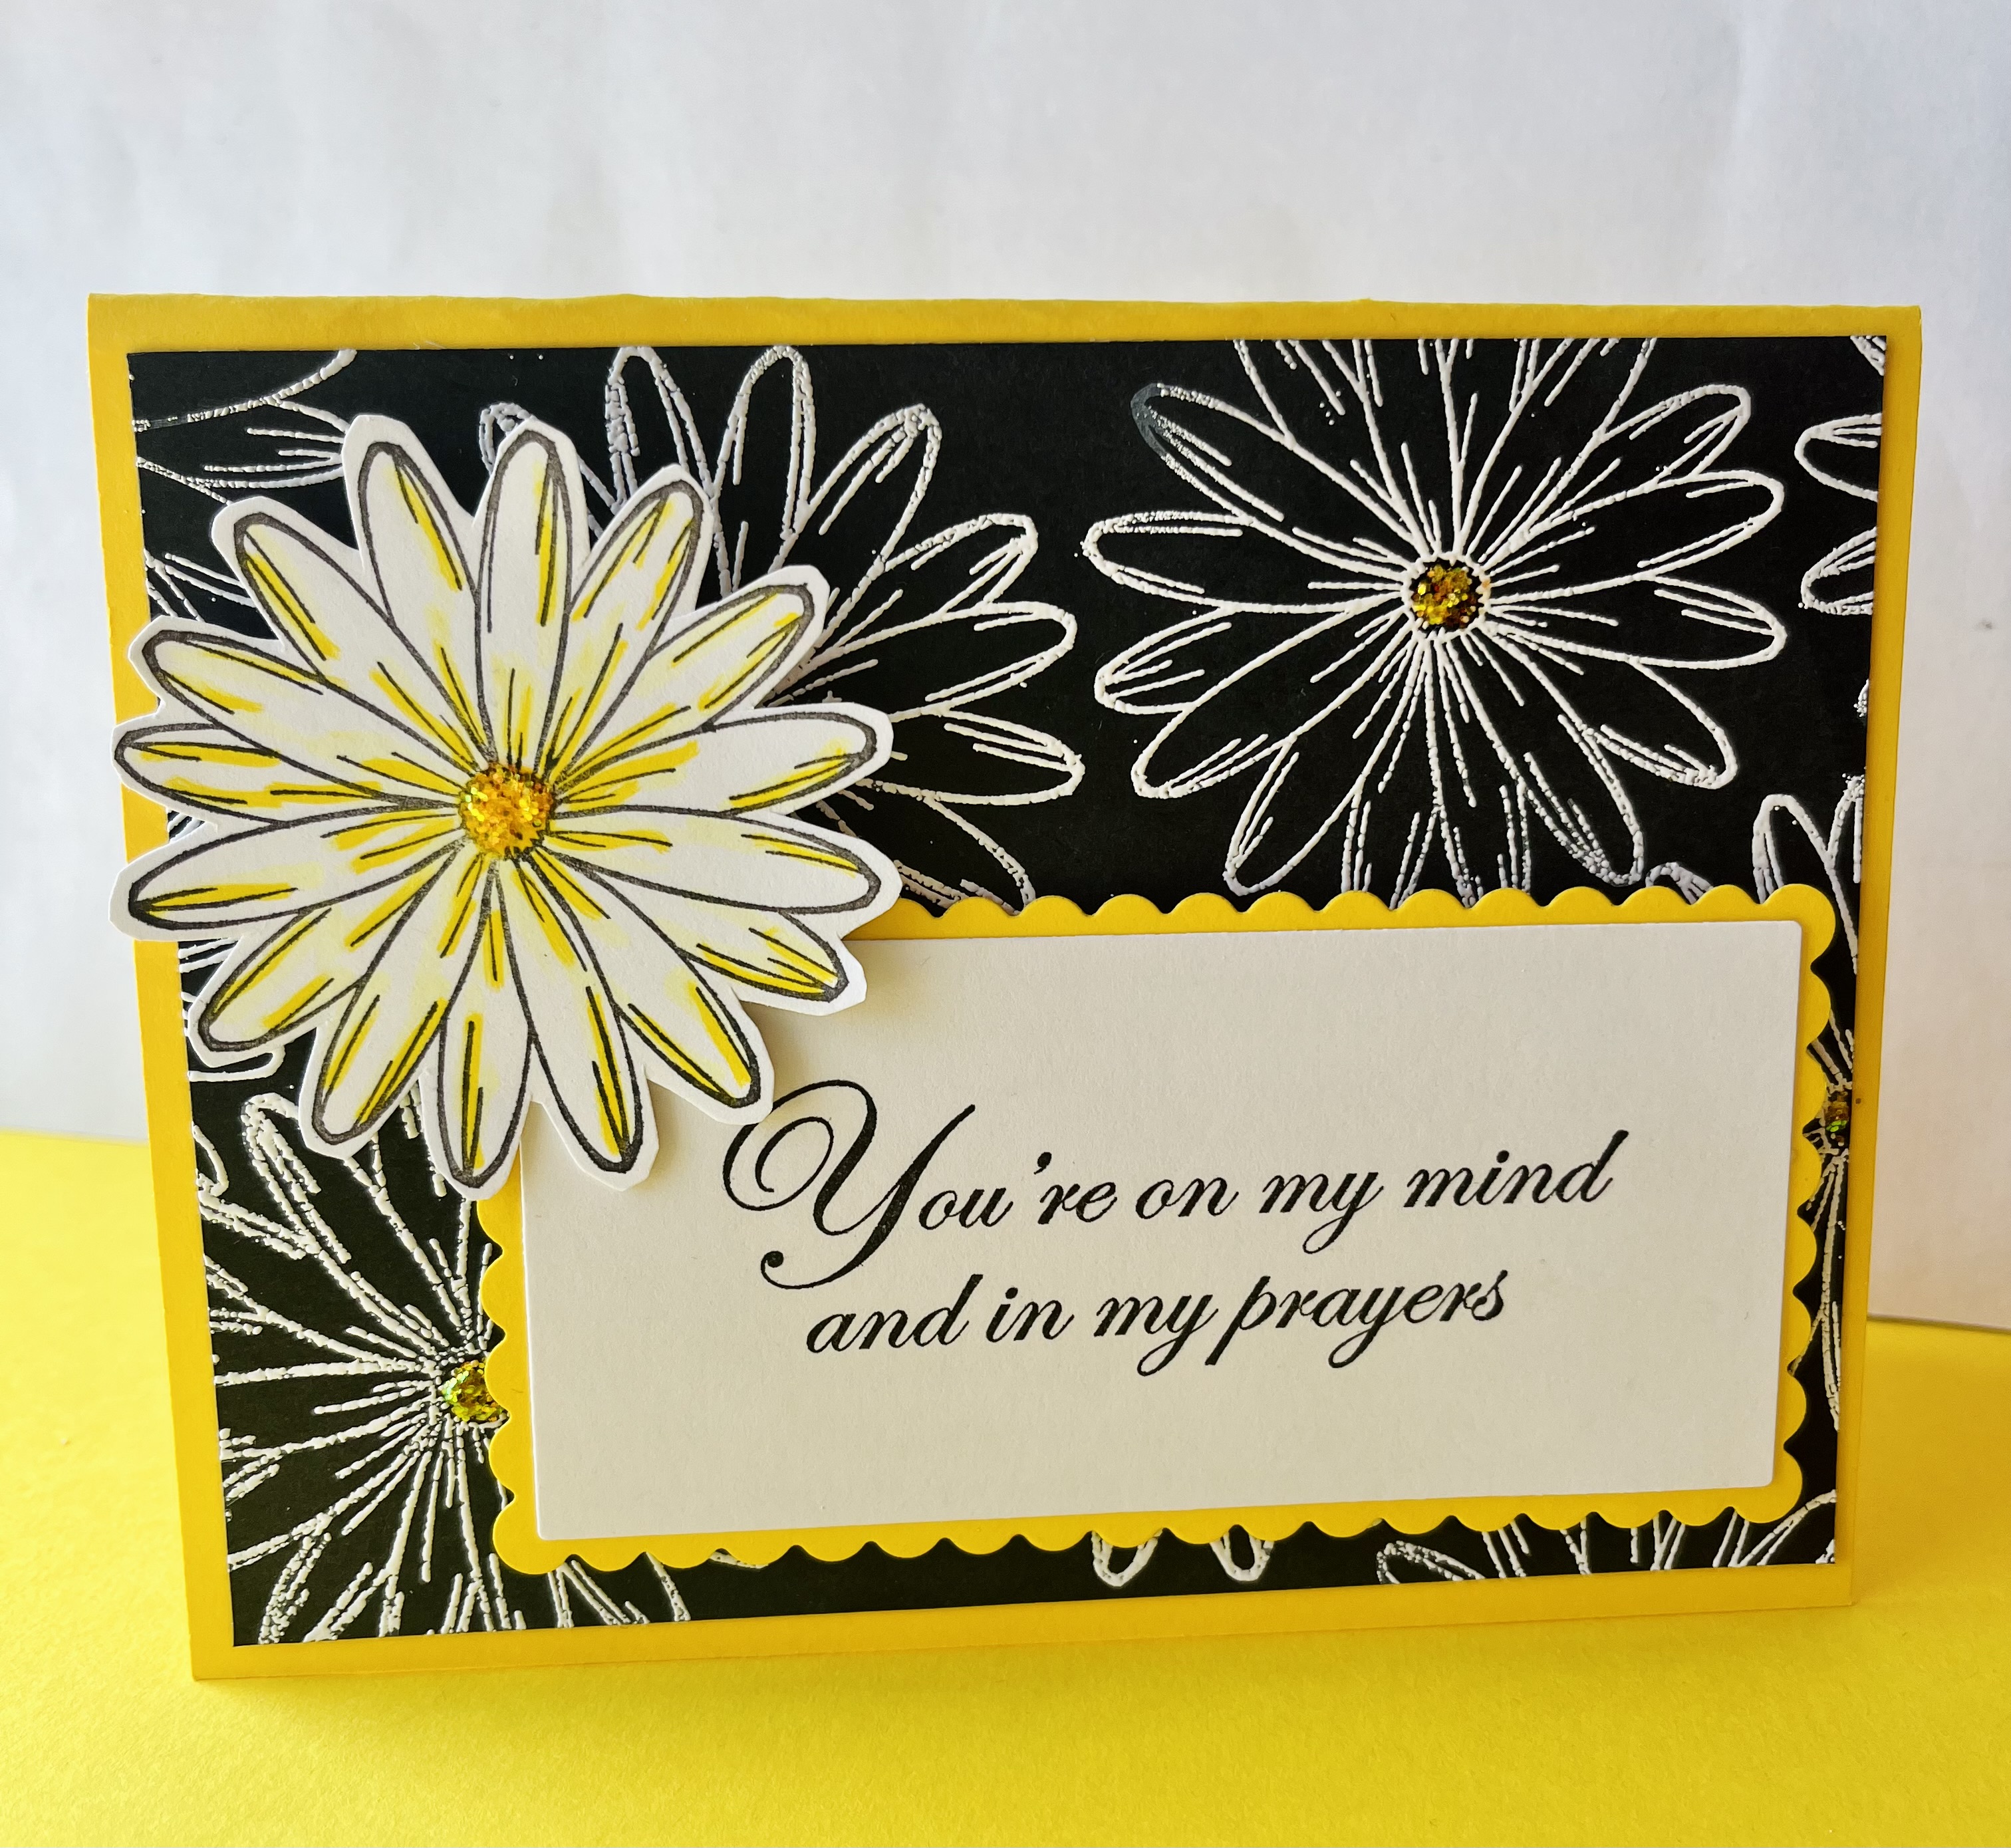
I think my second favorite stamp after the Dogwood Branch is the Medium Daisy Bloom.  It's so versatile and just plain cheerful.  I use it all the time!

I made this card for a friend who's going through a hard time, and I took inspiration from this card here.  

The background was heat embossed and I added some glitter glue to the flower centers.  I die cut the Mind and Prayers Greeting and added another fussy cut daisy as embellishment. 


To find these and many more flower stamps, just click here!

Happy Stamping!
Karin


Read more...

Missing You!

>> Thursday, July 27, 2023

 Hello friends!

Today I'm wishing to be somewhere much cooler than where I am so the only place guaranteed to be at least 20 degrees cooler than here is the coast.

Leonard is flying his kite where it is almost always windy (he has been here before and always brings his kite with him!).

I used DRS stamps: Missing you Pig Time, Leonard Flies a Kite, Sea Grass, Sailboat, Seaside Dock, and 4 in 1 Ocean Designs.


I actually did not have to mask anything except when coloring the sky with ink-blending brushes.
I stamped the sentiment separately and die cut with an HC die then fishtailed the end.
I also stamped Leonard separately so that I could pop him up. I then took a ruler and drew a new kite string for the kite.

I used some white gel pen on the closer birds and on the waves around the boats.
I also used some paint pens on the water reflection to help the color show more.
The images are colored with a combo of Copic Markers and Olo Markers.
Thanks for visiting today!

Robin 


Read more...

Tweetie!

>> Thursday, June 1, 2023

Hello fellow crafters!

Today I'm sharing a sweet birdie card! I love the little chickadees don't you?
I used DRS stamps: Bird on Branch and Thinking of You Tweetie.

The tag die is from IO and the embossing folder is from Sizzix which I used some Distress Ink on to make it like a letterpress.  The edges are inked with Vintage Photo Distress Ink as well.


This was a simple card to make and one you could get done in a hurry.
It makes a great all occasion card. 

Thanks for visiting today!

Robin


Read more...

Thinking of You

>> Tuesday, March 14, 2023

 Hi Everyone,

Here's a simple, flat easy to mail card that I made for a friend going through a hard time.  I used one of my favorite images for a snail mail card, because it has the sentiment built right in.  

I stamped, colored and die cut the Happy Mail image and sentiment for the front and used the Medium Daisy Bloom to create a background to match.  


An embossed panel in a matching color anchored the image on the card.  

Thanks for stopping by the blog today!

Karin


Read more...

Unfrogettable

>> Tuesday, May 3, 2022


Hi Everyone,


Time got away from me this past weekend, so this is a quick howdy-do, and look at these cute new Diving Frog Legs I used in the scene on today's card!  Goodness, they're adorable!


Here are the rest of the stamps used on the card:

Thanks for visiting the blog today!
Karin


Read more...

A Friendly Note...

>> Monday, April 4, 2022


This card was inspired by my nephew. He is away at boot camp for the Navy, and we are all sending him happy mail.

I used this cute HAPPY MAIL - 429G stamp for the focal. Rather than using the entire stamp, I masked out the Thinking of You sentiment from the stamp and used just the image. I colored the scene with copics and then sponged some clouds.

I then die cut the banner and used a paper emboss folder for the base. I then stamped the FRIENDLY NOTE GREETING - 790D stamping that on one of the embossed lines of the paper.

I finished the card with the little yellow butterfly.

Thank you for stopping by to check out my card this week.

Read more...

A Friendly Note

>> Tuesday, August 3, 2021

 Hi Everyone,


I was inspired by my cards in this post, to try stamping by masking off a portion of the main panel.  The last time, I masked off a section, and inked and stamped just between the two pieces of tape.  Here I used one piece of washi tape, and stamped my leaves and florals on either side.  I then removed the tape, and stamped  Friendly Note Greeting in the blank space, embellishing it with a couple of gems.


The stamps I used are as follows:


Silhouette Branch (stamped in green)


Puff Circle (stamped in pink)


Silhouette Leaf Branch (stamped in teal)


Thanks for stopping by!
Karin


Read more...

A Friendly Note....

>> Monday, July 5, 2021


This card is in honor of my niece. She loves sharks and was initially inspired by her to use this shark image.

The background was super fun to create using different blue papers from my scrap bin and creating a mosaic water scene gluing each piece individually.

Once the background was created I used the HAPPY SHARK - 153G stamping him  on cardstock coloring with copics and then fussy cutting him.

I then used that super FRIENDLY NOTE GREETING - 790D because it really is perfect for anyone.

Both the shark and the sentiment were popped up on dimensionals and the card was finished with white candy dots.

Thank you for stopping by to check out my card this week.

Read more...

Just a Friendly Note...or Two...or Three...

>> Monday, June 28, 2021


I have really enjoyed finding ways to use the FRIENDLY NOTE GREETING - 790D, This greeting is perfect for sending a card to anyone.

This first card I paired it with the SLEEPING GNOME - 833F to create a masculine card.

The base layer is an offset C fold card and the bricks were created with paper glaze and a brick stencil.

Once the gnome was colored with copics I cut a couple of oval layers and finished with the sentiment banner.

My second card uses the same FRIENDLY NOTE GREETING - 790D and POLKA DOT BACKGROUND - 688P.

I stamped the POLKA DOT BACKGROUND - 688P in purple and added a coordinating card stock on the base. This card was dressed up a bit to make it a bit more feminine adding a stacked flower and the center is a Nuvo Drop.

FRIENDLY NOTE GREETING - 790D was added in a dimensional banner and a strip of washi tape between the stamping and the card stock layer was added to tie in the flower to the card.


My third card is created for anyone. I used a yellow card stock and cut down to 3 by 3 post it note size and popped it up on dimensionals adding a bit of a curl to the corner.

FRIENDLY NOTE GREETING - 790D was added to the post it note.

To keep this card clean and simple I though the PUSH PIN - 789A stamped on the post it note then again on red card stock would be perfect for a more neutral note card.

Thank you for stopping by this week to check out my cards. Do you have a favorite? I would love to know.

Read more...

A Friendly Note and Father’s Day

>> Tuesday, June 15, 2021

Hi Everyone,

I have a couple of cards to share today, one for a friend and one for the dads.

I chose the Happy Mail image to pair up with the new Friendly Note Greeting, because the flower is cute and friendly!  The image comes with the words thinking of you on it, so I just masked them off, inked up the stamp and then removed the tape before stamping it, so that only the image remained. 

The card base and the yellow layer were stamped using the Puff Circle, and the orange layer was dry embossed.  My die cut grass was stamped using the Easy Grass Background and it was attached at the end of assembly along with the greeting.


This one is for all the golfing dads out there, and that includes mine!  

The background was made using an embossing folder and the Everything Golf Background.  I covered up the seam between the two papers with a strip of black cardstock and embellished it with a couple of metal brads.  I used the Especially Fore You Greeting and attached it to the card base.  For the image, I stamped and heat embossed the Silhouette Male Golfer, and used some post it notes to mask off the background, as I added ink to create the grass and sunrise.


Thanks for visiting the blog and visit DRS Designs for all of these stamps and more! 

 For those celebrating, have a happy Father's Day!  And for those who are missing someone, may the day land gently for you.  

Hugs,
Karin


Read more...

Thinking of You

>> Monday, November 9, 2020

 Happy Monday! Are you having unseasonably warm weather where you live? We are!! Today and the past few days have been in the 70s with lots of sunshine. And to think we had snow flurries last Sunday. Such goofy weather, but I have been enjoying the warmth. Even with the warmer weather, I'm still  working on Christmas cards.


I saw a Jennifer McGuire video recently where she uses Perfect Pearls in a variety of ways. Since I have had some Perfect Pearls in my stash for years, I decided to try out one of her techniques. I stamped the trees from the tree and mountain 2 in 1 image with a couple of different green inks. I left the stamp in my Misti so I could stamp the image again with VersaMark ink and then I applied a little Perfect Pearls to just the tops of the trees. I stamped it again with VersaMark ink and then heat embossed with clear EP. I did that three times and fussy cut the trees. I splattered some pearly white water color paint onto some navy CS which I used for the background panel and die cut for the focal point. The 3 rows of trees were added before I die cut the circle. After stamping the greeting onto the white panel the circle was added with foam adhesive for some dimension. It's hard to see the sparkle in the photo, but it really does shine in real life.


Thanks for stopping by today. Hope you are getting a head start on your Christmas cards. You can get some inspiration at DRS Designs here.


blessings,


shelia

Read more...

Thinking of You

>> Wednesday, September 2, 2020

 Good morning all!

Here I'm using some of the new stamp designs

with some of my favorite stamps from DRS.

One of the new designs is 2 in 1 Mountain and Tree Line.  I used these with the Christmas Village cabin, Mushroom Line

Mushroom Sign Post, Toadstools, Snail Toadstool

Sleeping Gnome, and Ladybug Toadstool , the sentiment 

is Warms My Heart


The tree frame die cuts are from Memory Box,  (I popped them up).  
The mountains, trees and cabin were stamped and colored then I sponged around the outside area.  Some of the foreground was actually going to be a different card but I just didn't like it so I cut away the bottom with the mushrooms and Gnome then added it to this card, adding in a few more mushrooms.  The trees were popped up between layers of mushrooms.
I also sponged around the outside with Wilted Violet after the tree frames were adhered to the card.
Thanks for visiting today!
Robin

Read more...

Blue Thoughts

>> Wednesday, January 15, 2020

Hello fellow stamp lovers!

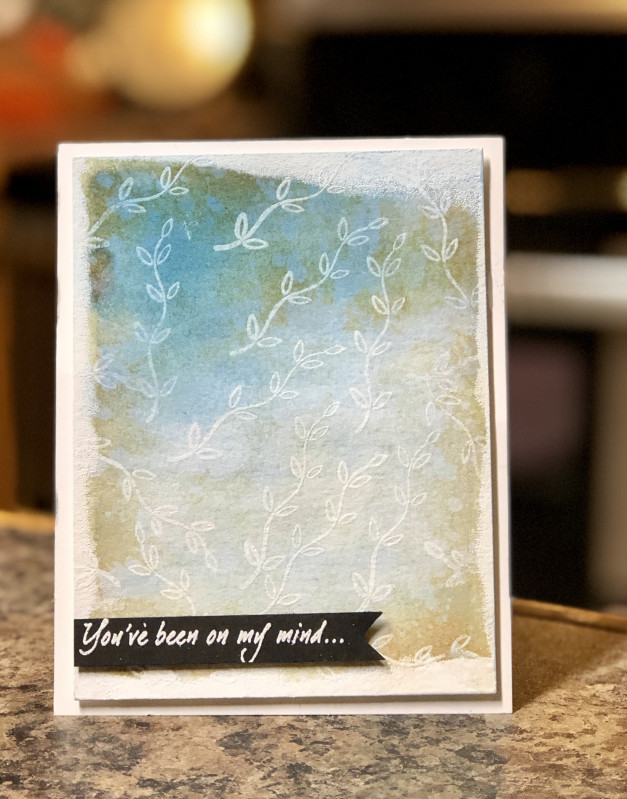
I have been wanting to do some elegant white embossing like Julie sometimes does and then I saw some beautiful blue colors in the Splitcoaststampers.com color challenge this week.  Those two ideas were the perfect inspiration for a thinking of you card that I need to send to a friend.  She loves rustic things but she is also very elegant.  She competes in National Horse Shows and has several World champion horses.  I think she will love this card.

I heat embossed the vine from the Four Flower Background after stamping with versamark. Then added more embossing around the edges. Then I did a water color wash with several blues and let that dry. Next I added some distress ink. Splashed the whole thing with water and then dabbed it with a paper towel. The water took the distress ink off in spots and whitened my embossing back up.  Next I heat embossed the On My Mind greeting on some black cardstock.

Hope your week is going well.

Hugz

Read more...

Extra Tweet

>> Tuesday, March 26, 2019

Hi Everyone,

I still had a piece of yellow cardstock sitting out on my craft table from last weeks card, so along with color inspiration, I took layout inspiration from that card too.

I stamped and colored up the Silly Bird four times, using my 1 1/4" square punch at an angle a couple of times.  I wanted to add to the playfulness of the whimsical, Extra Tweet Day Greeting. I just love this bird stamp :)


Everything was attached to a background made with the Feathers Three in One stamp. How's that for easy?  Well, not as easy as this next CAS card...
  

I used an embossed background, my bird punch and the following stamps:

Be sure to check out DRS Designs for all of these stamps and so much more! 

Have a great day!

Karin


Read more...

Birdies

>> Tuesday, March 12, 2019

Hi Everyone,

I'm itching for spring to arrive, so with that in mind, I have a couple of bird themed cards to share again this week.

I wanted to use the new Thinking of You Tweetie Greeting, so I looked through my bird themed stamps from the current catalog.

1. First I stamped the Lovebirds Branch. 
2. I stamped the Birdhouse Tree Branch below it.  That left a blank spot in the left corner, so I inked up the tip and stamped it again.
3. Lastly I stamped the Bird Bath.

I colored in all of my stamping using Copic markers and then created my sky using a sponge and a scalloped circle that was punched out.  Just keep moving the circle and inking over it,  to create the billowy clouds.  I masked off a portion of the bottom and sponged on some green ink for the grass.


After attaching a piece of die cut grass along the bottom, I found I had no room for the sentiment as it was, so I cut it into pieces and attached it with some dimensional foam tape.

This second card is very clean and simple, using only the Open Leaf Branch and the Extra Tweet Day Greeting. 


I colored in the tree, adding some glitter glue for sparkle.  I embossed a die cut frame and added a die cut bird to finish it off. 

The calendar is telling me spring is around the corner, so I hope the warm temperatures are as well!

Thanks for visiting today!
Karin

Read more...

Tweetie

>> Monday, March 4, 2019

Happy Monday! I have a fun card today that features three of the newest images:
Silly Bird (870D)
Thinking of you Tweetie (888D)
Feathers 3 in 1 (884F) 


I started by stamping my Silly Bird image with Archival black ink onto a 4 inch square of white CS. Next I used the Gina K Wreath Builder template to stamp the smallest of the 3 feathers with the same black ink creating the circle of feathers around my bird. After coloring the images with Copics the white square was layered onto some blue CS. The white panel was stamped with the greeting and then embossed with a TH feathers EF and layered onto the same blue CS. Everything was attached to a white card base.

I like the way this turned out. The new silly bird image is so fun to play with and color. Be sure to check out these new images as well as the others at the on line store here.

Thanks for stopping by today.

shelia

Read more...

Sitting here Tweetie

>> Saturday, March 2, 2019

Welcome!

My card today features our new Silly Bird image that's now available on our website along with a few other fun new images.


To create my card I started by sponging some turquoise ink onto my card stock using a torn paper towel to create the clouds.   I stamped our Silly Bird in the center (and on a piece of scrap) and found that my roll of tape (any 5" circle will do) made the perfect template to draw in the wire he's sitting on.  I colored and fussy cut the second bird image and attached him on top.  To make my telephone poles I stamped our Wood Grain image on scrap and after coloring, I cut it into 2 fat pieces and 2 skinny pieces and adhered them to my card.  I used 2 separate images for the greeting.  I stamped just the "Sitting here" from our Sitting Thinking greeting and our new Thinking of you, Tweetie using black ink and attached it all to a folded green card.

Thanks so much for stopping by!
Sue

Read more...

You've been on my mind...

>> Tuesday, August 28, 2018

Hi Everyone,

I've really been into using speech bubbles on my last few cards.  With my dies and punches still out on my crafting table, I decided to try and transform one, from a speech bubble, into a thought bubble, and make a thinking of you type card.  

I began by stamping the Cowgirl Line Dancer, masking her off and stamping the Barn Door slightly on top, making her look like she's in front or leaning against it.  I colored it up and die cut it and went to work on the rest of the card.  

Taking the colors from my image, I dry embossed a teal background and stamped the pink panel using the Western Word Square.  Once I assembled it, I only had room for a small bubble, so I colored up the head of the Cowboy Line Dancer and punched it out, attaching it along with a few circles, placing them above her head.   


That left me with a spot on the top corner for the On my Mind Greeting, which I stamped and cut in half to fit.  

Inside I stamped the Western Dancing Couple in teal ink along with the 


I just want you to know that I stamped the sentiment at an angle on purpose. 
#1. I thought it would add to the fun and happiness the card was trying to convey, and...
#2. (real reason) I was too impatient to make sure I lined it up straight ;-)

Sending you many happy thoughts this Tuesday!
Karin


Read more...

Blog Archive

StatCounter

  © Blogger templates Palm by Ourblogtemplates.com 2008

Back to TOP