Blog Widget by LinkWithin
Showing posts with label Flowers. Show all posts

Mom

>> Tuesday, March 26, 2024

Hi Everyone,

Now that I'm done with my Easter cardmaking, I thought I would move on to the next holiday for giving cards, Mother's Day!

To celebrate mom, I used the Flower Scroll stamp that was still on my stamping table from a previous card to create a pattern on my card base.  

The panel was created using both the Splatter Background, and the Easy Dot Background stamps, and I added a punched flower border to match the daisy theme.  A ribbon was added before attaching it to the base.  

One Medium Daisy Bloom was colored and die cut and the other was fussy cut and attached, and some glitter glue was added to the flower centers for some shine. 


Finally, I stamped and punched out the Happy Mother's Day using a scallop punch to once again match up with the flower theme. 

Hope your day is filled with sunshine and flowers!
Karin


Read more...

Happy Mothers Day

>> Monday, March 18, 2024


Hello crafty friends. I hope everyone had a wonderful weekend. I am sharing a Mother's Day card. I need to get on the ball and get several made as I send Mother's Day cards to my mom, mother-in-law, and all my sisters.


For today's card:

  • I first started with stamping the DOGWOOD BRANCH - 1092H on acetate using my Misti. I wanted to mask off the branch to leave just the flowers.
  • Once I knew where the flowers would stamp, I created a mask for the stem and placed it under the acetate to make sure I could still get all the flowers.
  • Next, I removed the acetate and stamped on the white card stock.
  • Once I had the flowers, I used a heart die cut as a stencil and a black marker to create the heart.
  • I then stamped the HAPPY MOTHER'S DAY - 826C inside the heart.
  • Once I had the imagery and sentiment, I colored the flowers with copics and finished them with a chunky Stickles glitter for the flower centers.
  • The panel was layered on a coordinating pink layer.

Have you started your Mother's Day cards?

I hope you have a wonderful craft filled week.

Read more...

Spring

>> Tuesday, February 27, 2024


Hi Everyone,

I have spring on my mind!  It's no wonder since we've had more rain than snow and a few days of temperatures in the 50's where I live!  

While this card doesn't have the colors of spring, it does have Pussy Willows which sure are a harbinger of that time of year.   I added some strips of glitter and the sentiment, Special Place In My Heart.


I also made a card celebrating St. Patrick's Day for a special someone, using some stamps that I normally reserve for Valentine's Day. 

The background was made using the Small Shamrock Group in two different green inks.  I stamped the Silhouette Love Heart eight times, four in the shape of a shamrock, and four more times which I fussy cut and attached just along the folded center.  I drew a stem and added an enamel dot to the center.  


I used the Lucky in Love greeting for my sentiment, adding some more enamel dots for embellishment.  And I can't leave out the polka dot ribbon and embossed orange strip!

Thanks for the visit today!
Karin


Read more...

Love and Blessings

>> Tuesday, February 6, 2024

 Hi Everyone,


Have you finished making your Valentine's Day cards?  If not, here's a bit of hearts and flowers inspiration for you today!


I paired up the Flower Hearts (SUCH a C-U-T-E stamp!) with the sweet new Love and Blessings Valentine's Day Greeting.  The image was stamped, colored and die cut, with a bit of glitter glue added to the hearts.  It is a valentine after all :)


I made the background using the Candy Heart Background along with and embossed background of the same type, covering up the seam with some gems. (Boy do I have a lot of them in my stash!)  


For more Valentine stamps, be sure to pop on over to the DRS Designs store!


Have a happy day,

Karin


Read more...

On my Mind

>> Tuesday, August 29, 2023

Hi Everyone,

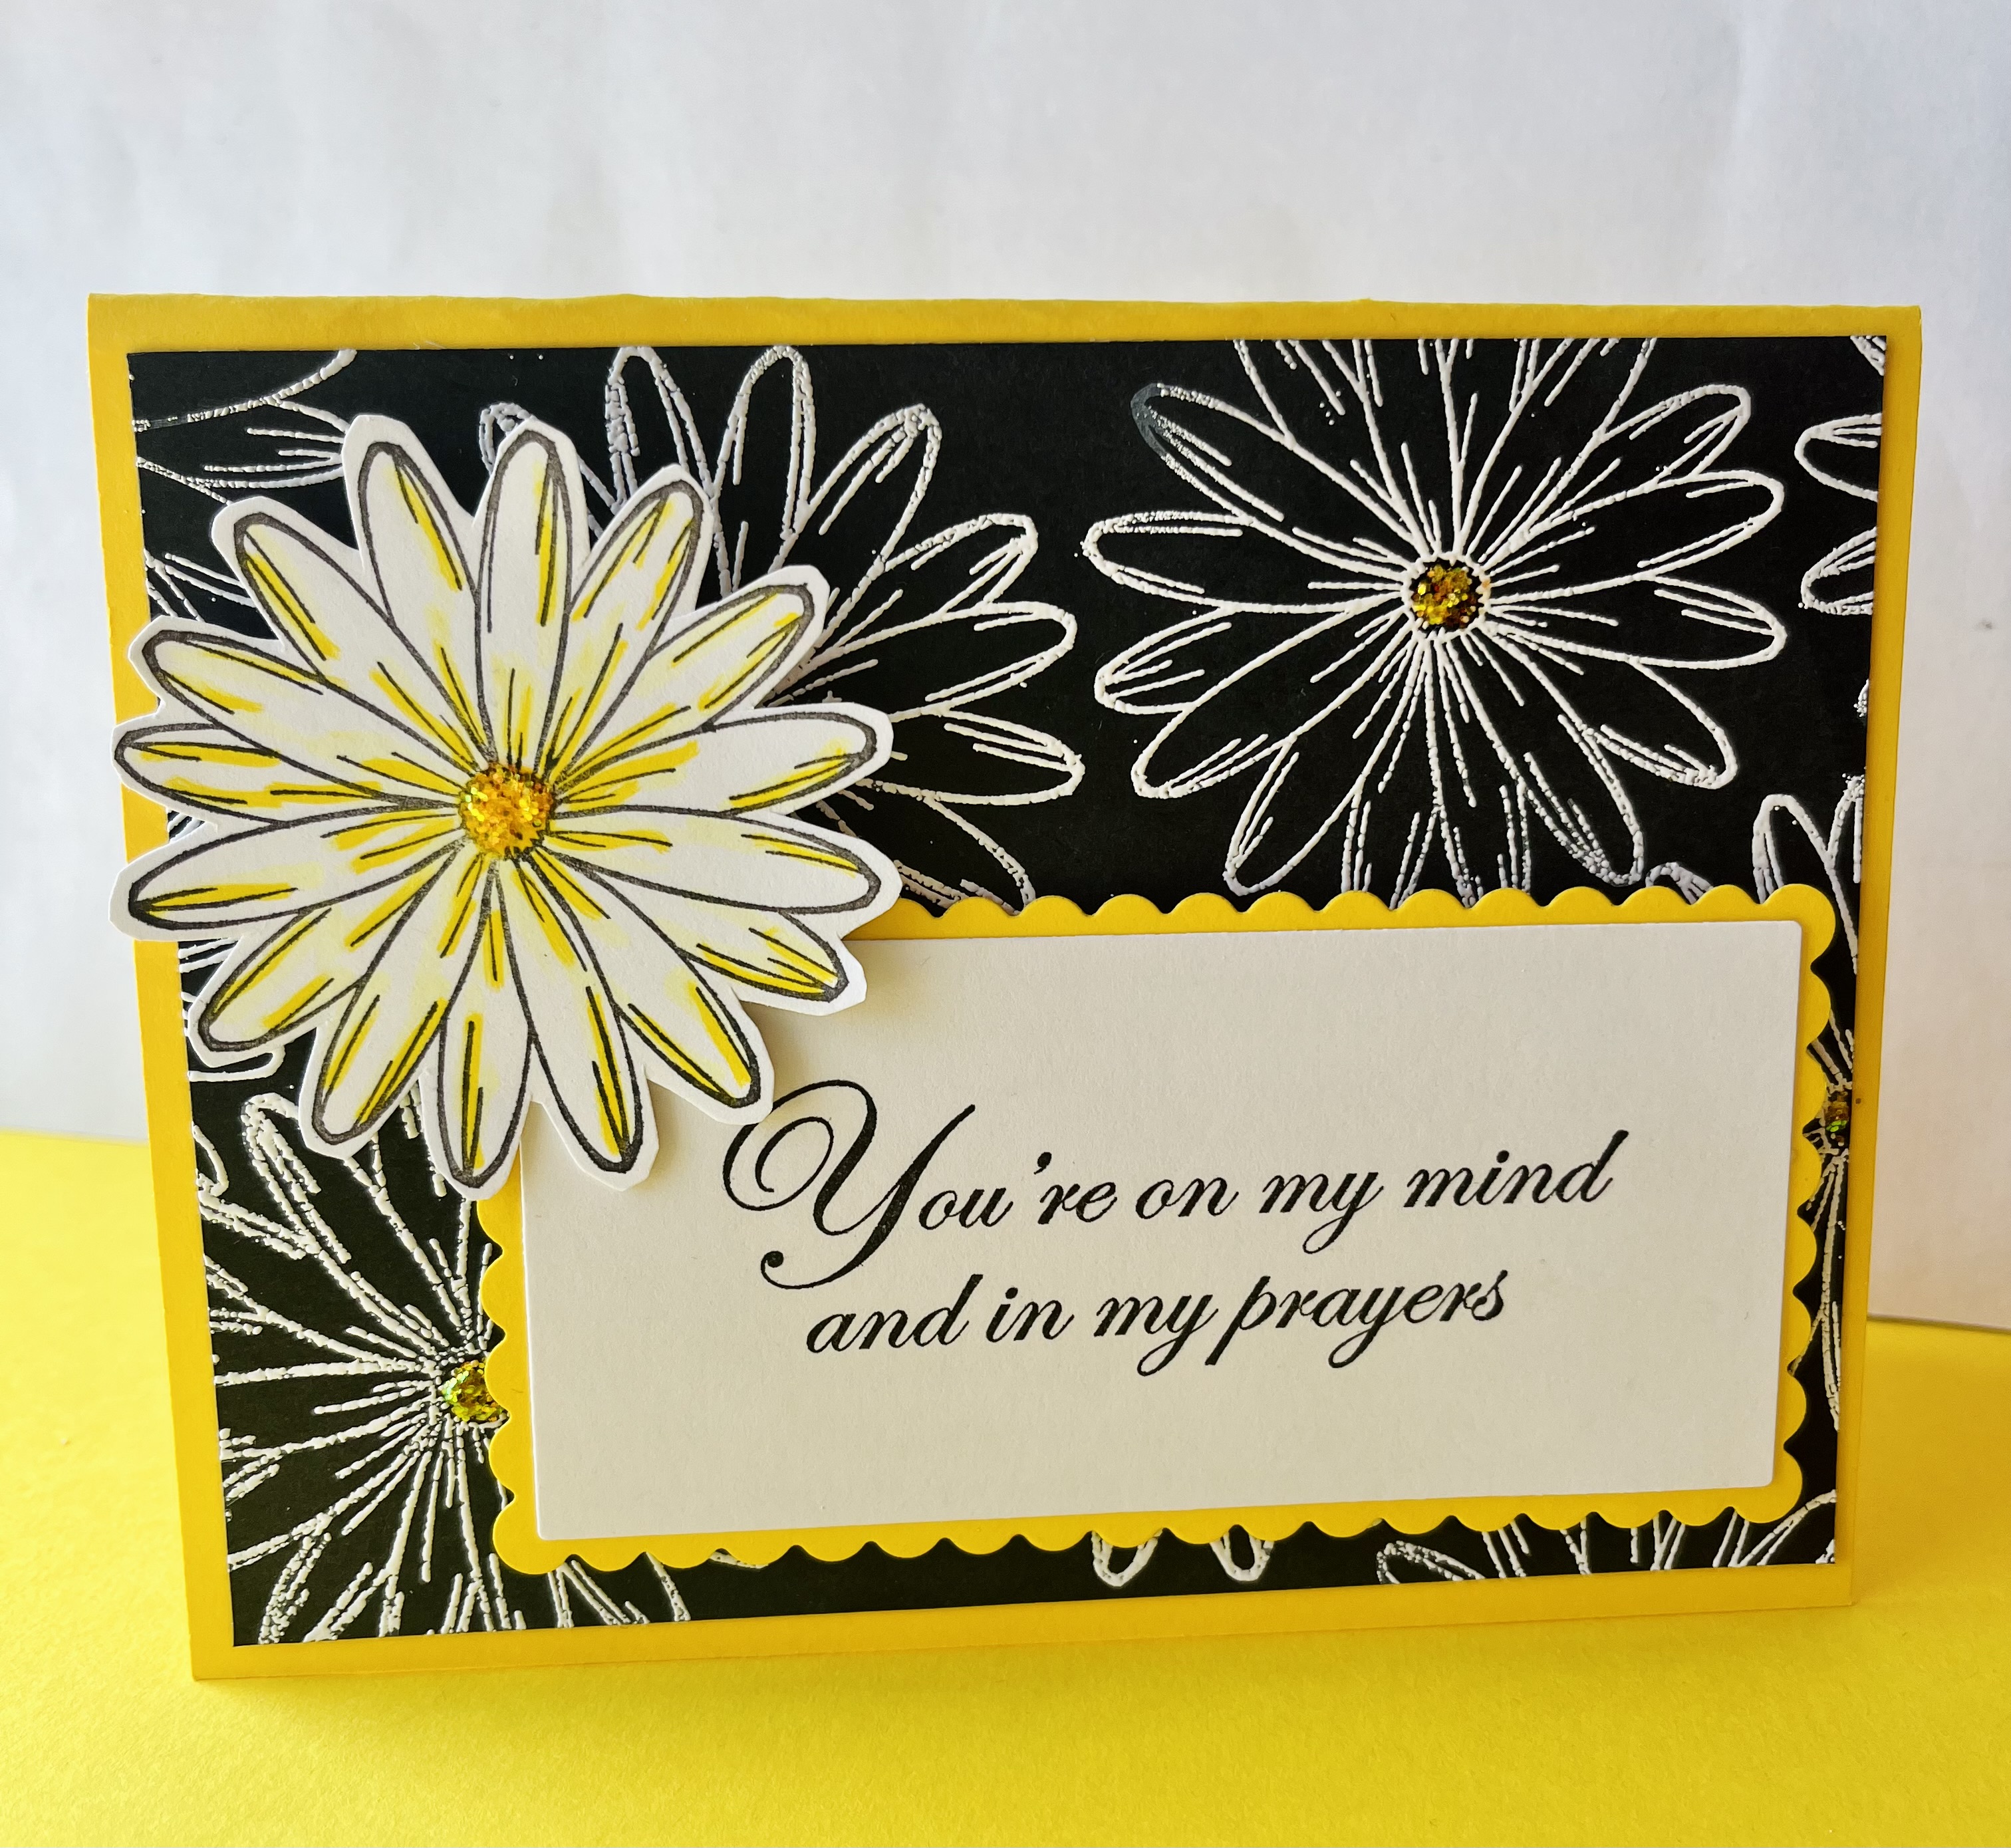
I think my second favorite stamp after the Dogwood Branch is the Medium Daisy Bloom.  It's so versatile and just plain cheerful.  I use it all the time!

I made this card for a friend who's going through a hard time, and I took inspiration from this card here.  

The background was heat embossed and I added some glitter glue to the flower centers.  I die cut the Mind and Prayers Greeting and added another fussy cut daisy as embellishment. 


To find these and many more flower stamps, just click here!

Happy Stamping!
Karin


Read more...

More Special

>> Monday, August 28, 2023


I really love the SPECIAL PERSON BIRTHDAY GREETING - 108G. It is perfect for any friend or family member that is very special and I feel I grab it for many cards.


For today's card:

Thank you so much for stopping by to check out my card this week.

Read more...

Deep Sympathy

>> Tuesday, August 22, 2023

Hi Everyone,

Making a sympathy card when you need one most, is always difficult for me.  Lucky for me, I have this Calla Lily Sympathy Frame stamp from DRS Designs that does all the heavy lifting.

I stamped, colored and die cut it out, adding some sponging to the edges.  I attached it to an embossed background and added some flowers that were fussy cut from the Dogwood Branch.


After attaching everything with dimensional tape, I added a bit of glitter glue to the flower centers and called it done.

This stamp and many more sympathy stamps can be found right here!

Have a great week!
Karin


Read more...

Mr. & Mrs.

>> Tuesday, August 15, 2023

Hi Everyone,


At this point, I think this wedding card making thing I have going on is boarding on obsession...lol!


I sat down to make a much-needed birthday card, but I saw this unused Mr. & Mrs. greeting that was already stamped and die cut, sitting in my stack of unused pieces parts. What's one more wedding card, right?


I used a tried-and-true layout and stamped and punched out the Silhouette Bride and Groom for the image and added some soft pink sponging the sentiment.  


It's hard to see the Dogwood Branch background, but it was heat embossed using some glittery embossing powder. I tried for a close up, but it looks great in person ;)


After taking this picture, I realized it needed some gems, so I added them and you can see them in the first picture.

Thanks for stopping by!
Karin


Read more...

Christmas Ornaments in July

>> Wednesday, July 5, 2023

Hello Crafty Friends.  I always love a bit of Christmas in July - can you believe we are over halfway to Christmas now?


I got the idea for this card after looking at THIS picture and THIS card.  I loved the idea of a plaid poinsettia and having folliage in the background.  

To make the flower, I used a stencil and some black ink to make the plaid, stamped the GIANT POINSETTIA image twice, fussy cut it, glued some Dazzling Diamonds (SU!) to the edges, and then added some crystal beads covered in gold glitter to the middle.  I sponged over the background after embossing with Pine ink from Close to My Heart and set the poinsettia on a label die cut decorated with Gold Stickles.  My grandson said it needed something in the "bare" spots so I stamped the TRIPLE HANGING CHRISTMAS ORNAMENTS and used one on the left and the hanger from one on my punched circle I had laying on my counter.  Both were outlined in Gold Stickles. To finish it all off, I used part of the MERRY CHRISTMAS TO ALL greeting (I love the font on that stamp). 

Now I have one more Christmas card done!

Hope you are having a lovely week.

Hugz

Nancy


Read more...

Army Proud

>> Tuesday, May 30, 2023

Hi Everyone, 

I was in need of a couple of cards and had little time to make them, so I went with my favorite Dogwood Branch stamp that would work for both, and a couple of sentiments.  

I simply stamped the With Sympathy Greeting and the flowers multiple times, adding color by stamping using a small square ink pad.


I did the same here, but added a die cut Brush Thank You.  Some glitter glue was added for some flair.


Finally, I made another star filled card to honor our military, using the following stamps:


Thanks for stopping by!
Karin

Read more...

Hydrangea Fun

>> Wednesday, May 3, 2023

Hello Crafty Friends.


I watched THIS lovely video by Kristy on how to paint a loose hydrangea.  I painted two of them and used some great DRS Design's sentiments to finish them off.


On this one, I used four colors and a little splatter of white. The greeting is the new Special Person Birthday Greeting

On this one, I used a lot of different colors and just the Happy Mother's Day line from the You Were Right Mother's Day Greeting (I used the rest of the sentiment inside). 
I have a lot of birthday's coming up in my family/friend group and Mother's Day is just around the corner so these will come in handy.

Hope you are having a fabulous and craft-filled week.

Hugz,

Nancy


Read more...

What is More Special...

>> Monday, May 1, 2023


This SPECIAL PERSON BIRTHDAY GREETING - 108G is absolutely perfect to send to so many wonderful friends and family.


For today's card:

  • I used the FLOWER BORDER - 1076H to create an angled boarder on my card. I first stamped the border on one angle then masked the flowers and stamped it again on the other angle.
  • Next, I stamped the SPECIAL PERSON BIRTHDAY GREETING - 108 above the flower boarder.
  • I then fussy cut the flowers and colored them with copics.
  • The flowers were finished with gold stickles in the centers and the panel was popped up on dimensionals.

Thank you so much for stopping by to check out my card this week.

Read more...

Birthday Flower Cart

>> Wednesday, April 26, 2023

Hello Crafty Friends.


Today I have some birthday wishes all wrapped up in a fun flower cart.  I started this pop up flower cart with a die from Alinacutle.  The die has lots of pieces but was relatively easy to put together.  For the wood-look side piece, I started with a white paper, scored lines, and then dragged an ink pad along the score lines.  I drew the awning after seeing THIS fabulous card by Lynn at Splitcoaststampers.com. 

After completing the card/cart portion, I stamped and fussy cut some flowers from the Sneaky Bunny Flower Pot and the Girly Swirly Flower Cake to complete the flower pots.  I split and watercolored the new Mr. Earl's Happy Birthday Greeting.  This card lies flat when you bend it so it can be easily mailed. 

Hope you are having a fabulous week!

Hugz,

Nancy


Read more...

Mother's Day Card

>> Monday, April 24, 2023


I absolutely love this new YOU WERE RIGHT MOTHER'S DAY GREETING - 117G. It really is a wonderful sentiment for any mother.


For my card:

I really love the clean and simple feel to this card.

Thank you so much for stopping by to check out my card this week.

Read more...

Daisy Birthday

>> Tuesday, March 28, 2023

 Hi Everyone,


I'm healing from my hand surgery pretty well, but I have to type using odd fingers.  Forgive my short post today :)


I had leftovers on my desk from making this card, so I copied it using this new birthday sentiment.  I masked off the bottom part of the Special Birthday Greeting...


And stamped it inside with a few more Medium Daisy Blooms.


Check out all the new stamps at DRS Designs!


Have a great day!


Karin

Read more...

Thinking of You

>> Tuesday, March 14, 2023

 Hi Everyone,

Here's a simple, flat easy to mail card that I made for a friend going through a hard time.  I used one of my favorite images for a snail mail card, because it has the sentiment built right in.  

I stamped, colored and die cut the Happy Mail image and sentiment for the front and used the Medium Daisy Bloom to create a background to match.  


An embossed panel in a matching color anchored the image on the card.  

Thanks for stopping by the blog today!

Karin


Read more...

A Little Flower

>> Thursday, March 9, 2023

 Hello there!

Today I'm sharing a beautiful butterfly card.

I've used DRS stamps: Three Butterflies and Butterfly Greeting.


The dies are from APG-Spellbinders.
I added a few sequins using glitter glue to adhere them to the card as well.


On the lattice looking die cuts, I used a gold layer underneath plus 2 white layers because
it isn't actually lattice, the lines go one direction, so I turned one layer upside-down to get 
a lattice look (hope that makes sense).
I hope you like today's card, thanks for visiting!

Robin

Read more...

Always Something to be Thankful For

>> Monday, March 6, 2023


For my card today I decided to do an April Showers bring May flowers theme. 

  • This ALWAYS THANKFUL GREETING - 040F is perfect to pair with my April showers bring May flowers theme. I stamped the sentiment in blue and then die cut the sentiment with a cloud stitched die cut.
  • Next, I used the RAINDROP BACKGROUND - 1012H and stamped it all over the card base.
  • I die cut the umbrella in navy and added white panels to the top and popped the umbrella up on dimensionals.
  • The card was finished with a few punched blue flowers and Nuvo Drops were added to the center.

Thank you so much for stopping by to check out my card this week.

Read more...

Easter Ears and Greetings

>> Wednesday, March 1, 2023

Hello Crafty Friends!


In this fun card, I combined the Dogwood Branch and Deco Easter Greetings images with some water color practice from Emma Jane Lefevbre (the bunny ears).  It came out super cute and was very easy. 

Hope your week is going well.  Stay warm and safe.


Hugz,


Nancy

Read more...

With Every Beat of My Heart

>> Monday, February 13, 2023


Recently I started going through my scrap papers looking for ways to clear some out. I started punching out some hearts and thought oh how fun would it be to create a card full of love in blue. Blue is my favorite color so it works for me.

  • I punched out several different blue hearts then layered the base layer of hearts to create a heart shape.
  • Next, I added a second layer of blue hearts and put them on dimensionals.
  • I added a pink flower and a couple of leaves and a blue gem.
  • The hearts were finished with white gel pen.
  • I used the EVERY BEAT OF MY HEART GREETING - 1056D stamped in blue.
How do you use scraps in your crafting?

Thank you so much for stopping by to check out my card this week.

Read more...

Blog Archive

StatCounter

  © Blogger templates Palm by Ourblogtemplates.com 2008

Back to TOP