Blog Widget by LinkWithin
Showing posts with label scarecrow. Show all posts

Lady Scarcrow

>> Monday, November 20, 2023


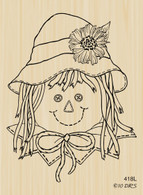
Hello crafty friends. I am happy to have you stop by to check out my card this week. With fall in the air, I just had to play with this really cute lady scarecrow.

For my card:

  • I stamped the LADY SCARECROW - 418L and colored her up with copics.
  • I then found some coordinating paper scraps in my scrap drawer and cut them down adding a black layer to accent the colors.
  • The card was finished with a couple of buttons from my stash to pick up the button theme from the image.
Thank you so much for stopping by to check out my card this week.

Read more...

Thanksgiving & Christmas

>> Sunday, October 25, 2020


I am being sucked in to the world of gnomes. This cute TREE HOME GNOME - 836M is perfect for holiday cards and the new TINY GNOME FOR THE HOLIDAYS GREETING - 174A sentiment pairs great with the image for holiday cards. 

I stamped the SIMPLE CHRISTMAS ORNAMENT - 491K masking off the shine from the ornament. Next I created a mask for the ornament and stamped the Tree Home Gnome inside the ornament. I added the Tiny Gnome for the Holidays greeting and colored the image with copics.

I added the MERRY CHRISTMAS ARC - 102E and a hand drawn string from the arc to the ornament.

I finished off the image with stickles on the snow and the ribbon on the ornament.

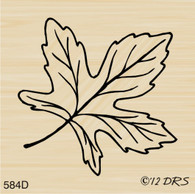
This card was so much fun to create using a few different images you can include the many fun fall and thanksgiving feeling in a card. I stamped the OPEN LEAF - 584D, the LAID OUT SCARECROW - 024G and the PUMPKIN PILE - 781H images and colored them with copics. Then I cut them down to 1 inch squares and layered.

I then stamped the 1 LINE HAPPY THANKSGIVING - 841D sentiment and cut the banner.

I embossed a leaf emboss folder and finished off with a pie button from my stash.

Thank you for stopping by to check out my cards.

Read more...

Happy Thanksgiving!

>> Sunday, October 18, 2020


This SCARECROW - 566F is on the job doing a great job attracting the crow away from the corn. Looks like the crow has a few friends that hopefully will stay away from that SILHOUETTE CORN STALK - 179B.


I stamped the scarecrow image and colored with copics. Next I stamped a few corn stalk images in green and added some copic coloring behind them. I finished with the 1 LINE HAPPY THANKSGIVING - 841D and a few hand drawn birds.


Thank you for stopping by to check out my quick CAS Thanksgiving card.

Read more...

Count Your Blessings

>> Tuesday, October 13, 2020

 Hi Everyone,


Just like last week, I have a card featuring the Laid Out Scarecrow...He's just beyond cute!


What can I say?  He and the World Changed Thankful Greeting paired up together, were all this simple card needed.   To make them fit inside the die cut, I masked off the Happy Thanksgiving portion of the stamp, and I attached the panel to an embossed pumpkin background.


The hanging banners with the dots were made after I colored up the scarecrow, using the same orange and blue Copic markers, so that they would match.  


Here's hoping we can be thankful for the rest of the fall season!


Karin

Read more...

Happy Fall!

>> Thursday, September 24, 2020

 Good morning!

Look at this cute new scarecrow.  He goes perfectly with so much 

but today they are on their own featured in fall

frames.

DRS Designs stamps: Laid Out Scarecrow and Autumn in the Air.

The fall frame is from Poppystamps (Memory Box) #2243
The round die is MFT's stitched circles.
I made a background with alcohol inks then die cut the frame.
Mr. Scarecrow was colored with Copics.

My next card is this same little guy but 
with the addition of the new sunflower basket.
DRS Designs stamps: Happy Fall Y'All, Laid Out Scarecrow, 

I used Spellbinders die S6-135 with wheat colored cardstock.
I also used some cute enamel dots on this one.
Thanks for visiting!
Robin

Read more...

Sunflower Wreath

>> Wednesday, September 16, 2020

 Hello crafty friends.

I love a wreath full of fussy cutting and today I have a fun one to share with you. 

I stamped the new Sunflower Bucket three times.  I colored in one bucket and fussy cut it.  I just colored the flowers with some Arteza Gouache paint on the other two and fussy cut them as well.  Next I stamped the new Laid Out Scarecrow image and fussy cut the head.  I cut three layers of the Tim Holtz Funky Wreath die.  I splattered on brown and white paint and then touched up the layers with a bit of gold paint. I also splattered on some paint on the top panel of my base. I filled up the wreath with my fussy cut images and added a little bit of the World Changed Thankful Greeting.  

I am sooooo ready for some Fall weather and Fall flowers!  Have a great rest of the week - we have made it halfway!

Hugz,

Nancy


Read more...

Lazy Scarecrow

>> Monday, September 14, 2020

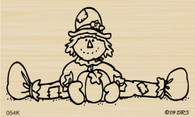
 Hello Everyone. Hope you had a wonderful weekend, I have a couple of cards today that feature the new Laid out Scarecrow (o24G) I think he looks like a lazy scarecrow. You know laying down on the job, not standing up on that pole trying to keep the crows and birds away from the crops. Anyway, he is adorable and there are no crops on my card, so I guess he's allowed to be laid out and relaxing!


I started by stamping the sign post and then masking it off, stamped the Happy Fall greeting, the fence from the 2 in 1 scene builder (087P) and the easy grass background. While the mask was still in place I sponged on some green ink for the ground and some blue ink for the sky. The new laid out scarecrow (024G) and pumpkins were stamped onto white CS, colored with Copics and fussy cut. After adding the scarecrow and pumpkins onto the panel it was attached to the white card base. This little scene just makes me long for fall and cooler weather!


This next card is very similar, I used the same fence (087P) and greeting, but this time I have my scarecrow (024G) with a bucket of sunflowers (062F). I cut a strip of kraft CS and stamped it with the splatter background image using Vintage Photo ink. For the grassy area I used green CS and then stamped the grass in a darker green ink. I used my Misti to line up the fence and so I could stamp it multiple times to get a good crisp image. The scarecrow and bucket of sunflowers were stamped onto white CS, colored with Copics and fussy cut. Some Nuvo Crystal glaze was added to the centers of the sunflowers.


I think I will be making another card using these same images and design, but this time I'll stamp Happy Birthday on the banner. I have a few friends who have fall birthdays and I think they'd like this.

Thanks for stopping by today. Be sure to stop by the on line store and check out all the new amazing images.

blessings,
shelia

Read more...

Happy Fall Ya'll

>> Sunday, September 6, 2020


How cute is this Scarecrow?
This card was so much fun to make. I started out with stamping LAID OUT SCARECROW - 024G and coloring him with copics. Then I used the SILHOUETTE CORN STALK - 179B and stamped it several times in a row. Once the cornstalks were stamped I added the RIVER ROCKS & FENCE LINE 2 IN 1 SCENE - 087P.

I added grass with copics and sponged the clouds and then drew in the birds.

I finished the card with the HAPPY FALL Y'ALL GREETING - 635B.

Once the scene was put together I fussy cut the Scarecrow and popped him up on dimensionals.

Thank you for stopping by to check out my card.

Read more...

Relaxing Scarecrow

>> Saturday, September 5, 2020

 Welcome!


Have you ever scared yourself with a card design idea?   That's my card today as I designed it in my head :)


I will also admit that I really didn't think I could pull it off, but in the end I was pleasantly surprised at how quickly and easily it all came together.


I think it was just the sheer number of stamps I was dragging out of my collection that made me nervous, but once I decided to stamp the background as a scene and fussy cut and attach the cabin, stonewall, scarecrow and leaf pile it all went quickly.


To start I cut out my "path" out of scrap so I could sponge on yellow and brown.  I covered the path with the piece I cut out and sponged on the grass and sky and stamped just the fence from our New Fence & Rocks 2 in 1 Scene using black ink. 

On a separate piece of card stock I stamped (using black ink)


Laid Out Scarecrow (New Image!!)


Autumn Leaf Pile


Stonewall with Gate


Cabin


I colored all using a combination of watercolor pencils and alcohol markers and fussy cut them and then attached them using some double sided tape.  I finished it off by stamping our Happy Fall Y'all in the sky and then layered all on black and then a folded yellow card.


Thanks so much for stopping by!

Sue


Read more...

Thankful

>> Tuesday, September 1, 2020

Hi Everyone,

I can hardly believe that it's September.  Even though we haven't gone anywhere this summer and the days felt long, now that we're heading into fall, I feel like the time has flown!  The cooler night time temperatures this past weekend, really put me in the mood for some card making.  I even snuck in some snow on my first card.  DRS Designs has some new fall stamps on the way this week, and I'm excited to give you a peek!

A couple of  the new 2 in 1 stamps allow you to be creative and stamp a whole scene.  I always need to give myself a pep talk before I start this type of project, but it was so easy to get great results. If I can do it, anyone can!

I began by stamping the mountains and then the tree line below it.  Next I stamped the Log Cabin, fence and filled in using the little bare trees. After coloring in everything, I made a mask for the house and stamped the the grass portion, finishing it up with some glitter and the greeting.  

Here is the list of stamps used:

Mountain & Tree Line 2 in 1 Scene (045P)
River Rocks & Fence Line 2 in 1 Scene (087P)


This card is right in my usual comfort zone.  One image, one sentiment and a layout of my choice :)

I dry embossed the base with a leaf embossing folder (Darice) and stamped a border using the
 Polka Dot Background.  I stamped it once in brown ink, and then used my stamp-a-ma-jig and lined up the green dots in between the spaces and stamped again,  for a slightly different look.   After stamping and coloring the new Sunflower Bucket (062F), I fussy cut it and attached it to a die cut.  I stamped the Thanks Be to God Greeting and layered that up using my punches.


Before I attached the greeting and image, I wrapped the background in a gauzy ribbon to finish it off.  

I hope this has got your fall cardmaking mojo going.  Be sure to check in here all week for more sneak peaks, of the new seasonal stamps! Have a great day...

Karin

Read more...

Give Thanks

>> Sunday, October 1, 2017

Good morning

I can't believe that today is the first day of October. It feels like the middle of summer here. But the leaves are still green and falling like crazy. I hope that we get to see some color this year. Fall has always been my favorite time of year.


I started by stamping the Split Scarecrow then covering with a mask and cutting a circle mask. The sky and ground were sponged with distress ink. The scarecrow and moon was colored with Zig Clear Color markers. The New Give Thanks Greeting was stamped with blue ink.


I really like this greeting at can be used for so many occasions.

Have a wonderful day,

Read more...
Fall Scarecrow

>> Friday, October 14, 2016

by Julie Warner - The Write Stuff

Happy Friday!
I hope your week has gone well! Are you enjoying your fine fall week? I'm glad to report we've had some much cooler temps..well much cooler than they were. I just remarked to someone yesterday that it was a nice fall day & felt just like it should..for September, lol. Problem is, it's already October. Seems we are about a month behind on fall. Anyway, I thought it was fall-like enough to put me in the mood for a fall card. 

This cute little Lady Scarecrow was stamped, colored w/ Copics, then die cut using my out of the box technique. I had some leftover (I know...I have a LOT of leftovers) layers of brown & pumpkin & they seemed just the right size so I used them & a die cut moss green flag on the side. On the green layer, I stamped the Wheat image w/ bamboo ink.  After putting it all together, I thought it needed a little something, so I tracked down some raffia & made a little bow w/ it.
Here are the Copics I used & below it is a look at the inside.

Thanks so much for stopping by! Have a great weekend!
Julie2 sig 
Supplies:
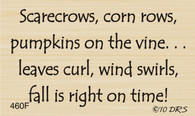
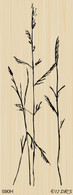
Stamps: DRS Designs –  Lady Scarecrow, Happy Fall, Tall Wheat, (inside - Scarecrows Greeting, Open Leaf
Paper: Staples 110# white, X-Press It white, brown textured, pumpkin, moss green
Ink: Memento tuxedo black, bamboo leaf, Colorbox frost white pigment
Accessories:  Copic markers, Misti,  MFT diagonal stitched rectangles & stitched flags, ODBD stitched ovals dies, Spellbinders A2 matting basics A, raffia


Read more...

Thanksgiving Scarecrow

>> Friday, October 7, 2016

by Julie Warner - The Write Stuff

Happy Friday!

I hope your week has gone well! And I hope you are not in the path of Hurricane Matthew! It's been a long time since I've had to go thru a major hurricane. But since I grew up on the TX Gulf Coast, we had quite a few bad ones, so I sympathize with all those affected. And I'm sure we'll have a lot of people heading this way from the coastal areas of FL, GA & SC. I just hope we at least get a little rain..it's been so very dry here lately.

I used 3 Splitcoaststampers Challenges…the Sketch (SC613),  Color (CC603) & Monday’s Technique (TLC606) as guides to make my card.  I used all 5 of the colors from the challenge for my Thanksgiving card & did the bandana tech (for the Technique challenge) on the olive green strips. For the sketch, I let the legs of the scarecrow serve as the 2nd horizontal band of the sketch, but all other elements are there.
The scarecrow was colored w/ Copics, fussy cut & added to a stitched oval that I stamped the arced greeting across the top. The scroll image was stamped on the die cut olive strips & I used the white gel pen for the bandana tech. The ombre yellow strip started out a honey color & I sponged the Distress inks on it going to red at the bottom. The sponged & fussy cut leaves & punched branches were added around the oval.
Here’s a look at the inside & below it are the Copics I used.
Thanks so much for stopping by! Have a great weekend!
Julie2 sig 
Supplies:
Stamps: DRS Designs – Split Scarecrow, Thanksgiving ArcOpen LeafScroll Corner Tile (inside- Thanksgiving Thinking of You)
Paper: Staples 110# white, X-Press It white, olive green, harvest gold
Ink: Memento tuxedo black,northern pine, Distress Ink fossilized amber, spiced marmalade, fired brick
Accessories:  Copic markers, Misti,  white gel pen, Misti, MS branch punch, McGill pine branch punch, MFT diagonal stitched rectangles, Lil’ Inker long skinny stitched rectangles, ODBD ovals & stitched ovals dies


Read more...
Blog Archive

StatCounter

  © Blogger templates Palm by Ourblogtemplates.com 2008

Back to TOP