Blog Widget by LinkWithin
Showing posts with label scene. Show all posts

Love & Laughter

>> Monday, July 24, 2023


Hello crafty friends. Today I am sharing a card I made to wish a friend well on their new home.


For my card:

  • First, I stamped the CHRISTMAS VILLAGE CABIN - 212G and then masked it.
  • Next, I used the trees from the MOUNTAIN & TREELINE 2 IN 1 SCENE - 045P stamping them once in green then off setting them and stamping them a few more times lighter and lighter to get the tree background.
  • Finally, I used the NEW HOME GREETING - 967G stamping it under the scene.
  • I then colored the CHRISTMAS VILLAGE CABIN - 212G with copics and added snow to the ground.
  • For the sky I used distress oxide inks in 2 different blues with the lighter blue to the center of the scene.
  • I added some white gel pen for clouds and some touches to the smoke from the chimney.

Thank you for stopping by to check out my card this week.

Read more...

You Were Right

>> Monday, April 3, 2023


I have to say this will probably be my favorite Mother's Day sentiment ever. It is so perfect for me to send to my mom now that I am an adult for all those years growing up and listening to all her advice.


For my card:

  • I stamped the LOVEBIRDS BRANCH - 413H on the right side of the card.
  • Next, I stamped the BIRDHOUSE TREE BRANCH - 733K on the left side of the card.
  • I then stamped the new YOU WERE RIGHT MOTHER'S DAY GREETING - 117G under the branches.
  • Once the images were stamped, I colored with copics for a very quick and simple card.

Thank you for stopping by to check out my card this week.

Read more...

Seasons of Birds

>> Wednesday, January 4, 2023

Hello Crafty Friends, 


Today, I am playing with the Bird on a Branch and the Small Birthday Wishes Greeting.  

For the card on the right, I popped up the bird and also used the Winter Trees image.  I used watercolors to make the sky and the shadows.  Then I added some Snowtex. 

For the card on the right, I watercolored the full scene behind the bird.

These were super fun.  I think I am going to figure out a few more ways to use this pretty bird. 

Hugz, 

Nancy


Read more...

Motorcycle Retirement

>> Monday, October 24, 2022


    I have a friend that will be retiring soon and he loves to take his motorcycle out on the open road and travel. I just had to use the Motorcycle - 073E image and the new WINDMILL - 025H stamp to create a card for him.


    For my card:

    I like to keep masculine cards simple and this is very clean and simple for a masculine card. 


    Thank you for stopping by to check out my card.

Read more...

A Bit of Spooky

>> Wednesday, September 28, 2022

A bit of spooky fun today.  


I started by sponging the background with some distress oxides, and then I added the Silhouette Grave Yard and the Accent Bats. 

On a seperate paper, I stamped the Bubbling Beaker, Leaning Ghost and Small Trick or Treat Greeting.  When I cut the greeting, there was a wobbly bottom and I kept it to add a bit more spooky.  The beaker was colored with distress inks mixed with a little water. 


After the images and greeting were popped up, I framed the scene and base purple layer with black.  


I love fall and Halloween.  I just got some faux grave markers for my yard, and my grandsons keep asking me to put the out. 


Hugz,


Nancy

Read more...

Hello Friend

>> Monday, August 29, 2022


    Anyone who knows me knows I love an image with a dog. This WHEELCHAIR BUDDIES - 1060H image is just so sweet.

  • I stamped the WHEELCHAIR BUDDIES - 1060H image then created a mask for the image.
  • Once the image was masked, I used the TREE LINE BORDER - 981P to help build a scene.
  • The scene was colored with copics and layered on a red card stock.
  • For the sentiment I die cut the Hello Friend 3 times and stacked it adding Nuvo Drops to give it some shine.
    Thank you for stopping by to check out my card this week. I hope you have a wonderful week.

Read more...

Have I Toad You...

>> Monday, May 23, 2022


The new DIVING FROG LEGS - 1105C is perfect to pair with the FROG ON A LOG - 252H. For my card,

Thank you for stopping by to check out my card this week.

Read more...

Tough Times...

>> Monday, January 17, 2022


New Year, time to start exercising and eating right. That has me bringing out my stamps that show ways to get in more exercise and hiking is a great way to get a few extra steps in to my day.

I used this great SILHOUETTE HIKER - 1026G image stamped on white card stock and I sponged on the yellows, greens and oranges to color the scene after masking the sunshine.

Once colored I die cut the black frame and white heat embossed the great TOUGH TIMES DON'T LAST GREETING - 1096D then popped it up on dimensionals.

Thank you for stopping by to check out my card this week.

Read more...

A Friendly Note....

>> Monday, July 5, 2021


This card is in honor of my niece. She loves sharks and was initially inspired by her to use this shark image.

The background was super fun to create using different blue papers from my scrap bin and creating a mosaic water scene gluing each piece individually.

Once the background was created I used the HAPPY SHARK - 153G stamping him  on cardstock coloring with copics and then fussy cutting him.

I then used that super FRIENDLY NOTE GREETING - 790D because it really is perfect for anyone.

Both the shark and the sentiment were popped up on dimensionals and the card was finished with white candy dots.

Thank you for stopping by to check out my card this week.

Read more...

Wild About You...

>> Sunday, May 16, 2021


I am wild about this cute JUNGLE JIM THE ELEPHANT - 842K and he is perfect for any time of year.

For this card I paired Jungle Jim a simple die cut trees and sponged yellow background. Once Jungle Jim was stamped he was colored with copics and then fussy cut.  I added a bit of shaping to him once fussy cut and popped him up on dimensionals.

I then finished him off with the I'M WILD ABOUT YOU GREETING - 331D

Thank you for stopping by to check out my card this week.


Read more...

Toad You...

>> Friday, April 9, 2021

by Julie Warner - The Write Stuff


Happy Friday!
I hope your week has gone well! And I hope you had a lovely Easter. Spring has definitely sprung around here. We've had a few nights below freezing but the days have been sunny, dry & in the upper 60's. Things are really blooming now..the peach trees, the apple trees, the pear tree..we have them all in our yard. I'm hoping we actually have fruit we can eat this year. Last year, there was some fruit, but critters stripped the trees during the night, so I'll have to keep watch this year.

For my card today, I used this adorable frog on a log to go w/ the new Toad You greeting. I stamped him, then added the cattails & rocks, colored them then sponged a little tumbled glass at the top. I didn't didn't leave enough room to stamp the 1 line greeting, so it became a 2 line greeting. A dk brown mat was attached behind the scene, then onto the card. 

Here's the inside & below it are the Copics I used. 


Thanks so much for stopping by! Have a great weekend!


Supplies:
paper:  Staples 110# white, dk brown, X-Press It
ink:  Memento tuxedo black, Distress ink tumbled glass,  (Kaleidacolor Fresh Greens also used on inside)
accessories: Rubbernecker  Rectangle Stitch dies, Copic Markers

Read more...

Happy Thoughts

>> Tuesday, February 23, 2021

Hi Everyone,

I'm showing off the new Arched Window stamp on my first card today.  It's so cold and snowy here, I needed to make a pleasant scene to warm me up...I'm dreaming of the sunny, cheerful days to come.

I stamped the window a few times and fussy cut out the first one.  I made a mask out of the second one, and fussy cut the shutters on the third one. I then colored and attached those shutters to the back of the window shutters, so that they could be folded shut.  I hope that makes sense.

The background was made using The Floor stamp and an embossed brick wall. I also stamped and fussy cut the Cattail Milk Pail and the One Line Happy Thoughts Greeting.


Here you can see what the window looks like opened up.  I used the mask I made for the window as a helper to stamp the tree top and the hot air balloon.

The tree and balloon come from the following stamps:


For my St. Patrick's Day card I stamped and heat embossed the new Shamrock of Shamrocks using gold embossing powder.  I stamped the bottom using the Small Shamrock Group and the made the greeting using the Tiny St. Pat's Day


Please send me some Irish luck to chase away the snowflakes! 

Happy Stamping!
Karin


Read more...

It's Freezin'

>> Sunday, January 3, 2021


 Happy New Year crafty friends. I am so thrilled to show you my cards this week. I have three to share.

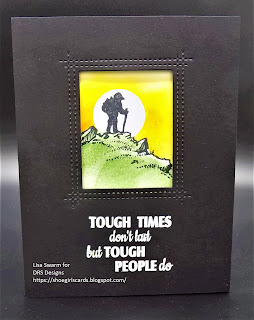
This cute Snowman will soon be available and I just had to play with him as soon as I got him. He also will be available as a silhouette and well that silhouette image was perfect to use a mirror image stamp and create a shadow on the pond. Once he was stamped I masked the image.

Once masked I stamped the SNOW TREE WITH FENCE - 144M and the new It's Freezin' Season sentiment stamp that will also be available soon.

I then colored the entire scene with copics and added stickles to the pond and some white gel pen to the pond as well.

To finish the sky I sponged some blue clouds but those are really tough to photograph.

My second card uses this new BOWLING STRIKE - 240H image is fantastic for creating cards for our bowling friends. 

This was a super quick card. I stamped the image on the card base and then colored with copics. I then masked the image and sponged yellow distress ink stars on the card base.

I finished with the BALL ON YOUR BIRTHDAY GREETING - 207D


With all the paper that I die cut through the Christmas holiday season I like to punch out the pieces and create what I call scrappy cards. For the green I punch them down with a branch punch and then glue them to a card base for trees. I then add stickels for babbles.

For this card base I sponged some blue for the sky and left the ground white to look like snow.

I finished the tree with a punched star then added this wonderful THINKING OF YOU AT CHRISTMAS GREETING - 183D sentiment.

Thank you for stopping by and checking out my cards this week. I wish you and your families a wonderful New Year.

Read more...

Beautiful Snowflakes

>> Sunday, November 8, 2020


I love blue and white cards. I may need to make a few more of this card as it is super quick and just my colors.

The base was created using a gel plate and a brayer and adding a couple of different blue distress oxide inks to the gel plate. Next I stenciled snowflakes and pulled the stencil off. Then I added the cardstock to the leftover ink on the gel plate.

Once the paper was dry I stamped in blue and white INTERLOCKING SNOW BACKGROUND - 015H.

I finished with heat embossing the TINY SEASON'S GREETINGS - 173A in white on blue cardstock and popping it up on dimensionals.

I added a few die cut white snowflakes and sequins.

I have a second card this week.


I absolutely love this COWBOY SILHOUETTE - 316M and wanted to try a neutral colored sky with it. I stamped the cowboy silhouette image and the RIVER ROCKS & FENCE LINE 2 IN 1 SCENE - 087Pand heat embossed them in black. Next I sponged brown, grey  and tan distress oxide colors for the sky

I die cut the panel and layered over the stamped background using VICKI'S VERSATILE BACKGROUND - 369H.

I will be making more colorful backgrounds using this image because I just love it.

Thank you for stopping by to check out my cards this week.

Read more...

What a View

>> Sunday, November 1, 2020


If I had this kind of scene I would be out walking every day but alas this kind of scenery is not any where near me so I created it on a card.

I stamped the mountains twice using the MOUNTAIN & TREELINE 2 IN 1 SCENE - 045P image. Then I stamped the trees from the scene 3 times in different shades and colors. I colored the mountains grass with copics.

Next I stamped the SILHOUETTE HIKER - 1026G and colored his hill and grass with copics. I cut off the edge of the hiker to add dimension to the card and popped that up on dimensionals.

I finished with stenciling in the sky with blue and pink.

I dream of getting out on a vacation to see the mountains.

Thank you for stopping by to check out my card.

Read more...

Gnome for the Holidays

>> Thursday, October 22, 2020


Good morning!
I drew the split door in the tree slice and masked it to stamp the Tree Slice Wood Grain.  First though, I stamped the sign with mushrooms and the Gnome Home.  I masked the wood slice and Gnome Home then stamped the mountains and trees.
I reverse masked the doorway and stamped the Peeking Gnome.  I did a bit more masking and stamped the mushroom lines.  The tree was stamped separately , colored and cut out then popped up.
I used a white painty pen to add snow to the mountain tops then added Stickles to make them sparkle.  I added Stickles to the ornaments too.

I used some Memory Box and Rubbernecker Dies on this one with gold paper.


The Lantern was stamped then I die cut it.  I die cut the gold frame using a combo of 2 dies then I popped it up.  I die cut the gold mat for the sentiment.  The pinecone was stamped separately then colored and cut out then glued it to the sentiment.

Thanks for visiting today!

Robin


Read more...

Gnome Holiday

>> Friday, October 16, 2020

by Julie Warner - The Write Stuff

Happy Friday!
I hope your week has gone well! Does it feel & look like fall in your area? The leaves are changing fast & some have already lost their leaves. A cold front is blowing through now & I think temps may be falling into the 30's tonight. 

I think this little gnome already has full winter where he lives. This scene isn't hard to do..I just had to sit & think a bit on exactly what was going where in order to determine the order I needed to stamp everything. I really didn't have to mask anything except the tree trunk on the left. 
After coloring everything, I thought it looked a little empty on the right, so I stamped, colored & fussy cut the Christmas tree, cut a slit & inserted the trunk. I added some stickles to areas of the snow, mountains & trees for some sparkle on the snow.
Here's the inside & below it are the Copics I used.

Thanks so much for stopping by! Have a great weekend!


Supplies:
paper: X-Press It white, Staples 110# white
ink:  Memento tuxedo black
accessories: Copic markers, Rubbernecker stitched rectangles & marquee dies, stickles, Misti


Read more...

Blog Archive

StatCounter

  © Blogger templates Palm by Ourblogtemplates.com 2008

Back to TOP