Blog Widget by LinkWithin
Showing posts with label Canvas Bag. Show all posts

Poppies....

>> Wednesday, March 30, 2011

Remember the bags that DRS has recently added to their website? Here's another way to decorate your bags...

Images by DRS Designs...


I used the girl swirl for my flower stem and added some burnt silk flowers with pearl centers.

I hope you've decided to try out these cool bags...I know you wont be disappointed with what you create with them.

Thanks for checking in...
See you soon...

Read more...

Three Chicks

>> Tuesday, March 29, 2011

Hi Everyone,

I showed this card off on my blog a few weeks ago, but I thought I would post it here, since it's what inspired me in the decorating of my canvas bag on today's post here at DRS Designs.  The card is pretty self explanatory, but I love it because of that darling little chick!  How can you not love that face? lol. 


Since I loved the card, why not use the idea for a matching gift bag?  I stamped the chick on adhesive backed felt and then cut them out.  I stamped the bag with the grass, chicks and sentiment and then adhered the chicks to the bag, just as if I were paper piecing them.  A few beads tied on to the drawstring finished this off.  Here are the links to the DRS Designs stamps I used:


Where can you get these canvas bags?  Well, right here of course.  At DRS Designs!

Have a great day :)

Read more...

Spring Time Canvas Bag

>> Tuesday, March 22, 2011

Hi Everyone!

I'm so happy to be able to share my sweet spring time bag I made using one of the canvas bags that are for sale in the DRS Designs store.  These bags are the perfect size for treats or small gifts.  Heck, after decorating the little bag, it too becomes a gift :)

I used the Woven Plaid stamp and created the background using a light blue ink.  I then used the Single Fall Tree stamp, stamping right on top of the background in brown.  The tree needed some leaves and blooms since it's spring, so I chose some pink and green buttons and sewed them on by hand.  I also sewed on some lace along the top, just by hand, and it gathers itself when the drawstring is pulled shut.

A couple of rows of half pearls finished the bottom. I'm so pleased to have unique packaging for my niece's Easter gift this year.

What will you make with your canvas bags?  Pick some up at DRS Designs today.  And, if you love a great challenge, DRS Designs is the sponsor of the Forever Friends Challenge that runs until April 3rd.  If you participate, you have a chance at winning a $10.00 voucher to the DRS Designs store!

Have a good one :)

Read more...

Luck of the Irish!

>> Wednesday, March 16, 2011

Hi There...have you checked out the newest addition to the DRS Designs online store? They have these nifty bags for sale now! If you are a long time online/catalog/Rubber Mania Monthly customer, you already know about these bags, because you used to receive some of your stamp purchases in them. Well, DRS has decided to sell these bags for you to get crafty with. All the DRS designers have been busy at work to provide you with ideas on how to use these bags. Check out my idea below and check back in some older post AND look for ideas in upcoming posts.

I used the new celtic knot image on my project...


I stamped the image in forest green staz-on ink. I added a button and jewel in the button center. I added green ribbon in the same "channel" as the pull string that came with the bag. Some beads dressed up the ribbon ends. The bag is filled with lucky gold coins, just in time for St. Patricks Day!!!

Thanks for checking in...
See you soon...

Read more...

Working On Canvas!

>> Monday, March 14, 2011

In our recent package of goodies from DRS Designs the DT was given a challenge. Each member was given several cute canvas bags to stamp up. Talk about a challenge!! It took me about two weeks to get the courage to start thinking out of my comfort zone-anything but a card and my brain has a tendency to freeze up and my creative mojo goes elsewhere! Considering the size of these bags, they are not too much different than working on a card front-they measure approx. 6.5" x 5" when completely flat and have a drawn string closure. Once I put my mind to it however, the ideas came to me rather easy.
I then took the plunge to see what I could come up with.


This fun, St. Patrick's Day goodie bag was the outcome of my first brainstorm attempt. I began by first stamping Sean and the Rainbow (L521) with Momento ink and coloring it very lightly with Copic Markers.  Next, I stamped the One Line St. Pats Day Greeting (636D) below the image and then stamped the Shamrock Background (326H) all over to fill the empty space with SU! Handsome Hunter ink.  Since there's always a pot of gold at the end of the rainbow, I thought it would be fun to fill my bag with chocolate gold coins, and besides, who doesn't love chocolate!?!!?
I was so happy with the result that I created a matching card to go with it.  

What would you create with these fun canvas bags?


Smiles,
Jennifer

Read more...

Irish Coin Bag

>> Friday, March 11, 2011

Happy Friday!

Have y'all seen these terrific little canvas bags on the DRS Designs site? This is what I did with one. I thought it would make a great little bag to put these gold wrapped chocolate coins in for St. Patrick's Day. I wanted the coins to show through, so after opening one of the seams, I used a square die to cut the window in the front. The shamrock circle was stamped and colored w/ pencils on the cut out square, then I used two circle dies to cut the wreath out.

The gold mesh was stitched around the edges to a piece of acetate then the circle was stitched on top. I stitched the mesh onto the open square along with the narrow gold ribbon around the edge. The Celtic knots, shamrocks and greeting were also stamped and colored around the front. After stitching the side seam back up, all that was left was to add a little charm and bow and fill it w/ the gold coins.

If you haven't seen these little bags, head on over to the DRS Designs site and grab some. They are so much fun!
Thanks so much for stopping by!


Supplies for Canvas Bag:
stamps:
Shamrock Circle, Celtic Knot, One Line St. Pat's Greeting, Four Leaf Clover, Clover Sprig
ink: Ancient Page coal
accessories: Canvas Bags, acetate, gold mesh fabric, Prismacolor pencils. sewing machine, narrow gold ribbon, charm

Read more...

If you've ordered...

>> Sunday, February 15, 2009

posted by Cathy...

from DRS Designs, chances are you have received your order in one of these bags...


Aren't they cool? Did you happen to save your bag or were you so excited to get your new stamps did you rip it open and then think later, gee...I probably should have saved that. Most stampers (it's ok to admit it!) save all kinds of packaging, etc either to copy the template and/or use whatever has been save in another way. We are the best recyclers on the planet!!! Anyway...getting to my point...if you have saved your bag (you can always place another order to get another one if you didn't!) here's an idea of something you can do with it!!
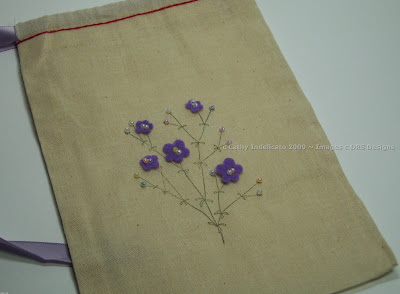


This is one of the easiest, quickest, prettiest, thoughtfulest (is that a word?) gift you can make...I see lots of teacher/Mother's Day gifts in my future!!!

I simply stamped the delicate flower background image in olive green staz-on ink and then used one of my cuttlebug dies (you could also use tiny primas or sequin flowers) to cut some tiny flowers from felt. I grabbed my container of pastel seed beads and stitched two beads into the center of each flower. (Click on the photos for a closer view) I caught an edge on each flower to keep it attached to the bag. I then stitched a bead on every bud in the image. Since I wanted a pretty ribbon rather than the string that the bag came with, I pulled it out and then ran some satin ribbon in the same holes. I did cut them a little on each side to accommodate the width of my ribbon but otherwise the ribbon slid through much easier than I thought it would.

After my bag was all prettied up, I added some potpourri and tied the ends of my ribbon. I added a couple of clear pony beads to dress up the ends and then added a tag. The hearts are from a large sizzix die and the sentiment is a newer release from DRS. I attached it to the ribbon with a little safety pin.


Very quick, very easy, very pretty and very inexpensive! I hope this inspires you to use some of those items you've been recycling!

Thanks for checking in...if this inspires you to do something with your bags, be sure to stop back and post a link to your creation...I might need some other ideas for all those teachers my girls have!!!

See you soon...

Read more...

Blog Archive

StatCounter

  © Blogger templates Palm by Ourblogtemplates.com 2008

Back to TOP