Blog Widget by LinkWithin
Showing posts with label Ornaments. Show all posts

Christmas Ornaments in July

>> Wednesday, July 5, 2023

Hello Crafty Friends.  I always love a bit of Christmas in July - can you believe we are over halfway to Christmas now?


I got the idea for this card after looking at THIS picture and THIS card.  I loved the idea of a plaid poinsettia and having folliage in the background.  

To make the flower, I used a stencil and some black ink to make the plaid, stamped the GIANT POINSETTIA image twice, fussy cut it, glued some Dazzling Diamonds (SU!) to the edges, and then added some crystal beads covered in gold glitter to the middle.  I sponged over the background after embossing with Pine ink from Close to My Heart and set the poinsettia on a label die cut decorated with Gold Stickles.  My grandson said it needed something in the "bare" spots so I stamped the TRIPLE HANGING CHRISTMAS ORNAMENTS and used one on the left and the hanger from one on my punched circle I had laying on my counter.  Both were outlined in Gold Stickles. To finish it all off, I used part of the MERRY CHRISTMAS TO ALL greeting (I love the font on that stamp). 

Now I have one more Christmas card done!

Hope you are having a lovely week.

Hugz

Nancy


Read more...

Merry Christmas Frosty

>> Tuesday, December 22, 2020

Hi Everyone,


Here's a look at the one paper crafted holiday item I made this year.  I was working on things over the summer for my niece's wedding and I made this rosette out of white paper.  It didn't work out for my favors, so I added some winter elements and made this ornament for the tree.


The rosette base was made from 2 strips of paper measuring 2" x 12", and scored every 1/4".  It was then border punched along one side, folded accordion style and hot glued together.   I stamped, colored and fussy cut the Medium Mr. Snowman image, attaching him to a few die cut and embossed circles of matching paper.  The word Frosty came from the Winter Wonder Words Greeting stamp.


And on the back I used the Snowman Especially for You stamp.


For my Christmas dinner, it will once again just be the 4 of us, so I copied myself and made the same favors I did in this Thanksgiving post, just using peppermint flavored chocolates and these stamps:


However you're celebrating this year, I'm wishing you a Happy Christmas!

Cheers!
Karin


Read more...

Thanksgiving & Christmas

>> Sunday, October 25, 2020


I am being sucked in to the world of gnomes. This cute TREE HOME GNOME - 836M is perfect for holiday cards and the new TINY GNOME FOR THE HOLIDAYS GREETING - 174A sentiment pairs great with the image for holiday cards. 

I stamped the SIMPLE CHRISTMAS ORNAMENT - 491K masking off the shine from the ornament. Next I created a mask for the ornament and stamped the Tree Home Gnome inside the ornament. I added the Tiny Gnome for the Holidays greeting and colored the image with copics.

I added the MERRY CHRISTMAS ARC - 102E and a hand drawn string from the arc to the ornament.

I finished off the image with stickles on the snow and the ribbon on the ornament.

This card was so much fun to create using a few different images you can include the many fun fall and thanksgiving feeling in a card. I stamped the OPEN LEAF - 584D, the LAID OUT SCARECROW - 024G and the PUMPKIN PILE - 781H images and colored them with copics. Then I cut them down to 1 inch squares and layered.

I then stamped the 1 LINE HAPPY THANKSGIVING - 841D sentiment and cut the banner.

I embossed a leaf emboss folder and finished off with a pie button from my stash.

Thank you for stopping by to check out my cards.

Read more...

Happy Anniversary to us!

>> Thursday, December 26, 2019

Good morning!
Yes, I know, it's after Christmas but hey, I need some for next year!
I paper pieced the silver star and the whole bottom ornament plus each ornament hanger.


Well, my husband and I will be married 37 years on December 31st
so, this card is our happy anniversary card (even though I don't drink champagne)
But this card would be great for a Happy New Year card as well just change the 
sentiment.

I used some shimmer on the bubbles and some gloss with shimmer
on the bottle.
I used a stencil for the table.

Thanks for visiting today!
Robin


Read more...

Merry Christmas Eve!

>> Monday, December 24, 2018


 Merry Christmas Eve!! I hope you have a wonderful Christmas!  I have a couple of things to share with you today. First are some ornaments I created for gifts for friends at church. I found these ornament frames at Hobby Lobby and thought they'd work perfectly. I die cut some circles, sponged on the sky and ground areas and then added some Sakura Gelly Roll silver dots for stars. The nativity is die cut using an IO set. The Merry Christmas greeting was stamped with Versafine Onyx ink. I really like how these turned out.

Next is a card featuring the new All in 1 Christmas Village. It was stamped with Memento Black ink, colored with Copics, die cut and then some Nuvo Blizzard drops were added for the snowy roofs, etc.
The greeting was also stamped with Versafine Onyx ink.


Inside I stamped the greeting and a single house which I colored  with Copics.


Have a blessed Christmas!

shelia

Read more...

Hanging Ornaments

>> Friday, December 22, 2017

Welcome!

As Christmas gets closer and closer my card making gets quicker and quicker!


I started my card by stamping the Triple Hanging Ornaments on white and coloring them with markers and layering it on some festive green cs.  My plaid was created by using our Woven Plaid and using a variation of this Tutorial using red and green inks and layering it on white.  Both panels were attached to a folded red card and added the Happy Holiday Greeting using versamark ink and white ep.

Thanks for stopping by!
Sue

Read more...

Come Let Us Adore Him

>> Saturday, December 9, 2017

Good morning!

Today I have two Nativity cards for you today.  This first card uses DRS stamp: 
Adore Him 246F and a die from Cottage Cutz.  
the base for this easel card is a Curved Square die from Spellbinders and the silver filigree die is also from Spellbinders.
The point is stopped at the metallic silver bow to keep the card open.


I have also used dies from Spellbinders and poinsettia and star die from Memory box.
Another version using Nativity Ornament 526K


Hope you enjoy these cards!
Thanks for visiting today!
Robin

Read more...

Peace and Joyful Christmas

>> Thursday, November 2, 2017

Welcome!

Now that Halloween is over (it is lingering a bit with leftover candy :) I'm ready to get moving on all things Christmas - and what better way to start than with Christmas cards!  Check out these New Christmas Stamps on the DRS Designs website!


My card today features one of them - Wishing you Peace and Joy.  I stamped it using black ink on red paper and cut into a rectangle and then lopped off all the corners with my trimmer.  I layered it on green card stock and did the same thing.  The white bow was made with plain white card stock and a bow die cut.  My white layer was stamped with our Ornaments Galore image using black ink, colored and layered on black.  My green folded card was stamped with our Polka Dot background and black ink.

Thanks so much for stopping by!!
Sue

Read more...

Challenge #251 - HOT TRENDS- Trash to Treasure!

>> Thursday, November 3, 2016

Welcome to the DRS Thursday Challenge!

First, the Winner from the Random Drawing....


Teresa 

Congrats, you are the winner from our Masking Challenge!  
Please contact us at info@drsdesigns.com to claim your prize. 


 This week's challenge is a total makeover...
From Trash to Treasure!

 (use any image, any technique, any die cut.. but be sure to include or use something you'd normally throw away..think acetate packaging, ribbons, flowers, papers, magazines, etc..


To enter, show us your card  by linking it below & please be sure to link back to us. The deadline for this challenge is Wednesday, November 9, at 6:30 pm ET and please link new creations only (no back dated or duplicate entries). Be sure to let us know what you repurposed. We are now limiting the number of entries to 3 per personChallenge entries don't have to use DRS Designs stamps, but if you use them on your challenge card, you'll get an extra entry into the prize drawing.
From all of the entries we receive, one lucky winner will be chosen to receive a 50% off coupon to the DRS Designs store!
Here are some repurposed wonders from our talented DRS Design Team and we'd love for you to leave us a comment!

Shelia - recycled acetate and silver twine


Robin  recycled Acetate package

Nancy - recycled acetate packaging and corrugated cardboard


Karin (Recycled mesh bag from onions)

Julie
(embossed recycled acetate packaging & paint chip)


( ziplock bag)


~~~~~~~~~~~~~~~~~~~~~~~~~~~~~~~~~~

Read more...

Challenge #248 - National Navy Day!

>> Thursday, October 13, 2016

Welcome to the DRS Thursday Challenge!

First, the Winner from the Random Drawing....
Congrats, you are the winner from our Stamp Your Own Background Challenge!  
 Please contact us at info@drsdesigns.com to claim your prize. 

This week's challenge celebrates the birthday of the US Navy...
Nat'l Navy Day!

 (use any image, die cut, punch, technique, but in honor of the Navy, either use a nautical image and/or the color Navy! Think anchors, ships, water, flags, etc..)


To enter, show us your card  by linking it below and please remember to link back to us. The deadline for this challenge is Wednesday, October 19 at 6:30 pm ET and please link new creations only (no back dated or duplicate entries)We are now limiting the number of entries to 3 per personChallenge entries don't have to use DRS Designs stamps, but if you use them on your challenge card, you'll get an extra entry into the prize drawing.
From all of the entries we receive, one lucky winner will be chosen to receive a 50% off coupon to the DRS Designs store! Wow!!

Here are the Navy Day cards from our talented DRS Design Team and we'd love for you to leave us a comment!


Julie


Janett

Nancy


~~~~~~~~~~~~~~~~~~~~~~~~~~~~~~~~

Read more...

One More Tag!

>> Wednesday, December 9, 2015

The DRS Designs Tag Challenge is still going on until tonight so I thought I would make one more tag. 

 
When I do the wrinkle-free distress technique, I like to use the ink one more time and get a little bit lighter paper.  The first tag I made for the challenge is with the darker ink and this is the color I achieved when I misted the left over ink.  After my paper dried, I stamped these images and sentiments:
 
 
Off to make a few more Christmas tags!
 
Hugz


Read more...

Marbled Ornament

>> Friday, December 4, 2015

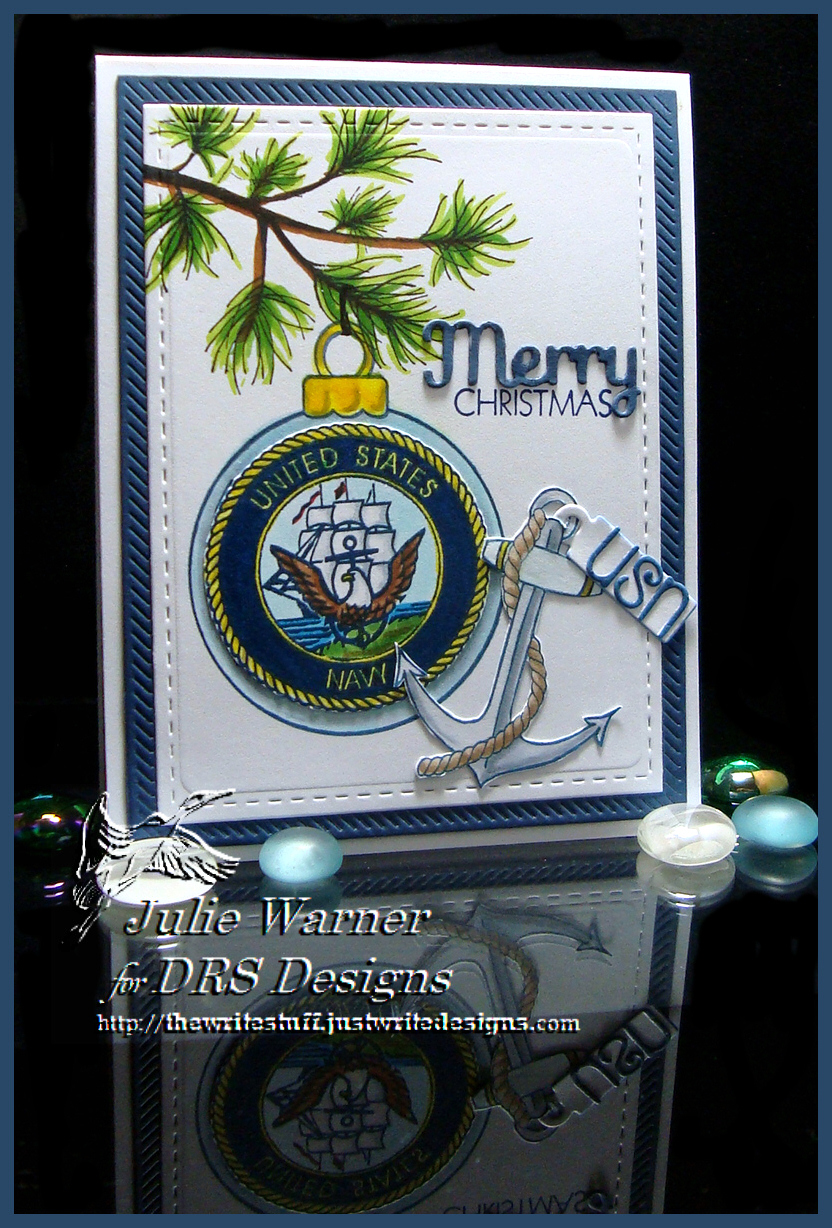
by Julie Warner - The Write Stuff

Happy Friday!
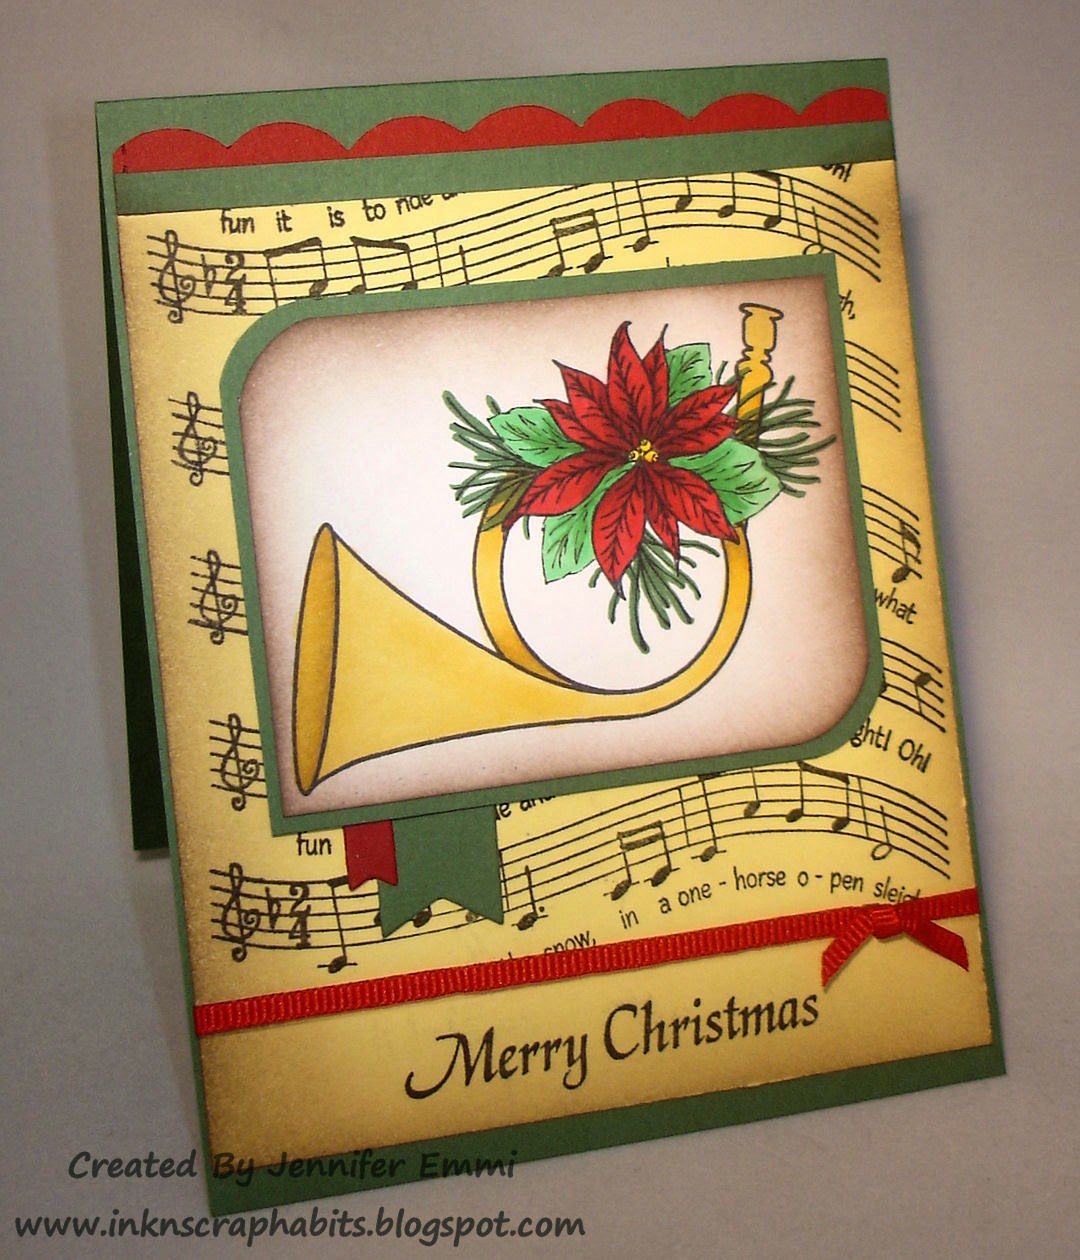
I hope your week has gone well! My card today was one of a series of experiments I tried using this wonderful ornament image. Yesterday's tag card was another & done almost the same way. For this version, I stamped the ornament on water color paper then took a gold gel pen and drew squiggly lines across it to imitate marbling. Then I wet areas of the ornament. From experience I knew the water would make the gold gel pen run & that's what I wanted. I added reds & bright pinks on one side then dried it w/ a heat gun. Then I did the yellows, blue & greens on the other side & dried it. The gold from the gel pen added a wonderful little bit of gold glitter across the ornament. I fussy cut it then covered it w/ clear embossing powder & heated it. I did this twice so it's really glossy.
The red, lime & gold pieces were all scraps that I either embossed, die cut or used as is. The little reddish drops are some I made using another ornament experiment. I used 3 or 4 coats of embossing powder then heated it & tilted it until the melted ep dripped onto a craft sheet. They formed these perfect little round "dew drops" so I glued them on as berries & embellishments. 

Thanks so much for stopping by! Have a great weekend!
Supplies:
paper: water color, lime, red, grass green, gold
ink: Versafine onyx, Versamark
accessories: Peerless water colors, gold gel pen, clear embossing powder, baker's twine, pine branch corners embossing folder (Darice), holly die (Sizzix), Spellbinders labels 16 die, stitched rectangles die, paper crimper

Read more...

Challenge #203 - HOT TRENDS- Tags!

>> Thursday, December 3, 2015

Welcome to DRS Challenge Thursday! 
First, our random winner from last week's challenge is....
Rae Ann  

Congratulations! You are the winner from our Holidays Challenge! 

Please send an email to info@drsdesigns.com to claim your prize.

This week we're using the HOT TREND of 
Tags!

(use any image, die cut, technique, embossing folder..but either make it a tag or put a tag on your project)

To enter, show us your card  by linking it below and we'd love for you to leave us a comment.  The deadline for this challenge is Wednesday, December 9, at 6:30 pm ET and please link new creations only (no back dated entires). Challenge entries don't have to use DRS Designs stamps, but if you use them on your challenge card, you'll get an extra entry into the prize drawing.

From all of the entries we receive, one lucky winner will be chosen to receive a $10 store voucher to DRS Designs!

And here are some heavy metal cards from our talented Design Team and we'd love for you leave us a comment!

Julie

Nancy

Shelia


~~~~~~~~~~~~~~~~~~~~~~~~~~~~~~~~~~~~~~~~~~~~

Read more...

Penguin Ornament

>> Tuesday, September 1, 2015

Hi Everyone,

For today's card, I used the recently released Simple Christmas Ornament as my feature item.  It's a great size that works perfectly on a card front, is great to color using a special technique, and can also fit any number of stamps inside of it. So many possibilities!

I chose this cute Percy Penguin stamp for inside and stamped and colored  my Simple Berry Branches  for my background.  


After I fussy cut my ornament, I didn't have the patience to wait for the glossy glaze to dry, so I skipped that and embossed the entire thing with some clear powder instead.  I attached it to my card with some dimensional tape and added a matching bow.

The tiny sentiment came from the Christmas Multi Greeting stamp.  I only inked up that one portion of the stamp and punched it out, adding it with some dimensional tape as well.

Thanks for stopping by!
Karin

Read more...

It's Beginning to Look a Lot Like Christmas!

>> Monday, August 31, 2015

Today we thought we'd show you a little Christmas card recap..since Shelia is on vacation (& we're sure she's having a wonderful time!), we have some beautiful Christmas cards using this month's new images as well as some older favorites. Sit back & enjoy the show!
Shelia

Nancy
Robin
Janett
Sue
Jennifer
Karin
Julie

Shelia
Janett

Robin
Jennifer
Sue
Karin
Nancy

Julie

It's not too early to start your Christmas cards! Plenty of ideas to get you going, right here. If you'd like more ideas, just click the "Holidays-Christmas" category over on the left side bar. Or just click HERE (I've linked it for you).

Have a great week!


Read more...

Blog Archive

StatCounter

  © Blogger templates Palm by Ourblogtemplates.com 2008

Back to TOP