Blog Widget by LinkWithin
Showing posts with label Tutorials. Show all posts

Cute as a Button with a Tutorial

>> Monday, March 27, 2023


For my card today I thought I would have a little fun with it. I had never tried the Basket Weave and thought I would give it a try. It is so easy and a great way to add a little interest to your cards with no extra tools needed besides scissors. I used the tutorial on splitcoaststampers.com HERE.

One thing I did that made it a bit easier is when I folded the weave, I used my scoreboard to score the pieces. This helped to keep the cardstock from tearing while I was folding them.

For the rest of the card:

I hope you give the Basket Weave a try. It is very easy and really adds a lot of fun to a card. Thank you so much for stopping by to check out my card this week.

Read more...

Life is Better...Tutorial

>> Monday, March 20, 2023


Have you ever tried using just parts of your sentiment stamps just to get one word placed on the card in a different layout? Today I have a peek at how I move around words on my cards without cutting apart my sentiments. 

  • To start off I stamped the boots from 4 IN 1 COWBOY GEAR - 697M on white card stock and colored them with copics.
  • I then use a piece of acetate and my stamp platform to line up my words where I want them on my card. I used the BETTER IN COWBOY BOOTS GREETING - 236D on this card.
  • First, I lined up the Life is better alongside the left of the boots. I stamp the sentiment in full on the acetate sheet and then move my card where I want that portion of the sentiment. Once it is lined up, I use masking or scrap paper to cover my card where the other words would be stamped so that my stamp will only stamp on the card stock just the words I want stamped in that location.
  • After stamping the Life is better portion, I move my cardstock to where I want the next portion of the sentiment. On this card I stamped in Cowboy in the next location. 
  • I then masked on my card where the Life is better and the word Boots so that my card would only have just the words in Cowboy stamped.
  • I then moved the card around again so that I could line up Boots where I wanted it on the card. As you can see on my card, the BOOTS is way down at the bottom. I was thankful it still fit. But it just shows you that you can be creative when stamping to move around just portions of the sentiments.

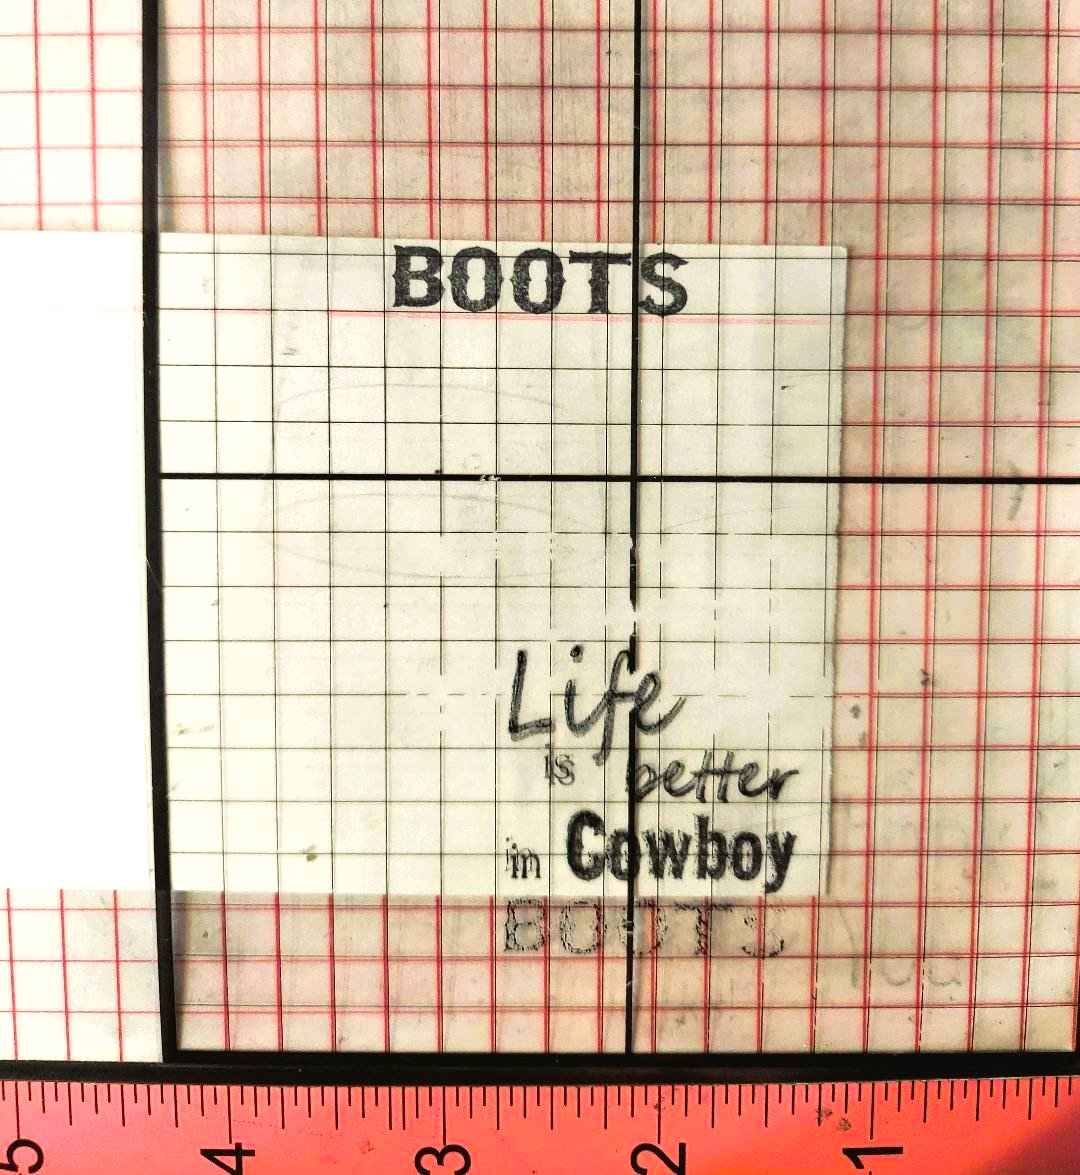
Here is a picture of my stamping platform, my acetate, my masking paper and the sentiment so you can get a better idea of the description on how I move around my sentiments on my card and get just a portion.


As you can see on my white paper, the word BOOTS at the top was stamped. This is my scrap paper, and I used this paper to help cover up my card stock. This image is the final stamping. I was working to line up the word boots so that I could stamp it in the final spot on my card and I am masking the Life is better in Cowboy portion of the stamp.

If you have a stamping platform and acetate, I hope you give this a try. It lets you use just portions of your stamps to place words wherever you want on your cards.


I also created a tutorial con my blog called Moving Around Your Sentiment.


Thank you for stopping by to check out my card this week and reading up on how I use just portions of my sentiment stamps on my cards.


Read more...

Year Calendar 2021

>> Thursday, November 26, 2020


Good morning and Happy Thanksgiving!
I've made a year calendar for 2021 out of 6 coasters and the Sticky Note Calendar
For January I used cold colors and images and I did the same for each month(I'll show you a few) using stamps and colors to best suit the month.
I'll give further instructions at the end.

Stamps used on January: Tiny Snowman, Icicles, and Snow Background

Stamps used on February: Heart Drops

Stamps used on March: Shamrock Swag


Stamps used for June: Graduation Background, Tassel
When you finish with June you turn the whole thing around and it starts up again at July.

Stamp used for July: Star Streamers

Stamps used for November: 4 in 1 Harvest Designs, Thanks Be To God

For the stand I made 1 panel 4 1/2" X 10 1/2" then scored at 5 1/4"
To keep the stand in standing position I added another panel 4 1/4 X 4 1/4" scored at 5/8", 2 1/8",  and 3 5/8".  Glue the 2 5/8" end tabs to the inside of the bottom of the 4 1/2" X 5 1/4" front and the same for the back.  the center score folds up into stand when mailing.
I then made a white stamped front and back (the same) measuring 4 1/8" X 4 7/8" and a blue mat just slightly larger than the white stamped panel but smaller than the outside measuring 4 1/4" X 5".  Before gluing the panels onto your stand/calendar holder, punch or die cut holes as 3 layers are hard to do.  Make sure to re-punch after each addition of the layers.  I made the calendar holder's holes larger than the coaster calendar pages for ease of turning over to use other side.
The stamps I used on the holder are: Interlocking Stars and Picture Perfect Day
So obviously I stamped the Calendar 12 times onto twelve 3 1/2" X 3 1/2" white panels to cover the 6 coasters (I used my Misti to make the process really quick).  Then decided on stamps to not only go with the month but also to fit the space.  After stamping and coloring I used them to the coasters and used a screw Punch to make my holes at the top.  I printed off the month names from my computer then glued them on.  The numbers were hand written so of course you can make this calendar for any year.
I found the calendar stand tutorial at SplitCoastStampers and just altered it to better suit this design.
The last thing I did was to add enamel dots to the header on each month and mark special occasion days in some way using my markers.
I hope you like this idea and try it yourself to give as gifts.
Thanks for visiting!
Robin


Read more...

Floor and Wall Tutorial

>> Saturday, June 16, 2018

Welcome!

I recently did a "make n take" at a stamp show that I thought I'd share with you :)

I used 4 of our stamps to create this card:

Country Window

Spring Crocus

The Floor

Brick Wall

a few masks and a bunch of coloring :)

Once the masks were made, total stamping time is less than 5 minutes!


 Step 1 - Stamp window and tulip bucket


Step 2 - Cover both with masks


Step 3 - Stamp floor image on top of tulip bucket mask


Step 4 - Mask floor


Step 5 - Stamp brick wall slightly overlapping floor mask


Step 6 - Finish stamping brick wall.


Step 7 - Dab dark grey, black and red inks on bricks


Step 7 - Remove masks and start coloring (I did all the cement grout a medium grey)!


Thanks so much for stopping by!
Sue

Read more...

June Wedding?

>> Thursday, April 26, 2018

Good morning!

Today I've done some wedding/anniversary cards, very simple
 barely any coloring.  I used a silver color pencil and 
some Zest-it to blend.
Below I have a picture tutorial of how to make this easel card.


The dies on both cards are from Spellbinders.


I used some gold Twinkling H2Os to put just a bit of color on the flowers.

Make the usual 4 1/4 X 5 1/2 (A2) card base then score the top again at 2 1/8".
Place a die that will fit, without going to the edges of the 4 1/4 X 5 1/2 top.  The middle of the die should be on the score line at 2 1/8" and place the cutting plate right at the score line as shown below.


This will ensure that the die only cuts to the score line.

The rest is self explanatory just looking at the
photos below.
Fold on score line to a mountain.
The last thing to remember on any easel card is to make a "stop" 
on the inside by popping something up, a layer, flower or anything like that.
On my cards above I have a popped up layer.  The "stop" should be at 
about the half way mark so that the front of the card stands up properly.

Thanks for visiting today!
Robin


Read more...

Brewing Up A Scary Halloween!

>> Saturday, August 26, 2017

Good morning!

This first card I thought I'd make a sort of background with make October 31st Square 306F.  Each square is raised up with foam tape. The other stamps used: Trick or Treaters Last Stop 277L and Vertical Happy Halloween 538D. I made my sky and eerie green and there is fog rising up from the ground where the kids are walking and around the house on the hill.  My moon looks a bit Tim Burton'ish.
The rectangle dies with the fun stitching is new for me from Memory Box.  I also used square stitched dies and Rectangle stitched dies from MFTs.   The Web embossing folder is from Taylored Expressions.

PS. My daughter's birthday is Oct. 31st! Ha! I did not think that was very funny when it happened but I've grown used to it over the years!  You should have heard me pleading to her NOT to come out yet!!!  Wait till Nov. 1st PLEASE!
She did not listen to her mamma!  She will be 40 this year, yikes!


This next card is using the Bubbling Beaker 253F, Brewing Halloween Greeting 308F and Magic Potion Shelf 537H. I've used the Memory Box stitched dies again and MFTs dies.  I fussy cut the Beaker to sit on the purple raised frame.
I put some Crystal Stickles on the bubbles that have come up out of the "liquid" just to give them a bit of sparkle (because they are magic of course).
On the long turquoise rectangle I did a bit of re-sizing with my die because normally it is not long and narrow like this. This technique works best with rectangle and square dies that have only one stitch line as you have to move the die and match up cut and stitch lines but in this case I used the largest die making it so that I could cut off the ends (which could not match up because of the irregular stitch lines).


Adjusting the size is really easier to do than it may look.
Below is one I did as a tutorial on my blog, it is making a die longer here.
To elongate a rectangle, place the top plate of your cutting sandwich just to but not covering the bottom horizontal cut (the die will ONLY cut where the top plate is), then, after your first cut, take the die out and place it on the cut but further down and place the top plate so that it cuts only the extra length and not across the horizontal top. 

 You can see the top plate does NOT go over the end.  I use removable tape to hold my die in place.
This can be done to make it narrower as well, just use the same technique.

Thanks for visiting today!
Robin

Read more...

Birthday Tile

>> Friday, March 20, 2015

by Julie Warner - The Write Stuff

Happy Friday!
I hope your week has gone well! Today I have a birthday card to show you. This faux tile background was actually made a while back and I came across it the other day and figured it was time to put it to good use. The tile background is actually pretty easy to do and I have a couple of tutorials on how it's done..the first one was on my blog, then Splitcoast asked me to do one for them. Here's the one on my blog: Faux Tile Background and here's the one on Splitcoast: Delft Tile Tutorial (and yes, that's actually me talking on the video). They are basically the same so please check them out if you want to see how I did it. 

So after attaching my background to my 4.25 x 5.50 card, I stamped the larger branch on a die cut piece of white card stock using the same rainbow ink pad then die cut a larger fancy label out of vellum. The greeting was stamped on the vellum and I matched up where the branch was underneath and stamped it again on the vellum. I added a few fussy cut butterflies here & there to finish it.
Thanks so much for stopping by! Have a great weekend! Be sure to check out the DRS Thursday Challenge...this week an Inspired by Color Challenge! There's a nice prize involved for one lucky winner!
Supplies:
paper: white, vellum
ink: Kaleidacolor Riviera, Memento tuxedo black
accessories: Scor-It board, Spellbinders labels 28 & decorative labels 28

Read more...

Stained Glass Candle

>> Friday, November 1, 2013

by Julie Warner - The Write Stuff

Happy Friday!
Did you make it through Halloween without having a sugar overload? Or the dreaded sugar coma after the kiddos come down from climbing the walls? When I was a kid, I remember my dad saying he had to go thru all our candy to "check it". Ok, do what you gotta do. But...it didn't take long for us to catch on. He was actually pulling out all the really good stuff and claiming he had to make sure it was alright by tasting it. Yeah...right! Soon all we were left with was the bubble gum (my sis had braces, so that was out for her) and stuff we really didn't like, lol.

Anyway, glad Halloween is over and I don't much candy left over. On my card today, I'm using this really wonderful candle image. I just love it! I thought it would look really nice w/ an opening behind it and the stained glass stamped on top. Logically, the stained glass should show thru the glass of the Hurricane lamp, but y'all will have to overlook that one. It was getting late and that was a bit too much to do. Especially since I already did a special "into the window" treatment. It's a lot like "out of the box" but it goes into the cut out instead of out of it. After stamping the image, I lightly penciled in the shape of the oval opening I wanted to die cut. Then I cut around the parts that I needed to have on top of the die to keep from cutting them off and I inserted the oval die as shown.
It's just a rough cut around the candle now...I'll trim it after I die cut the oval. 
This is how it looks with the bottom of the die inserted under the bottom of the image. All ready to die cut now.
Die cutting and embossing all finished! Now I'll trim it and color the image. The stained glass image was gold embossed on a piece of dk purple shaving cream background I made ages ago. I liked the contrast of the dk purple behind the candle. The greeting was stamped below and my finished card is 4.25 x 5.50. These are the Copics I used to color it.
Thanks so much for stopping by! Have a great weekend!
Supplies:
paper: Neenah white, dk purple
ink: Memento tuxedo black, Tsukineko ultimate metallic gold pigment
accessories: Copic markers, Spellbinders petite oval die, gold embossing powder, shaving cream & reinkers (for shaving cream background)


Read more...

Splish Splash & a Mini Tutorial

>> Friday, July 6, 2012

by Julie Warner - The Write Stuff

Julie Warner - justwritedesigns - The Write Stuff
Happy Friday!
I hope y'all had a terrific Independence Day holiday! The weekend is almost here so keep on celebrating! Today I'd like share a card and a quick little mini tutorial. I'm using a couple of new images, Happy Seal and Splish Splash along with this cute pair, Otters (they look a lot like seals, don't they?). The otters and seals were stamped on white c/s and the seals were cut out. For the bubble frame, I decided where to put the circles in the turquoise c/s and die cut them. Then I stamped the sentiment. Now this is where the mini tutorial comes in. I wanted to use an embossing folder on the turquoise but I also wanted to NOT emboss the sentiment. In case you've ever wanted to do this and don't know how, here's the skinny on the technique.
First, place the card stock you want to emboss in the folder the way you want it, but don't emboss yet.
Next, take two pieces of cardboard (I'm using a cereal box) and die cut the size opening you need to fit around your sentiment... it can be any shape, mine just happens to be a circle. Make sure to try and line these up in the same place on both so that the cardboard will cover everything except the area around the sentiment (or where you want the blank spot).
Line up and stack your 2 pieces of cardboard on top of each other and position them as shown on top of the closed embossing folder, so that only the sentiment shows through. You shouldn't be able to see anything else. Run this sandwich through your embossing machine. Note: I use an original Sizzix so I went with 2 pieces of cardboard. If you use a different machine, you may be able to only use 1 piece. Try it and see :)
Success! Here is my turquoise card stock, just the way I wanted.
A little close up of the finished card. After I embossed, I used a blue rainbow ink pad and a white pigment pad and sponged on a little more color in bands. Then I placed it over the background w/ the otters and positioned my cut out seals in the upper circle. The finished card is 5.50 x 4.25.

Thanks so much for stopping by! Have a great weekend!


Supplies:
paper: white, turquoise
ink: Ancient Page coal, Kaleidacolor blue breeze, Colorbox frost white pigment
accessories: Spellbinders circle dies, Cuttlebug tiny bubbles embossing folders, Tombow markers, white gel pen, tiny dew drops (aka: floral filler from craft store), cardboard

Read more...

Blog Archive

StatCounter

  © Blogger templates Palm by Ourblogtemplates.com 2008

Back to TOP