Blog Widget by LinkWithin

Thinking of You

>> Tuesday, April 30, 2013

 
Hi Everyone,
 
I have a simple "Thinking of You" card to share with you today.  It was made using the
Spring Crocus stamp which is perfect for spring time, since these little beauties are always the first ones to peek though the cold ground.  I colored the stamped image with Copics and die cut it, and then I stamped the background with the Easy Dot Background in yellow ink, using an edger die to cut the curve on the background panel.
 
 
The Flower and Vine Edger stamp fit right along the exposed bottom portion of my card, so that was stamped in a dark purple and then I embellished the flower centers with a dab of Stickles.
 
The Vertical Thinking of You greeting was cut in half to fit on either side of my card and I inked the edges in purple to help it stand out.
 
Thanks for stopping by!
Karin


Read more...

A Bright Mother's Day!!

>> Monday, April 29, 2013

Wow, can you believe it is the end of April?!! Mother's Day will soon be here! So I thought I'd share a card I made for Mother's Day.  I had my daughter in law in mind while creating this. She loves the color orange.


My card base is orange with a layer of bright yellow CS. On top of that is a white CS layer that was stamped with our new Chevron stamp in VersaFine orange ink. I used Copics to color the yellow chevrons. The main image was stamped in Memento Black ink on white CS, colored with Copics, die cut and layered on an orange scalloped circle. The butterfly was stamped and colored a second time, then fussy cut and glued on with a pop dot. The sentiment was stamped in black on white CS, die cut with a romantic rectangle die, sponged with the VersaFine orange ink while still in the die.The strip of yellow CS was punched with a scalloped border before attaching it to the card. A polka dotted orange ribbon was added to complete the look.  Hope you like it!

Thank you for stopping by today. Hope you have been able to play along in our challenge this week to use pastel colors on your card. 

Until next time,
shelia

Read more...

A Teacher Touches a Heart

>> Sunday, April 28, 2013


Hi all, hope you are enjoying your weekend. It will be the end of school soon and I made this card for my granddaughter’s teacher she has been very special this year and we want her to know how much she is appreciated.


I stamped the Teacher Tools and colored them with copic markers. This was layered onto brown card. The Teacher Touch a Heart Greeting and layer that the same way. This was layered onto red card that was sponged and stitched around the edge. A brown layer was added then everything was attached to a white card. I added a brass swirl to the image layer.

Have a wonderful day,

Janett

Read more...

Josephine needs a day off!

>> Saturday, April 27, 2013

Happy Saturday! Recently, I've experienced some days like this!  I hope I achieved the chewed restraints! I chose Josephine the Bold, the Chewing the Restraints greeting and the Argyle background. Some pink rhinestones to dress Joshephine up a bit! I had fun making this as I can relate to needing to chew through the restraints!

Pam

Read more...

Perfect Day

>> Friday, April 26, 2013

by Julie Warner - The Write Stuff

Happy Friday!
I hope your fine spring week has been going well. If your neighborhood is like mine, the sound of lawn mowers has been heard quite a bit this past week. With the spring temps and rain, it seems every man on the block has been revving up those Toros and Snappers and John Deeres. I'm sure it's fun and exciting now...but I can almost guarantee by mid summer, they'll be dreading it and a broken mower will seem like a good idea.

My card is pretty simple, just one layer. I started by stamping the fence w/ gray ink, masked the top and sponged in a few clouds and the sun. The lawn mower was stamped w/ black and the grass w/ several colors of green. Then I colored everything w/ Copics and added the sentiment and a little shading. The finished card is 4.25 x 5.50.

Thanks so much for stopping by! Have a great weekend!

Supplies:
stamps: Broken Mower Greeting, Brush Lawn Mower, Easy Grass Background, Add a Fence
paper: whtie
ink: Memento London Fog, Tuxedo Black, Cottage Ivy, Bamboo Leaves, Northern Pine, Cantaloupe, Summer Sky
accessories: Copic markers, black permapaque marker, white gel pen, bird punch

Read more...

Challenge #67 Pastels

>> Thursday, April 25, 2013

Welcome back to the weekly challenge here at DRS Designs! 

Please help me congratulate our newest winner, 

Chris Olsen!!
Thank you so much for participating in our blog challenge to show off some fancy Bows
Please contact us at info@drsdesigns.com to claim your prize.

Want to be a winner just like Chris? Then, I invite you to participate in this weeks challenge. The theme is 
"Pastels."
DRS Designs is giving away the following 3 stamps to one lucky winner:
Playful Pups (1110H)
Happy Tails To You Greeting (1106D)
Sit! Stay! Greeting (1120F)

I hope our DT has inspired you to create some fun cards this week! You can see their cards below.  Upload your challenge card by next Wednesday May 1st at 6pm EST to be eligible to win. We look forward to seeing your work!
Thanks for playing along and Good Luck!


Karin
Pam


___________


Read more...

Mother's Day Rose

>> Wednesday, April 24, 2013

DRS Designs is featuring the fun Argyle Background stamp (438P) this month and today's Mother's Day card shows you how it works! 


I first stamped the Argyle Background with black ink.  Then I used the Argyle Diamond (441A) to add color to it.  To do this, I first stamped the dark black diamonds using a dark pink ink and then I used a lighter pink ink to stamp the dotted diamonds on either side of the dark one. It's so easy, but I can understand if you need more examples.  Just click THIS LINK to view other posts on the DRS Designs Blog that feature the Argyle Background.

Here are few more details on the card seen above: 
The focal point is the Single Rose (774G).  I colored it with Copic Markers and then sponged pink ink around it while it was in a Nestability die.  (That's how I got the white frame around it.) I used the Mother's Day Greeting (783G) for the sentiment but split it up and put "Happy Mother's Day" on the banner below the image. A little layering and a border punch helped complete this layout. Finished card size is 4.25" x 5.5" 

Hope you enjoyed seeing it!
Have a great day!

Smiles,
Jennifer

Read more...

Mother's Day

>> Tuesday, April 23, 2013

Hi Everyone,
Well, I must say I feel on top of things regarding this holiday.  Not only do I have a Mother's Day card finished and ready to share with you today, but I actually have my mother-in-law's gift purchased and ready to give! Woo-hoo :)  I had a floral arrangement (silk, obviously) made for her coffee table.  It was something she asked for at Christmas, but I wasn't able to make it happen.  I'm famous for thinking, I gotta remember this idea for next time.  And of course I don't. The exception being now...However, I like to think this is a turning point, and a sign that I might be more organized this year ;)
Anyway, I chose one of my favorite floral stamps from DRS Designs, the Dogwood Branch.  I colored it with Copics, die cut it and added some Stickles. I chose the background stamps, 
Three Butterflies and Background Branch and colored them to match the main image.

I embossed one of the die cuts and was so excited to find that my flowered ribbon fit in my punched border strip perfectly.  I love happy accidents.  Finally, I simply added the On Mother's Day greeting to finish it off.

As a reminder, our current challenge here on the blog is "Bows", so I hope you get a chance to enter!

Have a great day!

Karin


Read more...

Butterfly Wishes

>> Monday, April 22, 2013

Happy Monday Everyone. Hope you had a great weekend and are ready for the new week to begin!!

I have a friend who is in the hospital so I thought I'd share a get well card that I made for her.


I created my background by sponging Barely Banana, Bashful Blue and Certainly Celery inks in random stripes all over a piece of white CS. Once the inks dried, I stamped the Textured Butterfly in VersaMark ink several times, added clear embossing powder and heat embossed the images. Old Olive ink was then sponged all over the CS. I used a paper towel to remove the ink from the embossed butterflies. I love how the blue, yellow and lighter green inks show up! The Feeling Better greeting was stamped with black ink on white CS along with a few barely banana butterflies, die cut and layered on a scalloped So Saffron oval. Before attaching it to the card, I punched a yellow strip with a MS punch and added it to the card along with a few tiny half pearls. Everything was then layered on a piece of the yellow CS and then attached to the white base.

Hope you like it. Be sure to check out our challenge this week! We'd love to have you join us!!

Thanks for stopping by today.

Until next time,
shelia

Read more...

Mrs ED in Shades of Gray

>> Sunday, April 21, 2013


Hi all, I hope you have had a good week. Spring is here and every thing is in bloom. The garden is planted and the sun is shining. I’m so happy spring is finally here.


For my card this week I used the Mrs. Ed stamp and Copic markers to color the image I was trying to color it so it would look like a pencil sketch. How did I do? The out of the box technique was used to cut out the image and it was layered onto black card that was cut with a oval Spellbinder die. For the background I used the Material Maker Square and London Fog Memento ink. I stamped the Script Font Background on gray paper and sponged the edges with London Fog. I added some ribbon and buttons to finish the card.

Don’t forget to join the challenge.

Have a wonderful day,

Janett

Read more...

Fishing Rules

>> Saturday, April 20, 2013

by Julie Warner - The Write Stuff

Happy Saturday!
Bet you didn't think you see me here, lol! I'm filling in for Pam today w/ a fairly easy card that's a  perfect guy card or for that avid fisherman you know. It's never too early to start thinking of making that card for Dad's Day.

The Fishing Rules was stamped on vanilla card stock and I used Copic markers to color it and a deckled rectangle die to cut it out. I love paint chips and I found this one in my stash w/ some cool shades of brown and I used Copics to color the white color bands in between the shades, die cut w/ a larger  deckled rectangle then embossed it w/ a distressed stripes folder. It's attached to a vanilla panel then to a larger rusty red panel. I pierced both of these and used a distressing tool on the red layer cause everyone knows guys aren't neat, lol. Really! My hubby only thinks he's neat...but he's seriously fooling himself, lol.

The red layer was also stamped tone on tone using Vicki's Versatile Background image and I added some rope like twine as an accent. The finished card is 5.50 x 4.25.

Thanks so much for stopping by! Oh and our wonderful Spring lasted a few days and now we're chilly again. What's up with that?? Have a great weekend!


Supplies:
stamps: Fishing Rules, Vicki's Versatile Background
paper: vanilla, rusty red, paint chip
ink: Memento tuxedo black, Colorbox barn red chalk ink
accessories: Spellbinders deckled rectangle dies, Cuttlebug distressed stipes embossing folder, paper piercer, twine, Copic markers

Read more...

Glittery Dogwoods

>> Friday, April 19, 2013

by Julie Warner - The Write Stuff

Happy Friday!
I hope your week has gone well! Spring is finally here with all the pollen covering everything! All the blooming flowers are so pretty but that pollen makes everything look like it's covered in powdered egg yolk! Sneezing has become the national salute.

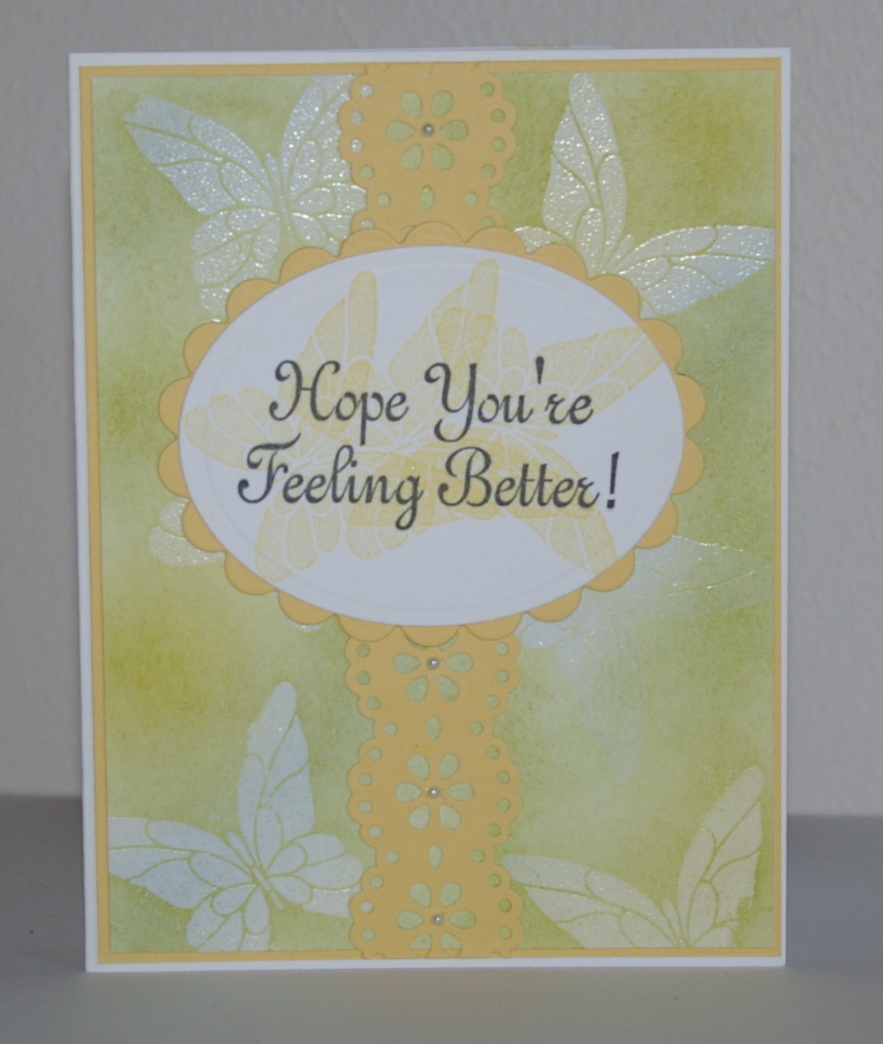
So for my card, there's no yellow, lol. I'm just pretending it all washed away and was replaced by glitter. I love these dogwoods and looking out my back door I can see the dogwoods blooming among the rest of trees in the woods. I stamped the dogwoods randomly, then masked them. Here's a little masking tip: Stamp your image several times on copy paper. Put a little respositionable tape on the backs then hold them up to the light, line them up and stick them on top of each other. Now cut out. This way you have 3 masks and only have to cut once. So after I masked them, I sponged on blue and green inks over the background. I didn't color the flowers at all but instead used some pinkish stickles in the centers and clear stickles for the rest of the bloom.
The sentiment was stamped in black on top of the dogwoods I stamped using the same ink for the background. I did stamp it off once before hand so it wouldn't be so bright. I added some black enamel accents to the centers and dotted the edge of the sentiment flag as well. The finished card is 5.50 x 4.25 and all that glitter glue took fa-eh-va to dry! Don't be tempted to use a heat tool...I promise, it will not end well. I did finally use my hair dryer on the COOL setting. 

Thanks so much for stopping by! Have a great weekend!
Supplies:
paper: white
ink: Memento tuxedo black, Kaliedacolor Caribbean Sea
accessories: stickles, Ranger black enamel accents, black Permapaque marker, fishtail banner die


Read more...

Challenge #66 Bows

>> Thursday, April 18, 2013

Hi Everyone! Hope you're having a great day! 

Today we Congratulate our winner from last week's Sewing challenge,
Kimberly C.!
CONGRATULATIONS!
Please contact us at info@drsdesigns.com to claim your prize. 

This weeks challenge theme is:
"Bows."
Get fancy with ribbon and show us some beautifully tied bows on your card front!

DRS Designs is giving one lucky winner their choice of 2 stamps from the online catalog at www.drsdesigns.com. Link up your challenge cards below by Wednesday, April 24th at 6pm EST. Come back to see the winner announced in the challenge post on Thursday, April 25th.

Here are the DT challenge cards to inspire you:

Karin

Shelia


Janett

Jennifer E.


Pam


Sue

Good Luck and Thanks for playing along!
___________


Read more...

For Mom...

>> Wednesday, April 17, 2013

Welcome!

Okay, there is something definitely wrong when not only am I  weeks early getting a card made, I actually like how it came out!!  What's up with that?  I guess miracles do happen!


I started by embossing ivory card stock using just the top portion of an embossing folder (sizzix thank you set) and then turning the paper around and doing the same thing on the bottom.  Next I stamped our Dogwood Branch on a separate piece of card stock using black ink and colored them with markers and then fussy cut them out and adhered them to my embossed layer.  I stamped our Mother's Day Greeting in the center using lavender ink and then layered all on purple card stock and then on a lavender folded 4 1/4" x 5 1/2" card.  Simple right?  Okay except for the cutting, but it went fast and I was done almost before I started ;)

Thanks so much for stopping by today!
Sue

Read more...

Celebration of your Liberation

>> Tuesday, April 16, 2013

Hi Everyone,
 
I have another graduation card to share with you in today's post.  I chose navy and gold as my colors this time around as they seemed like a classic combination. I know they belong to the University of Michigan, but that's a taboo subject with me living in Ohio :)
 
I stamped the Tassel along the top of my background and added the bottom panel made from the Argyle background stamp and the Argyle Diamond.
 
 
The Culmination Graduation Greeting was stamped in navy ink, die cut and highlighted with some matching gold ink.  I only added a ribbon strip to the bottom and ribbon knot attached with a glue dot at the top of the sentiment. I was trying to keep it gender neutral.  Did I succeed?
 
Thanks for visiting us today and don't forget the current challenge is "Stitching"!
 
Karin

Read more...

Kitty Kats

>> Monday, April 15, 2013

Hello Everyone! Today I have a fun card to share that would be perfect for those cat lovers we all know and love. :-)


I started by stamping a layer of pale pink CS with the Cat Paw Background stamp in Pretty in Pink ink. The small cat print and happy cat image were all stamped with Memento black ink, cut with nesties circle dies and layered on darker pink CS. The kitty was colored with copics. The Dogs have owners greeting was stamped in Memento black, cut with a nestie oval die, cut in half and layered on darker pink CS. Everything is layered on dark pink and then attached to a white card base. Hope you like it.

Thanks for stopping by today. Remember you still have time to join in this week's challenge to use stitching on your card - either real stitching or faux. We'd love to have you play along with us. You can see the details here.

Until next time,
shelia

Read more...

The Tassel is Worth the Hassel

>> Sunday, April 14, 2013


Good morning everyone, well spring is here and it wont be long until those graduation invitations start showing up in the mail box. This is a fast easy card.


First I stamped the Graduation Background onto white card with Memories Tuxedo Black ink and rounded the corners. This was layered onto black card and attached to a white card. Then I stamped the Tassel Worth the Hassel and the Tassel with Bard Red Memento ink. The corners were rounded and it was layered onto black card.

Don’t for get to join DRS designs sewing challenge you have until Wednesday night.

Have a wonderful day,

Janett

Read more...

Congrats Grad!

>> Saturday, April 13, 2013

It's graduation time again!  I have high school graduations as well as college this year. Many of my cards will be red and black. I stamped the interlocking star bg several times in black and colored in some random stars red. Next, I stamped the Bright Graduation greeting in black and punched it out with a scalloped oval punch....also punched in red and black and then layered it. The black and red strips are paper and then I punched out some stars to finish it off.
Have a wonderful weekend!

Pam

Read more...

A Man Thing

>> Friday, April 12, 2013

by Julie Warner - The Write Stuff

Happy Friday!
I'll bet most of you know or are related to someone described by this card. For me, it's my brother in law. The guy lives for duct tape and bungee cords as a fix all for everything. He also has a lot of old cars. Not antiques...just old, and at least one should have been put out of its misery a long time ago. One year for Christmas, I gave him a new set of bungee cords. This was after my sis opened the hood of the old clunker (car, not brother in law, lol) and showed me how he had a bungee cord holding the accelerator cable. With raised eyebrows I just said "Really?" Then made sure sis was not the one driving the bungee mobile. When I found out he planned on doing some rewiring, I sent my hubby over (he actually KNOWS about wiring). I told him she is my only sis and I would not be happy if brother in law burned down their house.

So for my Man Thing card, I wanted to use duct tape, but could only find some dark almost black duct tape around here, so I used some foil tape (don't know what it's used for but it's in the home improvement section) and stuck it to a piece of card stock and embossed it. I used some lg deckle scissors on the ends of the Man Thing part to look more like torn duct tape. The tool border was colored w/ Copics and I just happened to have a tool bg embossing folder to finish it off. The finished card is 4.25 x 5.50.

Thanks so much for stopping by! Have a great weekend!


Supplies: 
stamps: Duct Tape Greeting, Tool Border
paper: white
ink: Memento tuxedo black
accessories: Copic markers, silver foil tape, Sizzix embossing folder (riveted metal), Crafts-Too embossing folder (tool bg), lg deckle scissors, small brads, Spellbinders deckled rectangle dies

Read more...

Challenge #65 One Stitch At A Time

>> Thursday, April 11, 2013

Hi Everybody! Happy Thursday! 
Hope your looking forward to our next DRS Challenge as much as we are! 

The lucky winner from our last challenge to use Paper Flower's is:
Jackie Bowman!
Congratulations! 
Please send an email to info@drsdesigns.com to claim your prize.

The theme for our next challenge is 
"One Stitch At A Time!"
Your challenge card must display real or faux stitching.
Show us your card by linking it below. The deadline for this challenge is Wednesday, April 17th at 6pm EST.  From all of the entries we receive, one lucky winner will be chosen to receive a $10 store voucher to DRS Designs!

Here's some inspiration from our Design Team. 
Enjoy and Good Luck!


Sue


Shelia
Pam
_______________________


Read more...

Best Wishes On Your Shower

>> Wednesday, April 10, 2013

As someone who makes handmade cards regularly, I really despise having to buy them.  I like to be able to plan ahead and make one ahead of time when needed.  When I saw that DRS Designs was adding some wedding/baby shower themed stamps, I was over the top excited! These stamps were definitely missing from my collection and I was always buying cards for these occasions


I stamped up this card to give to one of my friends for her Wedding shower.  It uses 2 of the new shower stamps--the Umbrella (817G), and the Rain Down Greeting (837F). (The For Your Shower Greeting (835D) is also new.)  I stamped the Raindrops (1012H) in the background.  The umbrella was colored with Copic Markers, fussy cut, and then adhered on to a scalloped circle that was embossed with polka dots. The center panel was lined with cardstock that was punched with a border punch.  Then after stamping the sentiment on it the bottom portion and adhering the image to it, it was adhered to the card front with foam tape for dimension.  A bit of purple and white twine embellished it nicely.

Thanks for stopping by!

Smiles,
Jennifer

Read more...

Live the Life You've Imagined...

>> Tuesday, April 9, 2013

Hi Everyone,
 
The time has come for me to start thinking about graduations.  The high schools don't usually get out until June, but I know that both of my nieces are done with their college semesters in less than a month.  That's when all the announcements start hitting my mailbox, so I want to be on top of things this year.
 
So with that, I present you with my first graduation card of the year.  The background was made by stamping the Graduation Background (so adorable with all the caps and diplomas flying around!) and coloring it in with my Copic markers.  I used just the Argyle Diamond stamp (it's the one that pairs up with the Argyle background stamp) and made that border along the bottom.
 
 
I inked up the Go Confidently Graduation Greeting and used a baby wipe to take off the ink from the first two words and colored them in with a red marker before stamping it. It was then die cut and I added three gems for some bling. Finally, the graduation cap embellishment was made with a square punch, brad and a bit of embroidery floss.
 
There are only a couple of days left in our "Paper Flowers" challenge and then Thursday starts with an all new one! 
 
Have a great day!
Karin


Read more...

ConGRADulations!

>> Monday, April 8, 2013


Hi Everyone! Can you believe we are starting the second week of April? It will soon be graduation time, so I thought I'd share a grad card I created using my own high school colors: blue and orange. I started with a white base and added a piece of navy card stock. On top of this is a white panel that was stamped with the Argyle background stamp in Night of Navy ink. I used the small diamond stamp to fill in some of the spaces with navy and pumpkin pie ink. The Tassel is worth the Hassle sentiment was stamped in Night of Navy on white, cut with square nesties and layered on a lacy square nestie in orange. The tassel was stamped in Pumpkin pie, fussy cut and attached with some pop dots. The conGRADulations was stamped in nave, sponged with some pumpkin pie, cut and layered on navy CS. Some orange dew drops were added to complete the look.

Thanks for stopping by today. You still have time to join our most recent challenge - to use paper flowers on your card. You can see the details here. Hope you have time to play along with us!!

until next time,
shelia

Read more...

Leave a Path

>> Sunday, April 7, 2013


Hi all, I hope you are enjoying your weekend. I sure am the weather here is beautiful it finally feels like spring. The card that I’m sharing today could be used as a graduation card.


I used glossy card stock and my brayer to cover it with Desert Heat Kaleidacolor Ink. Them with black ink I stamped the Majestic Pines three times. This was attached to black card the onto a white card. The Silhouette Hiker was stamped with black ink and embossed with clear embossing powder. I used a Spellbinder Oval die to cut out the image. It was layered onto a black oval. And attached it to the card front. I stamped the Leave A Path Verse with black ink. And ran the edges across the Desert Heat ink pad to add a little color. This was layered onto black card. And attached to the card front.

Thanks for looking,

Janett

Read more...

Pawsatively Birthday!

>> Saturday, April 6, 2013

I have a sister that this totally reminds me of and she will be getting for her birthday in May!  I took the Pawsitively Birthday Greeting and stamped it in black and matted on creamy caramel. Next, I stamped the "Purr"fectly Comfortable Kitty in black on white paper and colored her gray, the sofa pink with caramel trim...and it was fussy cut. The rug was embossed with lattice ef and the folder was inked a bit to pick up some darker caramel.  Vicki's versatile bg was used on the flower and lastly, a strip of caramel was embossed with a woodgrain folder for the chair rail. The wallpaper was made with stamped off caramel using the Silhouette branch bg The kitty's collar is adorned with liquid pearls. 
Have a lovely day!
Pam

Read more...

Hooked on You

>> Friday, April 5, 2013

by Julie Warner - The Write Stuff

Happy Friday!
Spring is here...even if it doesn't really feel spring-like yet. April already and yesterday it was 41 degrees and rainy all day. I think last year we were in the 70's by now. I have a neighbor who goes crazy if he can't ride his riding mower and a day or so ago I hear a noise I hadn't heard since last fall. What is that noise?? Aww...he's out on his mower...too bad there's absolutely nothing to mow! He's out there in his coat and hat and gloves riding around in the 45 degree weather on top of dormant grass. Maybe he should take up fishing!

Now I have no idea if fish come in this color, but they seemed like nice fish possible colors to me. I don't even know what kind of fish this is...trout...maybe? Anyway, after I stamped the Jumping Fish,  I used copics to color everything then die cut the image. I traced around the die on black card stock and hand cut that layer then embossed it. It looked a little lonely in all the white space, so I put it back on top of the original layer it was cut out of and I liked it a lot better. I added a fussy cut fishing pole and stamped the greeting on the 5.50 x 4.25 card front and added a few accents w/ a white gel pen.

Thanks so much for stopping by! Have a great weekend!

Supplies:
stamps: Fishing Pole, Jumping Fish, Hooked on You Greeting
paper: white, black
ink: Memento tuxedo black
accessories: Spellbinders labels 21, Quickutz embossing folder (Tides set), Copic markers, white gel pen

Read more...

Challenge #64-Paper Flowers

>> Thursday, April 4, 2013

Hi Everyone, Happy Thursday!

Congratulations to 
SHARON!  
You are the winner from our Basket challenge!  
Please contact us at info@drsdesigns.com to claim your prize. 

Here are the details about this weeks blog challenge:
We want to see cards with 
Paper Flowers!
They can be stamped or feel free to use paper flower embellishments as well.

We hope that you'll join us and play along by linking your challenge project using the InLinkz feature below. Each week one lucky participant will receive a prize just for playing along! Challenge entries don't have to use DRS Designs stamps, but if you use them on your challenge card, you'll get an extra entry into the prize drawing. Due to the Easter holiday, the deadline for this challenge is extended until Wednesday April 10th at 6pm EST. The winner will be announced in the challenge post on Thursday April 11th.


For the prize, one winner will be randomly selected to win the following 3 stamps:
Daffodil Butterfly Circle (1073L)
Good Bye Winter Greeting (384G)
For Someone Special Sentiment (705D)

Here are some fabulous cards created by the DRS DT to inspire you:


Sue

Pam

Julie

Thanks for stopping by and Good Luck!
__________


Read more...

Blog Archive

StatCounter

  © Blogger templates Palm by Ourblogtemplates.com 2008

Back to TOP