Blog Widget by LinkWithin

Now See Here

Happy Wednesday!

>> Wednesday, March 31, 2010

Welcome!

I can't believe Easter is this Sunday! So much is left to do - I'm hoping to color eggs on Friday - Maybe I'll come up with some nifty color combo's I can share with you next week!

I had a lot of fun at the stamping table last night. For some reason it was a very laid back and relaxing evening. My first card focused more on the religious side of Easter~


I stamped our triple crosses (G510) and Christ has Died/Risen stamp (F432) on pale yellow paper with Vivid vintage green ink. After doing my fancy angle cutting on the crosses and cutting apart the sentiment I layered all three on a medium green metallic paper and then attached all to my pastel green metallic paper. The final step was to mount it all on matching medium green card stock, and stamp the 3rd line (Christ will come again) on the inside of my card.

My next card was very quick and easy ~


I stamped white card stock (upper center) with our Fuzzy Chick (D416) stamp using black ink. I colored it using my Bic markers and layered it on my folded yellow card. I stamped my Cool Beans Easter (E224) using Vivid spring green ink on more pale yellow and after trimming I punched t 1/16" holes on each corner and added my brads. The brads overlap each other with I kinda like! I mounted this on lime green using 1/8" foam tape and attached it under my fuzzy chick. Badda Bing, Badda Boom!

Thanks for stopping by!

Happy Easter!

Read more...

Dreams!

>> Tuesday, March 30, 2010

By Debbie Seyer - A Peek Into My Stamping Room


It's almost April, can you believe it? Then May will be here before we know it and in May, there are alot of Graduations coming up. When I saw this sentiment, Go Confidently Graduation Sentiment from DRS, I just knew that I wanted to use it for a graduation card for one of my daughter's friends. I stamped the sentiment using Rich Cocoa Memento Ink and cut/embossed using Petite Ovals Lg Nestabilities. I used some Distress Ink and a sponge to "shabby" it up a bit and some other fun embellishments to make this sentiment really stand out!

Have you thought about upcoming events in your life that will need cards? DRS Designs is getting ready to release some great new images and the sneak peeks will be starting. So be sure to check back often so you can start planning your Spring card making! Hope you have a great Tuesday!

Read more...

Purple Bunny Easter Card

>> Monday, March 29, 2010

I don't know what inspired me to color the bunny purple... but I love how he turned out!  I combined the purple with a light teal color, silvery aqua ribbon and lots of rhinestones.  The inside has a Happy Easter greeting.  Thanks for looking!

Read more...

Spring means change...

>> Sunday, March 28, 2010

posted by: Cathy/Crafty Thoughts...

We can't always do things the same way all the time...sometimes if you change things up you can get a different look or a different feel in your final project. You're probably wondering just what I'm getting at...I thought I would do a contrasting project post today! I took two very similar images and made two totally different cards with them to show that although things are similar, they can still be different in their own way...

Images by DRS Designs...

First up is Shelldon the turtle...I decided to give Shelldon a krafty/natural look for this card...


I colored Shelldon with my Bic markers and used another EK Success border punch...I punched it from two different color papers and then layered them slightly off from each other. I just love this twill ribbon...I couldn't resist adding a button and some gingham ribbon as well. My scallops are the same size (giga) so I layered them slightly off from each other as well. I just love this sentiment...so versatile.

And now, we have Shelldon's friend Sally the snail! Similar design in the focal images but a totally different look to the card because I used brights rather than earthy tones.


I love this snail trail image and stamped it several times to make a background. So much fun to color! I used the same sentiment and added some felt flowers from the Target $ spot (yes, from at least last year!) and some large brads to finish it off. I used my all time favorite grass background on the inside of the card. Can you see Sally's antennae? Since it was hard to cut around them when I cut her out, I cut them off (oops!) and replaced them with wire antennae!! Sally was stamped twice. I cut just her shell from the second stamping, colored it and adhered it to the first image with pop dots. (I love those almost as much as jewels!!)

Thanks for checking in...

Read more...

Galloping Under the Silver Moon

>> Saturday, March 27, 2010

By:
Dawn Knight

Oh, how poetic!!! I LOVE the way this card came out! I used the bouncing brayer technique. That technique is so easy and so pretty! I knew that this horse would be prefect for this background! I stamped the horse silhouette and then I added the moon by sponging silver ink through a circle stencil. Then, with a white gel pen, I added the "craters"! I thought that the silver swirls would look pretty and then I added some dew drops for texture and cuz I LOVE them!!! So, here is my super simple stunning card! Try the technique for yourself... and check out DRS for this awesome stamp! Thanks for checking in!

DRS Stamp: Horse Silhouette

Read more...

For Someone Special!

>> Friday, March 26, 2010

Happy Friday to you all!

Spring is finally here, and so are the birds!  With the warm weather we had last week I put my bird feeders in the back yard and I can't seem to keep them full for very long. It must have been a long winter for the birds this year too! However, I still haven't seen any Hummingbirds--I think it's still a little early for them since there's still a bit of chill to the air every once in a while. Since I've been watching the birds alot this week, I decided to create this Hummingbird Birthday card to share with you today. 


I colored DRS Designs' Hummingbird image (L067) with Copic Markers.  I did a little research on the internet to find out how to color the Hummingbird.  I wanted to make it exotic looking and found a photo of a hummingbird that resembled how I colored it.  Both the "Happy Birthday" (A1081) and the "For Someone Special" (D705) sentiments are also by DRS Designs.


 Well, it's once again "New Release" time! Stay tuned to the DRS Designs Blog and the rest of the DT Blogs all next week.  We'll be showing off sneak peeks of the upcoming releases due out on April 3rd.

Thanks for visiting today.
Have a wonderful weekend!
Smiles,
Jennifer

Read more...

Bunny & the Beans

>> Thursday, March 25, 2010

Julie Warner - The Write Stuff
This little bunny has really been working hard this week. He's such a cutie, it's easy to see why he's a main feature. For these two cards, I showed him a couple of different ways. I first made a background using the jelly beans and colored them with markers and a water brush.

For the Cool Beans card, I stamped the bunny twice and after coloring, I cut out the head, foot and the jelly beans and popped them up on top of the base image. I used my Out of the Box Nestie technique to cut the image out using an oval Nesite. I put it all together and used a lilac marker to die the white ribbon.

For the Jelly Belly card, I used a piece of the background from the first card. I stamped the bunny using a rainbow ink pad then overstamped the greeting and used the same oval to cut it out. The stripe was a leftover piece of inked/embossed background from a SCS challenge, TLC160.
Thanks so much for stopping by! Hope you feel inspired to create some Easter greetings by all the wonderful bunny cards this week.


Supplies:
stamps: DRS Designs - Jelly Bunny Bean, Jelly Bean Jumble, Full Belly Easter Greeting, Cool Beans Easter Greeting
paper: white, mint green
ink: Ancient Page coal, Kaleidacolor Pastel
accessories: markers, water brush, Std Oval & Scallop Oval Nesties, ribbon, Cuttlebug Distressed Stripes folder

Read more...

Pink Elephants

>> Wednesday, March 24, 2010

Welcome!!

I've been seeing way too many beer mugs lately - stamped beer mugs that is!! Between last week being St. Pat's Day and the summer like weather, they seem to be all over the place! I got to thinking about the after effects of too much beer and this is the fun card I came up with. Color-wise I don't think a card can get anymore colorful!!!


I used black ink, and every color neon paper I had! I masked the elephant to make the herd, then stamped the saying on yellow and layered it with lime. I stamped the beer mug on white and after coloring it in I pressed the top on a versamark pad and applied clear embossing powder to give it a "glass like" finish. I used some leftover 3D snow I picked up years ago at Walmart for the foam. All I had left to do was cutout the mug and assemble it all together.

Thanks for stopping by!!

Read more...

Jelly Bunny Bean!

>> Tuesday, March 23, 2010

by Debbie Seyer - A Peek Into My Stamping Room

Great minds definitely think alike! Yesterday Michelle's card used the super cute image - Jelly Bunny Bean and today I used the same image! It's because he is just so cute!


See what I mean? I stamped the image in Rich Cocoa Memento ink and colored his ears, cheeks and foot using a pink copic marker. I decided my bunny was white so all I did to highlight that was to outline him using a light grey copic marker. I colored the grass and eggs, too. I stamped the Medium Script Happy Easter using the brown memento ink and cut/embossed using Labels 8 Nestabilities™ from Spellbinders™. I sponged some Antique Linen Distress link around the outside edge and popped it up with some glue dots.

Hope you are having a great week!

Supplies Used:

  • Stamps - Jelly Bunny Bean, Medium Script Happy Easter
  • Cardstock - Aqua Mist, Kraft & Neenah White; Crate Paper
  • Ink - Rich Cocoa Memento Ink pad
  • Accessories - Jumbo Scalloped Borderabilities® Petite, Labels 8, Classic & Scalloped Squares Nestabilities™, Silver brads, ribbon, 3d foam squares

Read more...

Easter Bunny

>> Monday, March 22, 2010

 This adorable bunny with a belly full of Easter candy was so much fun to color!  I used Copic markers to color him in and pulled colors from the image for the paper colors used.  Thanks for looking!

Read more...

Spring and Summer...

>> Sunday, March 21, 2010

posted by: Cathy/Crafty Thoughts...

are both in the air here in CT!!! While DRS is gearing up for their next big release of images, I thought I would share some newly released images and an older image with you today.

First, Spring...the first day of spring came in with a bang here today...it was 72 degrees out!


The new jelly bean jumble background is one of my new favorites by DRS. This new sentiment is a perfect match.

And now on to summer...


This lawnmower image would be great for Fathers Day, male birthday, even an Anniversary card. There a bunch of great sentiments that will go with it as well even if you just want to send a "hello" card.

Thanks for checking in...
See you soon...

Read more...

A Different Type of Cards!

>> Saturday, March 20, 2010

By: Dawn Knight

I wanted to use some of my favorite images from DRS and I needed a new way to show them off. SOOO, since the ones I had colored were the food images... I came up with the idea to make RECIPE CARDS! I googled a template for blank recipe cards and I found a bunch of sites that offered them for free. I printed them, cut them out and adhered them to colored paper. I wrote the recipe out and added the colored image. I thought this would be a wonderful gift to make for a new bride or for a hostess gift. I LOVE to think of new ways to add stamping to things to jazz 'em up.
And... here is a little secret... the pink card has an image from the new release that DRS will be previewed beginning on March 29! Keep your eyes peeled to see the fun designs that will be shown! Thanks for stopping by and have a delicious day!  

Read more...

Masculine Birthday, Jumping Fish!

>> Friday, March 19, 2010

Posted By Jennifer E.

This week's challenge over at the Crazy 4 Challenges Blog is to create Masculine cards and DRS Designs is their sponsor again this week!  I created this Masculine Fishing Birthday card for the challenge.
 

The Jumping Fish (L325) and the "Happy Birthday" sentiment (B250) are by DRS Designs.  I colored the image with Copic markers and added some texture to my card front by embossing the background panel with the Tiny Bubbles Cuttelbug Embossing Folder and added some dark blue and gold brads. 

Make sure to check out the Crazy 4 Challenges Blog to find out the details about the prize you can win from DRS Designs just for playing along.  But hurray...another challenge will start tomorrow, Saturday, March 20th!

Thanks for visiting today and have a wonderful weekend!
Smiles,
Jennifer

Read more...

Easter Bunny Pop Up

>> Thursday, March 18, 2010

by Julie Warner - The Write Stuff
Don't you just love Easter bunnies and jelly beans? I saw this pop up template on the F4A2 challenge at Splitcoast for a free standing pop up card. It was actually pretty easy and looked so cute, I wanted to give it a try. The picture on the upper right is how it looks when flat for mailing. You pull the tag, and it becomes a pop up with its own base.

Everything was stamped and colored with markers and a water brush. I used the same markers on the plaid stamps and added a punched border. I cut the bunny out and attached him to some layers I cut with the long rectangle scallop Nestie set. The little grass/flower border was cut using a Cricut as well as the flower on top of the tag. The labels 4 Nestie was used to cut the top of the tag.

Thanks so much for stopping by!


Supplies:
stamps: DRS Designs - Bucky the Bunny, Jelly Bean Jumble, Lg Original Plaid, Open Plaid
paper: white, lt blue, lt pink
ink: Ancient Page coal
accessories: markers, water brush, loop border punch, long rect scallop and labels 4 Nesties, ribbon, Cricut accents cartridge

Read more...

Happy St. Patrick's Day!

>> Wednesday, March 17, 2010

Welcome!

I hope everyone is following custom and wearing green today! When I saw Michelle's card on Monday I fondly recalled my years of "green" beer on St. Pats day. Those were the days my friends.....

The best I can do now is send you all a St. Patrick's Blessing ~


I had a fun time with this card since I had very little idea where I was starting and absolutely no idea where I was going to finish. My one thought was to use my giga scallop oval punch as the outside frame around a mega oval punch out.

I immediately found that to be a problem since I had brought both oval punches to work and forgot to bring them back home again. Do I give up on an idea? wait for another day? Nope! Instead I just got a little creative and used the only punch I had left at home (mega scallop circle). I originally had two 1/2 circles, one for either side - but I decided to be a little more off beat than that ;)

I started by stamping my shamrock oval. I inked the center wording with Vivid green dye ink and then used Vivid black for the shamrocks, and stamped it on my celery green paper. Since I didn't have my oval punch I used scissors to cut it out and then distressed the edges to make my imperfect cutting fit in a little better. The shamrock paper was punched out first, then stamped and colored in. After assembling it all together I added the glitter stickers on the right side to add a little pop. It was fun to make an off-size card for a change!

Thanks for stopping by - and if you indulge in a little green refreshment, please have one for me!

Read more...

Two Peas and A Prayer!!

>> Tuesday, March 16, 2010

By Debbie Seyer - A Peek Into My Stamping Room

It's a silly title, isn't it? Well, I hope when you see my cards for today, you will understand! My first card is all about being Irish. Since tomorrow is St. Patrick's day I figured it was the best day to use this wonderful blessing.

This sentiment stamp is called Sunbeam to Warm You Irish Greeting. I thought it was quite appropriate for the day before St. Patrick's day, don't you? Plus the wonderful Everything Irish image goes perfect with it. Behind the image I stamped the Swag & Dot 2.5" Mega Circle using Bean Sprout Memento Ink and cut/embossed it using my Classic Circle Nestabilities™. This whole card came together so easily! Love it when that happens!

This second card came to mind when I saw the wonderful new Cosmo Cricket patterned paper pad - Garden Variety. Gotta love those Peas!


The card base was made from Scalloped Circle Nestabilities™. I layered the two different patterned papers on top and added the twine with the button. I stamped the Peas in a Pod image using Tuxedo Black Memento ink onto white cardstock. I cut/embossed using a Labels 1 Nestabilities™ and airbrushed it using the lightest yellow copic marker I have. I colored the peas using some Copic Markers, too. Isn't this fun? Gotta love green! I hope you have a wonderful St. Patrick's Day and wear lots of green! Have a great day!

Read more...

When Irish Eyes are Smiling

>> Monday, March 15, 2010

Since it's St. Patrick's week I'm sure there will by MANY eyes smiling for just the reason on my card!  I used some liquid applique for the beer foam and colored the mugs in with copic markers.  Thanks for looking!

Read more...

Luck...

>> Sunday, March 14, 2010

we could always use some right?!!! Some have more than others apparently!!! LOL

Images by DRS Designs...


I colored the buckle and shamrocks in the sentiment with a gold gel pen. Ribbon is from the dollar bin at Mikes.

Wouldn't you feel lucky if you found some real gold coins...I guess this one will have to be good enough until that kind of luck comes your way!!!


I added a gold foil covered chocolate coin as my focal image!!! I stamped the sentiment on a scrap so that I could color the shamrocks without them leaking thru my cardstock. A few paper piercings and some score lines and ribbon/cord finished things off.

***Don't forget to check out the Crazy 4 Challenges blog again this week for more DRS Designs cards AND a chance to win some DRS shopping money!!!***

Thanks for checking in...
See you soon...

Read more...

AWWWW... How Could You NOT Feel Better?

>> Saturday, March 13, 2010

By: Dawn Knight
So... My precious little boy is sleeping and my precious little girl is at preschool...AND the dishes are done.
What's a mommy to do? STAMP, of course! I got out my cutie pie gardner stamp from DRS Designs and got busy creating! I love the whole cutie pie collection, but this little gal went with this GET WELL sentiment perfectly! This sentiment has the words "Get Well Soon" on the bottom of this sentiment... but I trimmed it off so that it would fit my nestie and I used it on the inside of the card! Another reason to love unmounted rubber... easy to alter to fit your need!!! (And did I mention CHEAPER???) I colored her with copics and some glitter pens, added the flowers from Petaloo and here is my creation! Thanks for popping by! Have a wonderful, HEALTHY day!

Read more...

Happy Birthday, Western Style!

>> Friday, March 12, 2010

Posted By Jennifer E.

DRS Designs is sponsoring this week's Paper Piercing challenge over at the Crazy 4 Challenges Blog.  I created this Western Birthday card for the challenge.

The Silhouette Hourse, the background design, and the sentiment are all by DRS Designs.

The Silhouette Horse (K462) was heat embossed with Copper Embossing powder.  I sponged red, orange, and yellow ink in the background, distressed the edges, and added distressing ink to the edges as well.  Once matted with yellow cardstock, I pierced around the image.  The background was created by stamping the Lots O'Plenty background stamp (H366) with brown ink on Craft cardstock.  I also distressed the Craft edges with Vintage Photo Ink as well.  A focal image and background like this could be used for any occasion, but I decided to make a Western Birthday card by pairing them up with the Tiny Happy Birthday sentiment (A1081).

 Now that you have the details on my challenge card, run over to the Crazy 4 Challenges Blog to find out the details about the prize you can win from DRS Designs just for playing along.  But hurray...another challenge will start tomorrow, Saturday, March 13th!

Thanks for visiting today and have a wonderful weekend!
Smiles,
Jennifer

Read more...

Pierced Easter Lilies

>> Thursday, March 11, 2010

by Julie Warner - The Write Stuff
Happy Thursday!

Aren't these new images just terrific? They are so perfect for Easter. This is also for the Crazy 4 Challenges, C4C27 which is being sponsored by DRS this week.

The Easter Oval was stamped onto water color paper and I colored it using markers and a water brush. The oval itself was cut using a lg. petite oval Nestie and a little technique I call Out of the Box Nestie. I did an extra of the lilies, cut them out and attached them on top for a little dimension. It's attached to a petite scallop oval lg, then to a petite oval sm. layer.

The background was a leftover piece of DTP (direct to paper). It's just a piece of white c/s with pink, yellow and yellow/orange ink pads smooshed all over it. I used a Cuttlebug embossing folder on it, then used the embossed flowers as a guide for my piercing. A wavy pierced border was also added.

The sentiment was stamped on c/s, colored with a marker then attached to a piece of satin ribbon I also colored w/ a marker. I never have the exact color of ribbon. But I do have lots of white ribbons and plenty of markers, so I guess I have the right color of ribbon after all! The little buckle is a die cut.

Thanks so much for stopping by! Please check out the DRS new releases, they're fabulous!


Supplies:
stamps: Easter Oval w/ Lilies, 1 Line Blessed Day
paper: water color, textured coral & textured yellow (DCWV mat stack), white
ink: Ancient Page coal, sunburst, pink pizzaz, lemon peel
accessories: markers, water brush, Spellbinders petite oval sets, Cuttlebug Everyday Greetings combo, Sizzix buckle die, ribbon, piercing tool

Read more...

Oh Those Irish Eyes

>> Wednesday, March 10, 2010

Welcome!

It's getting close to St. Patrick's Day, so I thought I better get a move on my cards. The plaid was the first thing I thought of when I started thinking and of course it had to be all in green. I stamped a light green paper using Vivid green and spring green dye inks.

The "ribbon" was a great deal I found on clearance. It's about 5 to 6 inches wide and shimmers so nice in person. I cut a 7 inch piece of it and then split it down the middle. 2 knots later they were being taped onto the back of my plaid and my background was finished.

I really enjoyed coloring the shamrock hat - it had just enough, but not too much to keep me happy! When I was done coloring I sponged on a little spring green around the edges. The sentiment was stamped on white and then I cut off the last line of the saying, wanting to keep this card a little more serious. A little 2 sided tape and I was patting myself on the back for a job well done :)


Unfortunately, this is when I got myself into trouble (not really!!)

As I was cleaning up, I started thinking about the Irish eyes saying and well, the thought "what I really need is some green eyes" got me doing even more thinking. We do have an eyeball stamp, so what if it's for Halloween! I got a little silly trying out different greens and also stamping the eyeball in black and coloring in the iris green. My original idea was to do a whole background of different color green eyeballs (that actually was more suited for Halloween cause it was really scare-y!)

Once I established I couldn't go overboard on the eyes, this card was finished in about 5 minutes


Thanks for stopping by!

Read more...

Happy Tuesday!

>> Tuesday, March 9, 2010

By Debbie Seyer - A Peek Into My Stamping Room

Hope you are having a great week so far! This is my card for the Crazy 4 Challenges blog this week. You were to use paper piercing on your card. DRS Designs is sponsoring the blog so be sure to check it out and play along!


For my card, I used the Medium Script Happy Easter as my sentiment. I stamped it using Colorbox Chalk Ink - Picante - onto a Classic Petite Ovals Lg. Nestabilities™. I layered that onto a Labels 10 Nestabilities™. The butterflies are from the 4 Corner Butterfly Background. I stamped and colored them using copic markers. I cut them out and popped them up using some 3d foam squares. Hope this card makes you smile, no matter what kind of weather!

Read more...

A Little Irish Luck

>> Monday, March 8, 2010


Both of todays cards were made with some of the new St. Paddy's day stamps from DRS "Everything Irish" and "Hatful of Shamrocks". I just love coloring in the top image, I've made a few cards with it, but this is my favorite coloring job yet. The beer has liquid applique for the foam and the pot of gold feaures both Smooch in gold and gold glitter for a little extra sparkle. I also added some gold sticker edging for a little more bling. I used Core'dinations "Whitewash" cardstock for the base of these cards. The argyle was embossed with a cuttlebug then sanded to show the darker core.

Thanks for looking!

Read more...

Crazy for Challenges...

>> Sunday, March 7, 2010

posted by: Cathy/Crafty Thoughts...

DRS Designs is the proud sponsor of the up and coming challenge blog Crazy for Challenges!!! Be sure to stop by the challenge blog and check out what their designers did with their DRS Designs images and check out the cards from the DRS designers that participated as well! DRS Designs is sponsoring C4C this week and next week as well so be sure to check back again next week for a brand new challenge!!!

Here is my card for the challenge...paper piercing!


This new jelly bunny bean image is just the cutest...don't you agree? I just love it. I kept the bunny simple by just outlining the bunny with markers and then piercing around the focal panel. I used an Ornare piercing template for the flower and then punched a hole in each of the punched flower border centers.

Thanks for checking in...we hope you can play along with the challenges...you might just win yourself some new stamps!!!

See you soon...

Read more...

Ladybug Birthday and a Bookmark Card

>> Friday, March 5, 2010

By: Dawn Knight
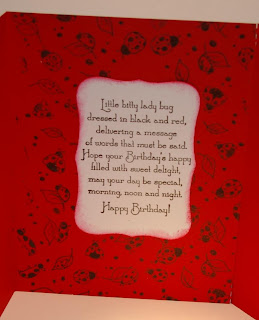
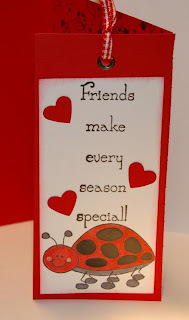
I don't know about you but I have a HARD time throwing handmade cards out. This bookmark card lets you keep a little bit of the hard work AND have a handy bookmark as well! I made this cute little Ladybug birthday card using the ladybug images and the sentiment from DRS Designs. I followed this tutorial from Splitcoaststampers.com and it was a snap to make! I used nesties on the front to cut the panels. I colored it in with copic markers and I used a gel pen for the dots. For the inside I used the ladybug easy background stamp and the ladybug Happy Birthday sentiment. For the bookmark, I chose the friends sentiment and the smily ladybug to complete the card. Now the Birthday person can remove the bookmark along the perforations and use it in their favorite book! Thanks for stopping in!

Stamps Used:
H779...ladybug background
G695... ladybug tower
F578... smiley ladybug
G576...Ladybug Birthday sentiment
F300... Friends sentiment

Read more...

Think Spring!

Posted By Jennifer E.
I know it has been a very long winter in my neck of the woods, and now that March is here, it feels so good to "Think Spring," doesn't it?  That's exactly what I had in mind as I put together today's card. 

This Praying Bunny (L407) image by DRS Designs is just too sweet!   From all of their Easter designs, I think this is one of my favorites!  (Although, I am partial to daffodils as well!)


 I love coloring and shading on my images to make them come to life, and this one was no exception--It was a lot of fun to color!  I colored it with Copic Markers and used Prismacolor Pencils to shade the background.  The layout I used follows this weeks Splitcoast Stampers Card Sketch challenge.  I added some texture by running the darker yellow panel through the Cuttlebug with the Swiss Dots Embossing Folder.  I used a sentiment from DRS Designs' latest release, stamped in regular black ink.  I love how it's perfect for just about any occasion!    

I hope you have a touch of Spring in your weather this weekend and if not, just remember to "Think Spring" and it will be here before we know it!

Thanks for visiting here today!
Smiles,
Jennifer

Read more...

Irish Eyes

>> Thursday, March 4, 2010

by Julie Warner - The Write Stuff

Happy Thursday!

I think it's probably true when people say "Everyone's Irish on St. Patrick's Day". How you could not love shamrocks and singing and parades and beer and all that GREEN? Maybe even green beer, lol. Coming from an Irish family (on my mom's side), I can definitely say that the greeting on my card is true! I think they all have a piece of the blarney stone in their pockets.

For my background, I drew a simple grid with a black sharpie, then drew over the lines with a couple of green waterbased markers and a blender to spread out the color. I stamped the Hatfull of Shamrocks twice, colored them with markers and cut out some of the shamrocks and attached them onto the base image for a little dimension. I cut a buckle out of a scrap of metallic gold and attached it.

The clover sprigs were also colored and cut out. I die cut three solid hearts out of a sheet of glitter foam and arranged them behind the clover sprig. The greeting was stamped twice (so I could split it), the corners rounded and then edged with markers.

Thanks so much for stopping by! All this green is sure to have those Irish eyes smiling!


Supplies:
stamps: Hatfull of Shamrocks. Clover Sprig, Smiling Irish Eyes Greeting
paper: white, emerald green
ink: Ancient Page coal
accessories: emerald green glitter foam sheet, Cuttlebug heart die, Spellbinders Labels 2 die, small corner rounder, green stickles, foam tape, markers & blender, black Sharpie

Read more...

Full Belly Bunny

>> Wednesday, March 3, 2010

I just absolutely love this bunny! All the stamps used on this card are from our newest release: Jelly Bunny Bean, Cool Beans Easter Greeting, Jelly Bean Jumble background

Paper: Pretty in pink, pink pirouette, black, white
Ink: black, Copic markers
Accessories: spiral clip, ribbon, pop-up dots

And here is the inside of the card.
DRS images: Full Belly Easter Greeting, Jelly Bean Jumble background, Bunny Tracks
_

Read more...

Blog Archive

StatCounter

  © Blogger templates Palm by Ourblogtemplates.com 2008

Back to TOP