Showing posts with label Fun Folds. Show all posts

Special Time

>> Thursday, December 29, 2022

Good morning!

It's almost my husband's and my anniversary so I thought I'd do an Anniversary card suited for our Dec. 31st anniversary.
It will be our 40th!

I stamped the Interlocking Circles Background in a very pale pinkish color (actually the second stamping of it each time to make it even lighter).  It is supposed to be bubbles in the background.
I stamped the sentiment, Quiet Valentine Love, in black over the bubbles 
I then stamped the Pour Me...Bottle and Glass (glass onlyfirst),then the Pour Me...Bottle and Glass again including the bottle.  I colored them then added micro beads for bubbles (I think one of my team-mates but I can't remember for sure).
                                                    I thought that that idea was really cool!

Thanks so much for visiting today!!

Robin


Read more...

Beware

>> Thursday, September 22, 2022

Hello there crafty friends!


This is a Z Fold box card.  Today I've used DRS Designs stamps: Summers End Tree


I used some Sizzix dies by Tim Holtz and word dies by Cottage Cutz and Sizzix.
The ghost was stamped and white embossed on shimmer vellum then fussy cut.
The fence was just stamped then trimmed and the top cut in the general fence shape.
Thanks for visiting today!
Happy Crafting!

Robin


Read more...

Western Birthday

>> Thursday, July 14, 2022

Good morning crafty friends!


This first card has lots of goodies on it starting with this cute Western Dancing Couple.
I can't think of anything that I like wearing more than cowgirl boots so this sentiment
stamp is perfect to me, Better In Cowboy Boots, I made into a pennant for the top.
I used pink and Kraft for my cardstock, burlap "ribbon" with lace as an element and also suede fringe.
To finish it off I added the silver stars and rhinestones with a little glitter on the cowgirl's hat and boots (of course, LOL!).
I used a Rubbernecker square stitched die set and Distress Burlap Ink for the main image panel.


For my next card, I made it an easel card...I love easel cards, you may have guessed that if you visit my post very often.


For the top I used the Cow Cutie and the fabulous Wagon Wheel along with the sentiment 
Herd Birthday Greeting.  The cow was masked after stamping then the wheel was stamped.
I did the out of the box cut with a Rubbernecker stitched circle die so that it would not cut the cow's
legs off.  I then glued it to the white strip and stamped the sentiment then added dots of Star Dust Stickles.  I added a strip of Kraft color cardstock under the white, glued it to the pink and set aside.
For the inside I made up the same white and Kraft strip, added the Stickles dots and set aside to dry.
I stamped the partial sentiment Saddle Up Birthday, die cut with Rubbernecker rectangle stitched die then popped it up...normally this would have been the easel stop but I wanted to add the 
Cowgirl Line Dancer because she is just too cute, so I made a line of silver studs above her on the pink panel to keep the easel top open.
For the card base, I cut the normal 8 1/2 X 5 1/2 panel, scored and folded in half to make 4 1/4 X 5 1/2 then scored and folded the right half in half.  I die cut the bottom 4 1/4 X 5 1/2 left side with a border die from Amazing Paper Grace.  For the top (front) of the card base I cut another 4 1/4 X 5 1/2 panel, cut the top edge with the same border die then glued it to the 2 3/4 X 4 1/4 right side.  The right side should be folded inward toward center score line.  This will finish the card base so that all you have to do now is glue the top Front) wheel panel to the top and the bottom (inside) cowgirl panel to the inside.

Thanks for visiting today!

Robin


Read more...

Congrats!

>> Thursday, June 23, 2022

Good morning!


I used a paw print embossing folder in the letterpress style by inking the folder with a brayer
then running it through the cutting machine.
I stamped Let's Play Puppy on white then die cut with a Cottage Cutz die.
I stamped the Dog Paw Print on white, die cut then stamped the sentiment New Pet Congratulation then popped it up on my Dog Paw Print Background. 


To embellish I added black pearls to each corner.


My next card uses the cute as can be Jenny Giraffe


The paper die is from Pink Posh.


Hope you like today's cards.
Now go get crafty!

Robin


Read more...

Birthday Wishes

>> Thursday, June 16, 2022

 Good morning!


I made some fun cowboy birthday cards today.  This first one features the cute 
Western Dancing Couple on the front and Cowboy Garb on the inside 
and also the new sentiment Special Birthday Wishes
The background is made with an inked Tim Holtz 3D embossing folder from Sizzix.  It looks like tooled leather.  I started with a piece of the texture roll tan (Sizzix) then ran it through the die cutting machine with the inked embossing folder.


My next card has a burlap background.  I started with tan paper, distressed the edges then used matte medium (a glue type stuff for multi medium crafting).  Once that was dry on both panels I glued them onto the card base.
I inked the edges with Walnut Stain Distress ink.
The images are colored with Copic Markers on both cards, die cut then glued to the cards.  Inside the easel cards the panel is popped up creating the easel.

I used Cowboy Cactus on the front and for the inside I used 4 in 1 Cowboy Gear
then for the sentiments I used Birthday Multi Greeting and One Line Happy Thoughts.

Hope you like today's cards, now go get crafty!

Robin


Read more...

Happy Birthday!

>> Thursday, June 2, 2022

 Good morning! 

Today I've used the Barn Door with the Wood Grain Background to make a barn for Cow Cutie ol' Betsie!   Some how she got out of her enclosure and now she's looking for some fun!


I used the Herd It's Your Birthday at the top.


For the inside I used part of Saddle Up Birthday and  Cow Cutie.  I also added some pearl halves. 


These cows are out to party tonight!


My next card uses several stamps to make a scene...I just love scene building, don't you?

This type of scene card takes quite a bit of masking and so to figure out which stamps I want to stamp first I stamp everything on a scrap paper (not worrying about over-stamping each image). That helps me to figure it all out.  Then I stamp mask on Post-it paper and cut them out.

Thanks for visiting!
Robin

Read more...

Hot Diggity!

>> Thursday, April 28, 2022

Good morning friends!

Today I'm using some more new stamps from DRS: Let's Play Puppy, Hot Diggity Dog Birthday, Dog Paw Background, and Dog Bone

I made another easel card for this first card...doesn't that paw background look so cute as a "decorative paper"?  
Hey, when you don't have the right paper for your project, make your own!!


My next card uses the cutie cow again.
She is Udder-ly adorable!
I stamped her 4 times masking each time to make a "herd".


Hope you like these!
Go get crafty!
Robin


Read more...

Cows Are Comin' Home!

>> Thursday, April 21, 2022


Good morning!

New release stamps used: Let's Play Puppy and Diving Frog Legs
I used a Kaliedacolor Pad for inking the Happy Birthday.
For the frog splash I used Liquid Applique puffed up with heat and Crystal Stickles on top.
My dog LOVES catching frogs!! Not to worry, after playing a bit he goes his way and the frog gets up and hops back into the pond!!
What a fun game they play!


My next card features the new Cow Cutie 
I stamped her 3 times using masks to stamp the cow behind.
I also used the new sentiment: Udder-ly Wonderful Birthday
Older release stamps include: Cowboy Cactus and 

This new cow really is a cutie! And the cow sentiment, how funny!!
I've been wanting a cow for a long time to go with the Party Till the Cows Come Home so now I have the cow and a couple more sentiments to go with it too, how fun!!
That first cow has the cowboy hat from Cowboy Cactus on her, she must have snatched it while he was taking a nap or something.  I used a grass border punch from the Martha Stewart line to put under the sentiment.
Background panels for this card uses a 3D folder inked up like a letterpress.  It is very tooled leather looking.  I used some texture paper like stuff from Sizzix (comes in a roll).  It looked like suede even before using the 3D folder with ink.

Thanks for visiting today! 
Robin


Read more...

Happy Easter Peeps

>> Thursday, March 31, 2022

 Good morning friends!

I've made 2 Easter easel cards today.  This first one features 

Easter Ears Leonard Pig.  I used him with a really cute Tulip embossing folder on the front.  I actually embossed it twice, once white and once pink then cut out the ribbon only from white and glued it to the pink for more interest.

Leonard is cut out with a stitched oval from Rubbernecker, popped up and glued to the embossed panel in the non embossed space between tulips.

For the inside I used the same oval die set and popped up the sentiment Easter Greetings
I added 4 mat enamel dots to the corners that show when the card is open and on display.


My next card features the Simple Easter Bunny.
I also used the Jelly Bean Jumble Background for the front and inside.
The little Nuvo Drops all around the circles reminds me of candy we had as a kids, Candy Dots on a strip of paper...you ate them right off the paper, yes weird! 

The sentiment inside is Favorite Easter Peeps and die cut.  I stayed with the candy dot
designs and matted with yellow then purple/lavender.

I hope you are inspired today.  Go get crafty!

Robin


Read more...

Decorated With Love

>> Thursday, March 3, 2022

 Good morning friends!

Today I have made a Z-Fold card for Easter.

I used the Woven Plaid stamp with a variety of Easter colors to make the background pieces.  The foreground bunny is Vincent Van Bunny  and the background bunny is Cute Bunny with Egg.

I made the grass using Martha Stewarts grass border punch.


My next card features the cute little Chick In Nest.
I used Springtime Easter Greeting for the sentiment.
Give it a couple of fun curved borders and there you go.
Curved border dies by Spellbinders.
I also added a line of pearls under the border.


Hope you like these 2 cards! Now go get crafty!
Robin

Read more...

Sweet Valentine's Day!

>> Thursday, February 3, 2022

Good Morning!
Ok, so my giraffe on the left side is leaping in the air for joy! LOL!
That's my story and I'm sticking to it!
Placing him there was actually best for viewing him while the card is open.

This is a flip card.
Shown open below, the sentiment circle actually flips.
I used colored pencils for coloring these images. 
I used a die to create this special fold although I have done plenty of these cards 
by cutting with different shaped dies and scoring myself, it isn't hard.
The die I used is from Sizzix.
The heart dies are from HC.

Thanks for visiting today!
Robin
 

Read more...

Loved!

>> Thursday, January 27, 2022


Good morning!
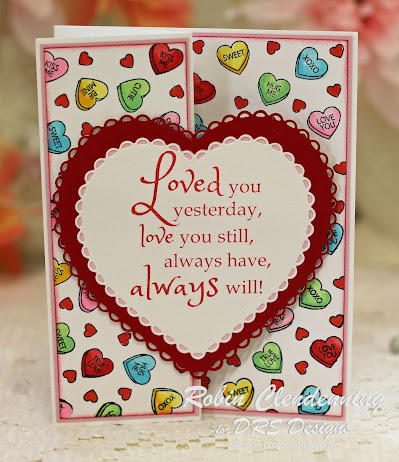
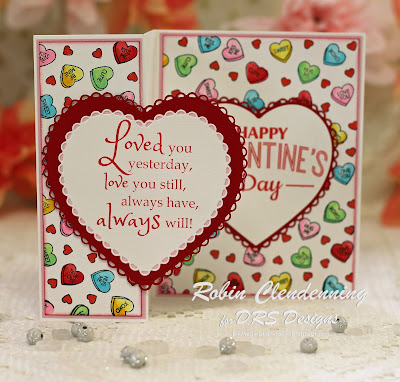
Today I'm sharing a Z-Fold card.
Here in this first photo it is closed.
I used DRS stamps: Candy Heart Background and Loved You Yesterday on
this part of the card.


As you open

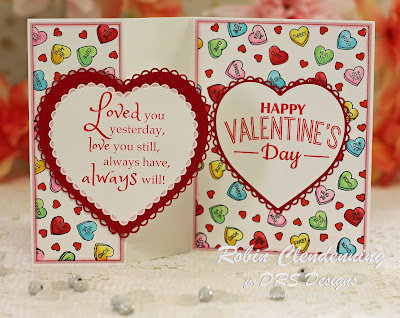
Fully opened you see the 


This is a 4 1/4 X 5 1/2" card when closed.  I scored the left side
of the 4 1/4 X 5 1/2" card at 2 1/8" (half of front) then folded opposite 
of the center fold to form a Z.
I made a 2 X 5 3/8" pink layer and a 4 1/8 X 5 3/8" pink layer for the outer left side and the inside.  I then stamped 2 panels with the Candy Heart Background stamp, one 1 7/8 X 5 1/4" the other 4 X 5 1/4". I colored the hearts with Copic Markers in shades of yellow, red, pink, green and blue.  I then glued the layers to the card in size order.
Next, I stamped the 2 love sentiments using a red ink on white cardstock, cut the front sentiment out with the HC scallop heart, the inside sentiment with the HC plain edge heart.  Under the scallop heart I glued a layer of pink cardstock.  I cut the next size up scallop heart from dark red then glued it to the bottom under pink.  For the inside I used the scallop heart fitting the smaller plain edge heart.
I used the inside heart to the center of the inside of card.
The outside heart was popped up on one side (left side) then only that left side was attached
to the left side of card (with the candy hear background).
Optional, attach ribbon under top heart to go all the way around card and tie at right side to keep card closed until recipient opens.
Hope you like my card, thanks for visiting!
Robin

Read more...

Couldn't Love You More!

>> Thursday, December 16, 2021

Good morning!
I have 2 easel cards to share today
The first is a fun flowers and chocolate Valentine.
Shown closed.


It opens to the rest of the sentiment and some chocolate hearts.  I've used DRS stamps: Scattered Hearts, Flower Wheelbarrow and the new sentiment Love You More Chocolate (release date 12/15/21)
The dies are from Spellbinders.


My next card is a heart shaped easel
I used 2 new stamps from DRS: Heartbeat
Every Beat of my Heart (release date 12/15/21)  and also 
I Love You sentiment with some letter dies
from Sizzix to spell "MORE" in red.
The heart dies are from ODBD (Divinity Designs now).
I also used some red sparkly tule to make a ruffle behind the heart on top.


Thanks for visiting today!
Robin


Read more...

Silver Bells

>> Thursday, November 11, 2021

 Good morning!
Today I've used DRS Designs Bells Holly and Bow, and


I also used an embossing folder on both the silver and white panels.
The oval dies are from Rubbernecker.
I used some rhinestones by Spellbinders.
When I was growing up the song Silver Bells was always my favorite
Christmas song.  You can imagine that now every time I hear it I think 
of those sweet Christmases in my childhood.
These bells made me think of that song as soon as I saw them!

Merry Christmas Gnome Boy
Z Fold card

I used the new Plaid Fir Tree
and on the inside I used the Plaid Fir Tree, Merry Christmas Arc, Tree Home Gnome ,


I used Spellbinders dies for the frames.

Thanks for visiting today!

Robin


Read more...

Gnome One Like You!

>> Thursday, July 29, 2021

Good morning!

I used a separate background piece for the inside of the window and some lace for curtains.
To do this I cut out the window panes and popped up the image panel over the background with "curtain" glued to the back of window.  It gives a little depth better seen in person.
The butterfly and mushrooms are glittered.
The lacey border is from Concord and 9th.  I used some purple pearls in the lacey holes.


My next card is an easel card done with a single die.
The glossy paper for the frame die cut was colored with alcohol inks first, the other matte paper for the flower and butterflies die cut was sprayed with inks first then die cut.  I sponged the edges on the card with Green Brilliance. The die including frame, card base, flowers and butterflies is from Memory Box in 1 set.
Thanks for visiting!
Robin


Read more...

Happy Retirement

>> Monday, January 4, 2021


Happy Monday Everyone. Hope you had a great new year and found some time to get inky. I'm still having fun with the new bowling images. Today I paired the strike image with the Happy Retirement sentiment and made a tent topper card. This was super quick and easy to create and I really like the way it turned out. I started with a cranberry square card, added the white panel and stamped the Happy Retirement sentiment in Versafine Black ink. The Strike image was stamped onto white CS, colored with Copics, die cut and layered on the same cranberry cs. I added Nuvo Crystal Glaze to the bowling ball for some dimension.


Thanks for stopping by today. Please stay safe and healthy while enjoying card making!


blessings,

shelia

Read more...

Happy Halloween Bendi Card

>> Thursday, October 15, 2020

Good Morning!
The dies on this card are from Sizzix, Tim Holtz collection, the pumpkins are I.O. and the fence bendi dies are from Tonic.  One the fence I used Black Magic cardstock that had orange on the back side.
I used some gauze at the bottom that I dyed with a Tea Bag.

 There is glitter on my ghosties.  The background was done with Distress Oxide Inks sponged on but remind me next time that black does not stamp over the oxides as BLACK unless you heat emboss it.  I even used my Misti Tool...no luck!

The clouds were done with an opaque white pigment ink and a small makeup type sponge.   For the RIP gravestone I stamped it again on white, colored and cut it out to glue over the one I stamped on the background.  I wanted that one to show up better plus it is easy to cut out!!  I used DRS stamps: RIP Gravestone, Silhouette Graveyard, Flying Ghost, Leaning Ghost, Silhouette Halloween 3 in 1 Tree, and Batty Happy Halloween.

My next card features the new ghost and good ol' Leonard.

DRS Designs stamps: Small Flying Ghost, Leaning Ghost, Count Porkula,

and Small Trick or Treat

I used some dies from Tim Holtz Sizzix collection for the village and scary looking background of tangled thorny branches.  I also used some MFT's rectangle dies to create a frame which I popped up.  I glued the Trees, Trick or Treat and Count Porkula to the outside of the frame.
The ghost were stamped with white and embossed on vellum then cut out and added to the scene.

Thanks for visiting today!

Robin

Read more...

Happy Thanksgiving

>> Thursday, October 1, 2020


Good morning!
I decided to make a covered front porch today complete with fall
decor.  It IS time isn't it?  October 1st already, wow!
This year will be over before we know it and won't we all be glad?
I sure hope 2021 is a lot better year than 2020.

So today I've used  new and a few older designs from DRS.
The new stamps: Autumn Harvest Chair, Sunflower Bucket and World Changed.
The older DRS stamps: Open Plaid, Floor, and Wood Grain Background

I stamped the chair with fall decor first then masked it and stamped the wood wall 
and floor for my inside panel.  
I stamped the bucket on a separate piece of white and cut it out.  
I stamped the plaid on white with oranges and browns mostly then cut it to fit.
I made a shadow box and then made the roof with little pop up corbels.  I then glued my scene inside before gluing my box together.  I made another back and glued 3 sides so that I could slide a sentiment tag into it.
I stamped the sentiment and glued it to my tag that I made using a decorative
die to embellish to pull.  I then slide it inside the pocket.  A personalized sentiment
can be written on the back of the tag if you want. The tag can slide in and out.
I finished by gluing my bucket to the outside left bottom corner.
Thanks for visiting today!
Robin

Read more...

Picture Perfect Day

>> Thursday, September 10, 2020


Good morning!
It's a picture perfect day and permission to fish!!
Instead of a double Z fold I guess you could call this a triple Z fold! LOL!!
There is a strip on top and 1 on the bottom to form a box in the center.  I did not fill the box with extras but that could be done, maybe some cattails or...
Looking down on this card shows the construction a bit better.

The fish was stamped on the base and on a separate piece of white cardstock as well 
then cut out and popped up on the base image.  I stamped the base image using Broken China on the bottom (water rings) and Fern Green on top (trees and reflection of trees).  When I added the popped
fish I did not pop the tail but glued that part down over the splashes.  The splashes were
done using a Snow Marker sprinkled with glitter then heat puffed to give it a foamy look.
The fish was colored then Stickles was added in Crystal and Diamond.
The lake, ground and sky were all sponged with various inks on hand (Beige Brilliance and Shabby Shutters Oxide on the ground, Broken China for the lake and sky).  I used a torn paper 
towel to make the clouds in the sky (used sort of like a stencil brushing up from the torn side). 
The 2 Z fold strips going in the opposite direction fold wise, were stamped and sponged 
the same as the card base, fence was stamped using Rich Chocolate and tops were roughly 
cut out). The rocks, fish and mountains were stamped with Tuxedo Black then colored
with Copics. Warm and cool grays on the rocks and mountains, grays, greens and pink on the fish.
Thanks for visiting today!
Robin

Read more...

Gnome Home

>> Thursday, August 27, 2020

Good morning!
This little guy was lucky to find this big Redwood tree that had hollowed out because of a lightning started fire in it...it made it much easier to hollow out the rest of the way to make a nice Gnome Home.  He and his Gnome buddies cut down the tree and there you go.
The background was sponged with Distress Oxide Ink.
The die cuts are from Memory Box and I.O.
It took quite a bit of masking and stamp aligning to do the whole bottom portion 
then I cut the bottom out so that I could glue it over the background.


My next card started out to be a Halloween card but my Peeking Gnome ended up looking like he was IN the pot not peeking at what was inside so I changed my mind...didn't want the poor guy cooked in a witches brew!!!  So his friends are just keep his water the right temperature for hot tubbing!
My Hot tubbing sentiment is computer generated since I don't think the Gnomes have ever landed in hot water before!!!  My background was done with Distress Oxides again but this time I patted some color on a kraft sheet then sprayed it with water and dipped my watercolor paper into it. 
The dies are from Lawn Fawn, MFT's and Memory Box.
Thanks for visiting today!!
Robin


Read more...

StatCounter

  © Blogger templates Palm by Ourblogtemplates.com 2008

Back to TOP