Showing posts with label poinsettia. Show all posts

Christmas Poinsettia

>> Monday, December 18, 2023


This new SMALL SCRIPT MERRY CHRISTMAS - 272E is fast becoming a go to sentiment in my collection. It is a great size and perfect for any style Christmas card.


For my card today:

  • I used a small poinsettia die cut and cut a cluster from red, green and gold mirror paper. I then die cut a white panel to layer the poinsettia and finished with a pearl.
  • I then stamped the SMALL SCRIPT MERRY CHRISTMAS - 272E and then layered the poinsettia cluster just above it on a dimensional.

This card is very clean and simple and really packs a punch with just the perfect sentiment to fit perfectly under the cluster.

Thank you for stopping by to check out my card this week.

Read more...

Painting Poinsettias

>> Wednesday, August 23, 2023

Hello Crafty Friends, 


Don't you love learning new techniques?  


I have been learning the Wet on Damp Watercoloring technique covered in THIS YouTube video by Anna Bucciarelli.  I thought it would be great on a stamped poinsettia so I stamped the DRS Designs Giant Poinsettia on my paper a few times, and then watercolored it all with Daniel Smith Watercolors.  When the petals were still damp, I extended the viens a bit.  I have a long way to go before I get this technique down, but I am still loving the results.  Plus I did this on regular Heavyweight Paper from The Paper Studio and it would have been much easier on watercolor paper. 

I finished the card off with a lightly sponged Merriest Wishes Greeting


It's time to start those Christmas cards if you haven't already!

Hugz,

Nancy


Read more...

Leaf Print Poinsettia

>> Friday, October 30, 2020

  by Julie Warner - The Write Stuff

Happy Friday!
I hope your week has gone well! We're skating into November this weekend so time to get those holiday cards in the works! I love making Christmas cards all year so it's not hard to get me in the holiday mood. Today my card is a little different. As I was taking the bird feeders out one morning, I noticed that some of the crape myrtle trees had leaves that were already bright red. So I pulled some off & was going to put them on paper & roll them thru my Big Shot. I did, but they didn't really work well. From past experience, some leaves work better than others. If want to see a comparison I did w/ different leaves & papers, HERE is that post. Since it didn't work w/ these crape myrtle leaves, I went another direction. I inked a large leaf by rubbing the ink pad directly over it & printed it onto paper. By printing, I mean after it was inked, I laid it on the paper & gently rubbed over the back w/ a paper towel. Rub too hard, & all the leaf vein detail is lost. To me it looked like a poinsettia leaf so I took a couple of sizes & printed a poinsettia w/ them.
The lighter ones are second generation printings & for the green leaves, I inked part of another leaf & used the red leaf as a mask. I added some gold gems to the center & some splatter w/ the splatter bg stamp. 

Here are the leaves as they looked when I took them off the tree. Don't they look like hearty poinsettia leaves? I'm pretty sure a real poinsettia leaf is too delicate to use, but these leaves are pretty sturdy.
Here's the inside:
Thanks so much for stopping by! Have a great weekend!


Supplies:
stamps: DRS Designs - DRS Designs - Beauty of the Season (new!)Splatter Bg  (inside: Deco Peace & Joy)
paper: Staples 110# white
ink:  Memento tuxedo black, Distress inks fired brick, barn door, shabby shutters
accessories: Rubbernecker stitched rectangles dies, Misti, crape myrtle leaves


Read more...

Poinsettias!

>> Monday, December 2, 2019

Happy Monday Everyone. Hope you had a wonderful weekend! A few weeks ago I saw a video by Jennifer McGuire where she uses background dies to do partial die cutting on her cards. She explained the process so clearly and her cards looked amazing (as always) so I thought I'd give the technique a try.

I used an older SB lattice die and arranged it in my SB Platinum machine so only the lower right corner was die cut. I really like the look and it is rather simple to do.  Here's my card.


I stamped and colored the Poinsettia twice, then fussy cut and layered them together. This poinsettia is one of my favorite Christmas images from DRS Designs. The Merry Christmas is part of the Christmas Scene Greeting and was stamped with black ink. A strip of gold glitter CS was added along the edge of the die cut part. I then added a piece of green CS to match the leaves to the inside to show through the lattice.

This was a fairly quick and easy card to create and I really like the way it turned out.  DRS Designs is having a special sale through December 3. You can purchase this gorgeous Poinsettia image for 20% off and there's free shipping on orders over $50. You can check out the details here.

Hope you are enjoying creating Christmas cards for your friends and family. These are my most favorite cards to make!

Thanks for stopping by.

blessings,
shelia

Read more...

Christmas Plaid

>> Saturday, December 23, 2017

Welcome!

Merry Christmas!!  I'd like to wish everyone the Merriest Christmas!  Thanks so much for spending your time visiting our blog - especially at this crazy, busiest time of year!


I started my card using our Woven Plaid andjust used the largest center section to stamp alternating green and red on a diagonal in both directions.  I stamped our Giant Poinsettia on a scrap of white and colored and fussy cut it.  I stamped our Deco Christmas greeting in black and colored the open letters and layered it on green before assembling everything together.

Merry Christmas!!
Sue

Read more...

Heartache at Christmas

>> Friday, December 15, 2017

Welcome!

10 days and counting to the big day!

If you know someone who suffered a loss this year, DRS has come out with the perfect sentiment to let them know you're thinking of them this holiday season.


I started my card by stamping our Giant Poinsettia on grey card stock using a medium grey ink.  I used watercolor pencils and a Tombo blender pen to color them.  For the sentiment layer, I used our Poinsettia Vine Corner that I had previously cut apart, (leaving me with the poinsettia and the longer holly vine).  I stamped the poinsettia in the center with the vine going to the right and then masked just the left half of the poinsettia and turned the stamp upside down to stamp the left side of the vine.  Once that was done I stamped our Heartache at Christmas above it using black ink, colored the vine with the same pencils/blender that I used for the background, layered it on green, sponged the edges with grey ink and attached it to my card.

Thanks for stopping by!
Sue

Read more...

Frosty Hurricane

>> Wednesday, December 6, 2017

Today's card was an adventure.  I wanted to give the Holly Hurricane Lamp a frosty look without using glitter.  I put on a few coats of gel medium and heated them up in between.  The image is bumpy and bubbly and full of fun texture.  The bottom part of the foliage just didn't seem to work once the glass had so much texture so I stamped the Giant Poinsettia,  sponged it green, added some glue, and then sprinkled with glitter.  Then I put it all together with the bow from Holly Hurricane which has a smooth coat of gel medium to really brighten the color.  The background was made by spraying some Dylusions Ink Spray and then splashing it with water to tone it down.

Hope you are almost done with your Christmas cards - I still have a bunch to go just like every year!  LOL.

Hugz,

Nancy

Read more...

Candles Galore

>> Friday, December 1, 2017

Welcome!

Are you in a Christmas panic yet?  Many, many people around me seem to be :)  Here it is December 1st and my neighbors are making me feel like a slacker because I haven't decorated outside yet - let alone put up my tree!  Why??? I'm stamping, of course!


My card today was supposed to be a quick card, but I totally lost control at some point and just went with it!

I started by stamping our Candles Galore on some white card stock.  I made a quick mask (just cutting out the bottoms of the candles) and stamped our Floor image on top.  It was supposed to be another checkered tablecloth, but I lost control of that too, so I turned it into a wood plank table top and colored my candles red and green.  For my greeting I stamped out Deco Merry Christmas using red, black and green inks and die cut it.  Everything was attached to a folded black card.  I wasn't quite ready to call it a night, so I stamped the longer part of our new Poinsettia Vine Corner twice on a separate piece of card stock and sat back to color and cut.  I loved how it looked and decided to add two more poinsettia's at the top.

Thanks so much for stopping by!
Sue

Read more...

All Is Calm

>> Saturday, December 3, 2016

Good morning!!
If you are like me you'll be sending out Christmas cards till the last minute, as you receive them in the mail you realize, oops, forgot to send one to aunt Anita...
Here are a few more ideas for some fairly flat cards to send quick!

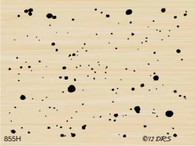
I colored my bird with Copics R21, R24, R29, R59 the pine cone and branch with E31, E33, E35, E37 and the greens with YG63, YG67.  The sky was sponged with some Blue Sky Brilliance Ink.  Then I splattered white acrylic paint onto the image panel with watered down paint and a toothbrush.
The image panel was cut with a Pierced Rectangle die and a bit of Out of the Box cutting around the birds head and the green pine needles.  The pine cone tips have a bit of Liquid Applique puffed up with heat for snow build up.
What is more peaceful than watching birds so I decided to use the All is Calm sentiment with this pretty cardinal.

This next card is  made using 093M Giant Poinsettia and 620F Peace Be Your Gift.
 
I made it an easel card.
My green background is embossed on the front and I used a large Merry Christmas die over it in white.
The inside sentiment panel is popped up to act as a catch, to hold the card open for display.
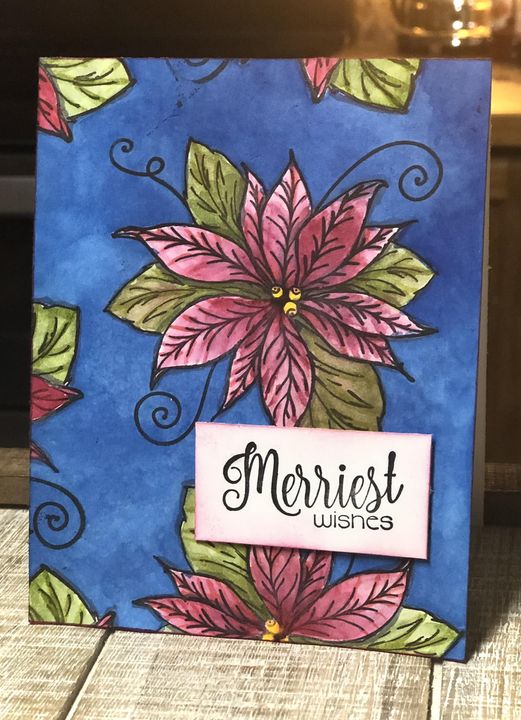
I die cut some small (Spellbinders) poinsettias and shaped them then glued some Prills (US Artquest) in the centers of the flowers.
The Poinsettia is colored similar to the cardinal only I used a bit of G40 for close to the centers.

I hope you are enjoying your weekend and getting lots of ideas for Christmas.
Go and be crafty!
Robin

Read more...

The Gift of Peace

>> Wednesday, November 25, 2015

Peace is a wonderful gift and blessing.  Sometimes our lives seem to be so full of drama, stress, tension, or worry - especially stress and especially around the holidays.  On top of that, there is no World Peace, no matter how much we try to go about our lives not thinking about it. 


So Peace is a perfect wish for the holidays and perfect for a holiday card.  I paired up the DRS Designs Giant Poinsettia with a new Christmas peace greeting that will be available in the store soon.  I stamped the poinsettia twice and cut out a bit of the flower for the top layer to add dimension.

I wish everyone peace during the holidays - from Thanksgiving this year to next!

Hugz

Read more...

Peace!

>> Monday, November 16, 2015

DRS Designs is about to release some new images. I'm sure you will see lots of new designs and greetings on the blog this week. My card today features the new Peace be your Gift at Christmas ((620F). In light of recent events around the world, this sentiment really is my hope and prayer for the world. Wouldn't it be amazing if we had peace this Christmas and throughout the year?!


I started by stamping the Giant Poinsettia three times, fussy cutting two of them and layering them on top of each other after coloring them with Copics and embossing the panel with a Darice folder. The sentiment was stamped with VeraFine Onyx Black ink, die cut and added to the card once the glittery ribbon was attached. I used a Sakura Gelly Roll Stardust pen to add some glitter to the berries.

This wasn't a difficult card to create, just a little time consuming with the fussy cutting. I think this will be this year's Christmas card for family and friends. I love the sentiment.

Be sure to check back this week to see other new images and greetings. You still have time to join in this week's challenge. You can see details here.

Thanks for stopping by,

shelia

Read more...

Poinsettia Gift Tag

>> Sunday, August 23, 2015

Hi all, today I have a tag to share with you.


I used colors from the color challenge this week. I stamped the Giant Poinsettia and colored with Copic markers. For the top I traced around a die the fussy cut down and round one side of the Giant Poinsettia. The bottom comers were rounded. I stamped the Gift Tag Greetings   and added ribbon. Join us in this weeks color challenge.

Have a wonderful day,

Read more...

Poinsettia

>> Saturday, August 22, 2015

Good morning!
Today I am using the challenge colors again for this card.
DRS stamp used: 093M Giant Poinsettia.  I stamped the poinsettia twice and cut out the top petals to pop up. I used R32, R14, R35, R29, YG03, YG23, YG14, YR23, YR24, Yellow Stickles and gold Prills. to color.  I off set the top petals and used foam tape to pop them up. On the white panel I embossed, added pearls and finally added a sheer red bow, it is also popped up from the image.  I'm not sure what you call fabric that looks like the white panel used in weddings and fancy gowns but I love it.  It reminds me of medieval costumes or Victorian gowns as such.
I hope you are having a great weekend and crafting away!
Robin

Read more...

Pretty Poinsettia

>> Wednesday, December 17, 2014

Welcome!

One week till Christmas Eve!  ONE WEEK!  Are you getting there?  I'm actually feeling confident at this point, which I'm sure will change in the next few days :)

But while I'm feeling calm and confident I have this card to share with you today!


I started by stamping our Giant Poinsettia on white card stock, coloring it and fussy cutting it.  The wooden square background  are actually just that - actual think pieces of wood meant for business cards that have been in my craft supplies so long I can't remember where they came from.  They were a very light color so I used some brown ink and "stained" them and then alternated the grain as I attached them to my red panel which I had run through my cuttlebug using a swiss dots folder on the top 3/4.  The Merry Christmas is part of our Christmas Multi Greeting which I stamped using black ink.  I attached all (including the black ribbon and charm) to the red panel and all of that to a folded black card.

Thanks so much for stopping by!

Sue

Read more...

Challenge #149 - Inspired by Color Challenge!

>> Thursday, November 20, 2014

Welcome to the DRS Thursday Challenge!
First, the Winner from the Random Drawing....
Vicki in MN 
Congrats, you are the winner from our Hang it Up! Challenge!  
 Please contact us at info@drsdesigns.com to claim your prize. 

For this week's challenge, we are doing an
Inspired by Color Challenge
The theme for this challenge is Poinsettia Bright colors!
 (use some of the colors inspired by this picture somewhere on your creation)
You don't have to use all of these colors, or only these colors.

To enter, show us your card  by linking it below and we'd love for you to leave us a comment.  The deadline for this challenge is Wednesday, November 26 , at 6 pm EST. Challenge entries don't have to use DRS Designs stamps, but if you use them on your challenge card, you'll get an extra entry into the prize drawing.
From all of the entries we receive, one lucky winner will be chosen to receive a $10 store voucher to DRS Designs!

Here are the Color Challenge cards from our talented DRS Design Team and we'd love for you to leave us a comment!
Robin
Shelia
Julie
Karin
Janett
Sue
Jennifer E.


~~~~~~~~~~~~~~~~~~~~~~~~~~~~~~~~~~~~~~~~~~~~~~~~~~~~~~~~


Read more...

Challenge #132-Inchie Along!

>> Thursday, July 24, 2014

Welcome to DRS Challenge Thursday! 
First, our random winner from last week is....
Congratulations! You are the winner from our Inspired by ColorChallenge!

Please send an email to info@drsdesigns.com to claim your prize.

This week we're just going to
Inchie Along!
(inchies are simply 1" squares, you can have one or many by either cutting, punching or die cutting 1" square. Use small images or parts of a larger image..click here for some ideas for inches)


To enter, show us your card  by linking it below. The deadline for this challenge is Wednesday, July 30, at 6 pm EDT. Challenge entries don't have to use DRS Designs stamps, but if you use them on your challenge card, you'll get an extra entry into the prize drawing. From all of the entries, one lucky winner will be chosen to receive their choice of 2 stamps from the online catalog at www.drsdesigns.com!

Here are the Inchie Challenge cards from our talented DRS Design Team and we'd love for you to leave us a comment!


Shelia 
Karin

Janett
Julie
Robin
Sue


Read more...

Challenge #131-Inspired by Color Challenge!

>> Thursday, July 17, 2014

Welcome to the DRS Thursday Challenge!
First, the Winner from the Random Drawing....
Karen McAlpine  

Congrats, you are the winner from our Big Chill Challenge!  
What a super card for a grad! Please contact us at info@drsdesigns.com to claim your prize. 

For this week's challenge, we are doing an
Inspired by Color Challenge
The theme for this challenge is Strawberries & Cream colors!
 (use some of the colors inspired by this picture somewhere on your creation)
You don't have to use all of these colors, or only these colors.


To enter, show us your card  by linking it below and we'd love for you to leave us a comment.  The deadline for this challenge is Wednesday, July 23, at 6 pm EDT. Challenge entries don't have to use DRS Designs stamps, but if you use them on your challenge card, you'll get an extra entry into the prize drawing. From all of the entries we receive, one lucky winner will be chosen to receive a $10 store voucher to DRS Designs!

Here are the Color Inspired Challenge cards from our talented DRS Design Team and we'd love for you to leave us a comment!

Karin
Shelia


Sue

Robin

Read more...

StatCounter

  © Blogger templates Palm by Ourblogtemplates.com 2008

Back to TOP